Table of Contents
Advertisement
Quick Links
Advertisement
Table of Contents

Related Manuals for Amcrest AMDV10808-8B


Summary of Contents for Amcrest AMDV10808-8B
- Page 1 Quick Start Guide Amcrest HDCVI DVR Version 3.3 Revised April 9th, 2015...
-
Page 2: Important Safeguards And Warnings
Welcome Thank you for purchasing our Amcrest HDCVI DVR! This quick start guide will help you become familiar with our DVR in a very short time. Before installation and operation, please read the below safeguards and warnings carefully. Many of the setup sections below have corresponding videos on YouTube To access the setup videos, please go to http://amcrest.com/videos... -
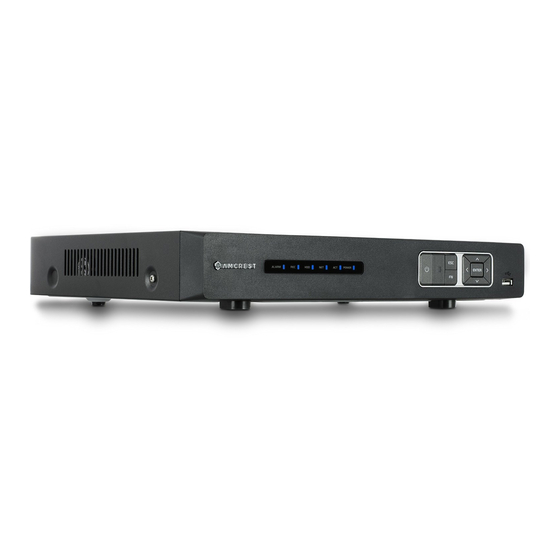
Page 3: Front Panel
Front Panel Please refer to the following chart for information on the front panel buttons. Name Icon Function(s) Power button, press this button for three seconds to boot up Power button or shut down the DVR. Activates current controls, modify settings, and move up or down. -
Page 4: Rear Panel
Note: It is recommended to connect all components of the system as shown below BEFORE mounting any of the cameras. This is to ensure all components are working. If any components are not functioning, please contact Amcrest Support. To set up the DVR hardware, there are 7 major steps: 1. - Page 5 2. Connect a USB mouse to the front of the DVR. 3. Connect an Ethernet cable to your router, and then connect the other end of the cable to the DVR.
- Page 6 4. Connect the camera video extension cable to the camera’s video cable and connect the camera power extension cable to the camera’s power cable. There should be a tag on the video cable to help you make sure the right end of the cable is at hand.
- Page 7 5. Connect the camera cable to any of the video input ports. 6. Connect the camera power extension cable to one of the camera power cables, connect this power cable into the power brick, and then plug the cable into an electrical socket.
- Page 8 7. Connect the DVR power cable into the back of the DVR, and then plug in the DVR power adapter into an electrical socket.
- Page 9 - PLEASE READ BELOW- Note: Your DVR may not work properly if the following is not accounted for. Every single HDCVI DVR comes preset to a video output resolution of 1280x1024. What this means is that any time an HDMI cable is plugged in to an HDTV, it may result as a blank screen even if the DVR is operational.
-
Page 10: Software Setup
4. Software Setup After turning the system on, the default video display shows multiple windows. To bring up the login screen, left click the mouse or hit enter on the keyboard. The login screen should look like this: To login to the system for the first time, use one of the following default username/password combinations. - Page 11 The next screen that comes up is the General Settings Screen. Make sure to click the tabs at the top for Date & Time, as well as Holiday to configure those settings as well. Once you are satisfied with the settings on this screen, click the “Next Step” button at the bottom of the screen. Note: These settings can be changed at any time by accessing the settings menu.
- Page 12 The next screen that comes up is the Record settings screen. Once you are satisfied with the settings on this screen, click the “Next Step” button at the bottom of the screen. The next screen that comes up is the Schedule settings screen. Make sure to click the tabs at the top for Record and Snapshot to configure those settings as well.
- Page 13 The final screen in the setup process is the Network settings screen. Once you are satisfied with the settings on this screen, click the “Finished” button at the bottom of the screen. Once more, note that these settings can be changed at any time by accessing the settings menu. Once the setup process is finished and you have clicked the “Finished”...
- Page 14 5. Software Interface Guide The screenshot below is the main screen for the Amcrest DVR software: Below are short descriptions for each of the menu items on the main menu: Operation -> Search: Search and playback recorded video. Operation - > Backup: Backup recorded files onto a CD or USB drive.
-
Page 15: Web Setup
To view a video on how to setup the HDCVI for UPnP/DDNS remote access go to http://amcrest.com/videos and view the video titled “How to Gain Remote Access to Your HDCVI DVR with Universal Plug and Play”. - Page 16 18. Once the main interface opens, click the plug icons next to each camera on the list on the left hand side, and activate the main stream for each of them to enable the live feed. To view videos on other methods to setup remote web access for the Amcrest HDCVI DVR, go http://amcrest.com/videos To get more detailed information on other methods to setup remote web access for the Amcrest HDCVI DVR, please refer to the user manual.
-
Page 17: Web Interface
7. Web Interface The web interface has 3 main tabs: Live: This tab shows live playback of any connected cameras. Ensure that the small icon on the right of each camera’s name on the left hand list is blue; otherwise the live video feed will not show. -
Page 18: Amcrest View App Setup
8. Amcrest View App Setup The Amcrest View app is available for both Android and iOS. There are two versions of the app, Amcrest View Lite, and Amcrest View Pro. The Pro version contains some features that the Lite version does not. - Page 19 3. Go to your DVR, and open the main menu. 4. From the main menu, go to Settings -> Network -> P2P. 5. Ensure that the “Enable” option is selected on this screen. 6. On the app, click the plus sign in the top right hand corner.
- Page 20 7. Click the button that says “Scan QR Code”. 8. Point the phone’s camera at the QR code displaying on the DVR’s screen. Make sure the QR code fits inside of the clear box in the center of the phone screen. Your phone will vibrate and take you back to the previous page when the scan is successful.
- Page 21 9. Enter whatever Username and Password you use to login to your DVR. By default, it will use “admin” for the Username and “admin” for the password. Click “Start Live Preview”. To view a video on how to setup the Amcrest HDCVI DVR for remote access on a smartphone or tablet, go to http://amcrest.com/videos and view the video titled “How to Setup Amcrest HDCVI DVR for Remote Access on Smartphone/Tablet”.
- Page 22 All the designs and software here are subject to change without prior written notice. All trademarks and registered trademarks mentioned are the properties of their respective owners. If you have any questions or concerns, please contact us at support@amcrest.com, or call us at 888-212-7538.
Need help?
Do you have a question about the AMDV10808-8B and is the answer not in the manual?
Questions and answers