Advertisement
Quick Links
MARIMBAS
CONCERT
YM-460/460F/410D/410/410F/46/41/
2400/2400R
取扱説明書
Owner's Manual
Руководство пользователя
使用手册
사용설명서
『安全上のご注意』 (2ページ)を必ずお読みください。
Make sure to read the "Safety Precautions" on page 22 and the "PRECAUTIONS" on page 23.
Обязательно прочтите разделы «Меры безопасности» на стр. 40 и «МЕРЫ ПРЕДОСТОРОЖНОСТИ» на стр. 41.
务请阅读第 58 页的"安全注意事项"和第 59 页的"注意事项" 。
76 페이지의 "안전 주의사항" 및 77 페이지의 "주의사항" 을 반드시 읽어 주십시오 .
YM-460
Advertisement

Subscribe to Our Youtube Channel
Related Manuals for Yamaha YM-460


Summary of Contents for Yamaha YM-460
- Page 1 MARIMBAS CONCERT YM-460/460F/410D/410/410F/46/41/ 2400/2400R 取扱説明書 Owner’s Manual Руководство пользователя 使用手册 사용설명서 『安全上のご注意』 (2ページ)を必ずお読みください。 Make sure to read the “Safety Precautions” on page 22 and the “PRECAUTIONS” on page 23. Обязательно прочтите разделы «Меры безопасности» на стр. 40 и «МЕРЫ ПРЕДОСТОРОЖНОСТИ» на стр. 41.
-
Page 2: Safety Precautions
* Approximate weights for concert marimbas are given in the following chart. YM-41 41 kg (90 lbs 6 oz) YM-410 49 kg (108 lbs) YM-460/2400R 55 kg (121 lbs 4 oz) YM-46 44 kg (97 lbs) YM-410F 55 kg (121 lbs 4 oz) -
Page 3: Maintenance
Injury or handicaps to persons caused by the disregard of warnings with Caution this mark or, misuse of the instrument, may result in the loss of personal property. Please change cracked tone bars as soon as possible. Cracked tone bars have sharp edges that can cut hands. If the instrument is often moved, bolts, parts, etc., may become loose. - Page 4 Exhaustive research by Yamaha technicians and craftsmen focusing on tone quality and playability, has led to the design and creation of these marimbas, using select, high quality materials, and Yamaha’s original FRP Acoustalon. We are convinced that you will enjoy play- ing your instrument that produces spreading and yet deep sounds as well as rich volume to your content.
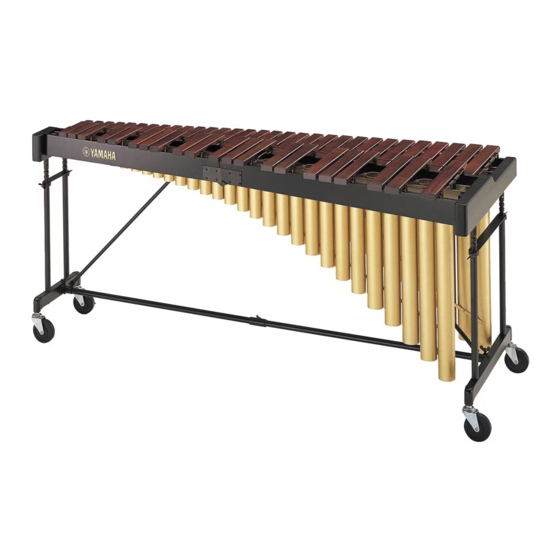
- Page 5 NOMENCLATURE ■ YM-460/460F/410/410F/46/41/2400/2400R * The illustration shows model YM-460. Accidental tone bars Natural tone bars Rail Suspension cord Frame end Slide leg Leg (Small end) Slant shaft Resonators Resonators (Natural tone side) (Accidental tone side) Caster (with brake) Reinforcement stay...
- Page 6 Before assembling the instrument, confirm that all parts are included as listed. * In the event that a part is missing, please contact the shop where the instrument was purchased. y Rail (1) q Natural tone bars YM-460/460F/46/2400/2400R: Two-section folding type YM-410/410F/41: One-piece type u Rail (2) YM-460/460F/46/2400/2400R: Two-section folding type...
- Page 7 We recommend to you to assemble the instrument on a soft rug or carpet. Connect the large and the small end legs using the reinforcement stays. * YM-460/460F/410/410F/2400/2400R: Before proceeding to the next step, make sure that the slide leg fixing bolts of the large and small end legs are securely fastened.
- Page 8 YM-460/460F/410/410F/46/41/2400/2400R ASSEMBLY 1-2. YM-460/460F/46/2400/2400R: Connect the reinforcement stays at the center. Align the end of the fixing bolt and the holes in the reinforcement stays and tighten the fixing bolt securely. * Insert the support using the reference hole close to the hole for the screw as a guide.
- Page 9 Tone bar height can be adjusted at this point. (Refer to n on page 32.) Rail (4): With YAMAHA logo. Logo side facing the audience. (3): Both sides have clamps attached. The side with the shorter clamp should face the player.
- Page 10 YM-460/460F/410/410F/46/41/2400/2400R ASSEMBLY Attach the resonators. 3-1. Assemble the resonator pipes of the YM-460/460F/410/410F/46/2400/2400R. Make sure that the natural tone and accidental tone sides are properly assembled. All pipes on the natural tone side have bottoms attached. 3-2. Insert the resonators into the resonator holders on the frame ends in the same way as the rails.
- Page 11 YM-460/460F/410/410F/46/41/2400/2400R ASSEMBLY Insert the rails (1) and (4) into the frame ends of the legs. 4-1. Insert the outer rails (1) and (4) in the same way as the inner rails (2) and (3). A mark “A” is printed on the large end face of the rail (1) and the groove section of the frame end of the large end leg, and a mark “D”...
- Page 12 YM-460/460F/410/410F/46/41/2400/2400R ASSEMBLY YM-460/460F/410/410F/2400/2400R Only Adjust the height of the tone bars. Make sure that this procedure is performed by at least two persons. Reverse the assembly procedure going from steps b → v → c and remove the resonators and the stay fixing bolts attached to the rail section (2) so that the stays can be moved.
- Page 13 Accidental tone bars Threaded hole i Rail (3) Clamp on both sides e Resonators (Natural tone side) o Rail (4) YAMAHA logo !0 Leg (Large end) r Resonators (Accidental tone side) t Reinforcement stay For bass side !1 Leg (Small end)
- Page 14 YM-410D ASSEMBLY For safety, the instrument should be assembled by at least two persons in a loca- tion with sufficient space. We recommend to you to assemble the instrument on a soft rug or carpet. Connect the large and the small end legs using the reinforcement stays. 1-1.
- Page 15 YM-410D ASSEMBLY 1-3 Insert the reinforcement stay with its notch facing up into the stay mount hole of the large end leg Fixing bolt as far as it will go (aligning the notch with the fix- ing bolt) and tighten the fixing bolt securely. Reinforcement stay Notch Fixing bolt...
- Page 16 * Do not insert one side of the rail all the way down first, but push both sides into grooves alter- nately little by little until both sides are inserted fully and stop. Rail (4): With YAMAHA logo. Logo side facing the audience. (3): Both sides have clamps attached. The side with the shorter clamp should face the player.
- Page 17 YM-410D ASSEMBLY Attach the resonators. 3-1. Assemble the resonator pipes. Make sure that the natural tone and accidental tone sides are properly assembled. All pipes on the natural tone side have bottoms attached. 3-1. First, lower the accidental resonator pipes from above the instrument between the frame sections, and into the rubber resonator holder.
- Page 18 YM-410D ASSEMBLY Insert the rail (1) into the frame ends of the legs. 4-1. Insert the outer rail (1) in the same way as the inner rails (2), (3) and (4). A mark “A” is printed on the large end face of the rail (1) and the groove section of the frame end of the large end leg.
- Page 19 * The contents of this manual apply to the latest specifications as of the publishing date. To obtain the latest manual, access the Yamaha website then download the manual file. Since specifications, equipment or separately sold accessories may not be the same in every locale, please check with your Yamaha dealer.
- Page 20 Manual Development Group © Yamaha Corporation WU03920 版次 : 1811 R2 Published 11/2018 发行 PO-A0...
Need help?
Do you have a question about the YM-460 and is the answer not in the manual?
Questions and answers