
Related Manuals for GME TX6160X


Summary of Contents for GME TX6160X
-
Page 1: Preface
TX6160 HANDHELD UHF CB RADIO – 5 WATT INSTRUCTION MANUAL TX6160 INSTRUCTION MANUAL... -
Page 2: Copyright Notice
PREFACE COPYRIGHT NOTICE GME Pty Ltd reserves all rights to this document and the information contained herein. Reproduction, use or disclosure to third parties without express permission is strictly prohibited. © 2021 GME Pty Ltd, Sydney, Australia SAFETY INFORMATION The TX6160 is a radio transmitting device. -
Page 3: Possible Issues
(ACMA) at www.acma.gov.au and the Ministry of Economic Development (MED), Radio Spectrum Management at www.rsm.govt.nz. GME CONTRACT WARRANTY AGAINST DEFECTS This warranty against defects is given by GME Pty Ltd ACN 000 346 814 (We, us, our or GME). Our contact details are set out in clause 2.g. 1. Consumer guarantees Our goods come with guarantees that cannot be excluded under the Australian Consumer Law. - Page 4 Send your claim to: GME Pty Ltd. PO Box 96 Winston Hills, NSW 2153, Australia. Tel: (02) 8867 6000 Fax: (02) 8867 6199 Email: servadmin@gme.net.au...
- Page 5 Warranty period We provide the following warranty on GME and Kingray products. No repair or replacement during the warranty period will renew or extend the warranty period past the period from original date of purchase.
-
Page 6: Table Of Contents
PREFACE ..........................1 COPYRIGHT NOTICE ........................2 SAFETY INFORMATION ......................2 IMPORTANT INFORMATION CONCERNING UHF CB RADIO............2 POSSIBLE ISSUES ........................3 GME CONTRACT WARRANTY AGAINST DEFECTS ..............3 EMERGENCY CHANNELS......................8 TELEMETRY CHANNELS ......................8 IMPORTANT ADVICE ........................ACCESSORIES SUPPLIED ....................... 9 TX6160 ............................9 TX6160X .............................9... - Page 7 TIME-OUT TIMER ........................18 SELECTING CHANNELS ......................19 SQUELCH ..........................19 KEYPAD LOCK ..........................19 DUPLEX OPERATION ........................20 LED TORCH ..........................20 FACTORY RESET........................21 SCANNING .......................... 21 ADDING OR REMOVING CHANNELS ..................21 SCANNING FOR CHANNELS .....................21 SCANNING FEATURES ......................22 CTCSS, DCS AND SILENT MODE ................... 22 MENU OPTIONS ........................
-
Page 8: Emergency Channels
• Always switch off your radio where notices restrict the use of two-way radio or mobile telephones. • Use only GME approved rechargeable battery packs with the supplied charger. • Avoid storing or charging your radio in direct sunlight. • Avoid storing or using your radio where temperatures are below -20°C or above +60°C. -
Page 9: Accessories Supplied
• 2 x Ear-piece Style Microphones (HS015) • Dual Desktop Charger (BCD021) • Rugged Carry Case • 12V DC Vehicle Charger (BCV007) • AC Adaptor (PS002) • 2 x Belt Clips (MB045) NOTE: Instruction manuals are available online at https://www.gme.net.au/manuals-and-brochures.aspx TX6160 INSTRUCTION MANUAL... -
Page 10: Features
FEATURES Feature Description TX6160 - 5/1 watt RF Power: Selectable transmitter power allows you to conserve battery power when transmitting in close range by using the Low Power setting. Transmit (TX) Individually programmable Duplex function: User selectable for only those individual channels in your area that have repeaters, leaving others free for use as extra simplex channels. -
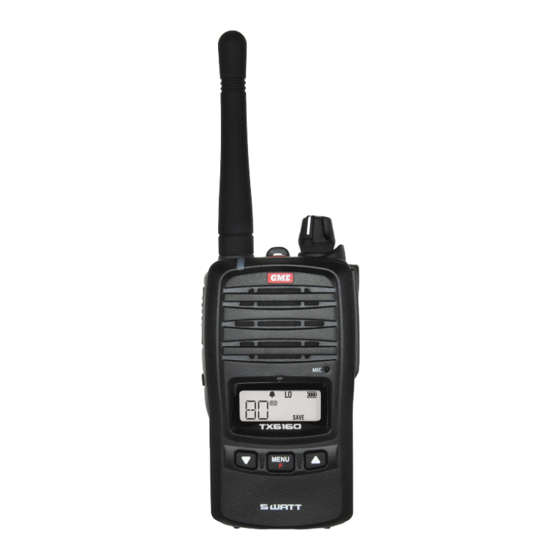
Page 11: Controls
Menu/Function Key Indicator LED LCD Screen Lanyard Mount Channel Up Key Speaker Channel Down Key On/Off Switch and Volume Control Menu/Function Key Speaker Channel Down Key © 2018 Standard Communications Pty Ltd trading as GME. All rights reserved. TX6160 INSTRUCTION MANUAL... -
Page 12: Lcd Icons
Scan icon: Flashes when radio is Battery charge status: Displays the % scanning. battery charge level at switch on. © 2018 Standard Communications Pty Ltd trading as GME. All rights reserved. TX6160 INSTRUCTION MANUAL 14 June 2018 50158... -
Page 13: Powering The Radio
Warning: Use only the approved GME charger. The use of other types may be dangerous and Warning: Use only the approved GME charger. The use of other types may be dangerous and will void the will void the warranty. warranty. -
Page 14: Charging The Battery Pack
2. When the battery has charged, the LED will change to green. © 2018 Standard Communications Pty Ltd trading as GME. All rights reserved. The fully charged battery can be left on the charger until it is needed. -
Page 15: Tx6160Tp
The red LED will then light and the normal charge cycle will begin. If the LED flashes red or Amber while charging, a fault condition has been detected. Try removing the battery then reinserting it. If the LED continues to flash, remove the battery and contact your GME service centre for advice. -
Page 16: Battery Charge Status
BATTERY CHARGE STATUS The TX6160 radio incorporates a battery charge status feature, enabled by default, which briefly displays the battery capacity from 1%-99% when the radio is switched on. To enable/disable this feature, press and hold the Scan and Menu buttons simultaneously while switching the radio on. -
Page 17: Avoid Scanning
AVOID SCANNING The radio draws more power from the battery pack when scanning than when monitoring a single channel. This is because it must ‘wake up’ more often to monitor each channel for activity. In addition, scanning increases the chance of finding a signal thereby keeping the receiver ‘awake’ and the squelch open more often. -
Page 18: Transmitting
If the incoming signal is encoded with a CTCSS or DCS tone matching the one set in your radio, the LED indicator will light orange and you will be able to hear the signal in the speaker. If the LED indicator lights green and flashes but you cannot hear the signal, it is likely that the incoming signal is using a different CTCSS or DCS tone to that selected in your radio (see Menu options for more details on setting CTCSS/DCS tones). -
Page 19: Selecting Channels
SELECTING CHANNELS 1. In the Standby mode, press the key to step up one channel or the key to step down one channel. 2. Press and hold the keys to quickly scroll through the channels. SQUELCH The Squelch is used to eliminate the background noise when there are no signals present. When the squelch is open the receiver’s background noise can be heard. -
Page 20: Duplex Operation
DUPLEX OPERATION Duplex operation allows the radio to transmit on a different frequency to that which it receives. This allows operation through repeater stations in your area. Repeaters automatically re-transmit your signal over a much wider area, providing greatly increased range. The Duplex mode only works on designated repeater channels 1 –... -
Page 21: Factory Reset
FACTORY RESET To clear any settings you have made to your radio and restore it to the factory defaults, perform a reset by pressing and holding the Menu and SQL keys simultaneously while switching the radio on. SCANNING Channel scanning allows you to monitor all channels for incoming signals. Note: While the radio is scanning, the Menu setting key is disabled. -
Page 22: Scanning Features
SCANNING FEATURES • If a signal is received, the scan is paused allowing you to transmit and receive on that channel. During this time the icon will continue to flash to show that the scan is still active. Once the channel has been inactive for 5 seconds the scan will automatically resume. •... -
Page 23: Menu Options
To activate or deactivate Silent mode on a channel: 1. Select the required channel. 2. Press and hold the SQL key. The selected CTCSS or DCS code will be displayed on that channel. Channels that have Silent mode enabled will now remain quiet unless a signal containing your chosen code is received. -
Page 24: Duplex Mode Selection
When CTCSS tones are being selected, ‘CT’ is displayed. To access DCS codes, scroll past CTCSS tone 50 until ‘DT’ is displayed. ‘DT’ is displayed. © 2018 Standard Communications Pty Ltd trading as GME. All rights reserved. TX6160 INSTRUCTION MANUAL 14 June 2018... - Page 25 To select a CTCSS or DCS code: 1. Select the required channel. 2. Press and hold the Menu key until the radio beeps. ‘CT’ (for CTCSS) or ‘DT’ (for DCS) will be displayed. 3. Press the keys to select the required tone/code. 4.
-
Page 26: Transmitter Power
TRANSMITTER POWER The transmitter power can be set to High or Low. The power setting option applies to all channels (except 5/35). To set the transmit power: 1. Select the required channel. 2. Press and hold the Menu key until the radio beeps. 3. -
Page 27: Voice Scrambler
Your radio incorporates a voice scrambler using band inversion. The scrambler is compatible with the majority of scramblers used by other manufacturers, allowing you to enjoy scrambled communications with owners of non-GME radios. To enable or disable the scrambler: 1. Select the required channel. -
Page 28: Squelch Level Setting
SQUELCH LEVEL SETTING The Squelch is designed to keep the radio quiet when there are no signals present. The Squelch setting adjusts the sensitivity of the Squelch to incoming signals. Higher Squelch settings require stronger signals to overcome the Squelch and be heard in the speaker while lower settings allow much weaker signals to be heard. -
Page 29: Call Alarm Selection
CALL ALARM SELECTION The radio provides 5 user-selectable Call Alarm melodies to alert other users to your incoming call. When enabled, the melody can be transmitted to another user where it will be heard in the speaker of the receiving radio. To select your favourite call alarm melody: 1. -
Page 30: Dual Watch Operation
DUAL WATCH OPERATION • If a signal is received on either channel, the radio will pause on that channel for as long as it remains busy, then resume the dual watch 5 seconds after the last transmission has ceased. • To talk on the dual watch channel, press the PTT switch while the radio is paused on that channel then talk in the usual way. - Page 31 The table that follows details the CTCSS tone frequencies of the TX6160 radio. CTCSS Tone Frequencies Frequency Frequency Frequency Frequency 67.0 107.2 167.9 159.8 71.9 110.9 173.8 165.5 74.4 114.8 179.9 171.3 77.0 118.8 186.2 177.3 79.7 123.0 192.8 183.5 82.5 127.3 203.5...
- Page 32 The table that follows details the UHF CB operating frequencies of the TX6160 radio. Frequency Frequency Frequency (MHz) (MHz) (MHz) 476.425 477.100 476.7875 476.450 477.125 476.8125 476.475 477.150 476.8375 476.500 477.175 476.8625 476.525 477.200 476.8875 476.550 477.225 476.9125 476.575 477.250 476.9375 476.600 477.275...
-
Page 33: Specifications
SPECIFICATIONS GENERAL Type Description Frequency Range 476.425 – 477.4125 MHz Channel Spacing 12.5 kHz No of Channels 80, (75 voice, 2 telemetry RX only, 3 for future use). CTCSS Codes DCS Codes Dimensions (W x H x D): 59 mm x 102 mm x 35 mm (without antenna and battery pack) Complies with AS/NZS 4365: 2011 POWER SUPPLY... - Page 34 GME Pty Ltd 17 Gibbon Road, Winston Hills NSW 2153, Australia Part: 311096 Drawing: 50158-2...
Need help?
Do you have a question about the TX6160X and is the answer not in the manual?
Questions and answers