
Related Manuals for Philips SWW1800/27


Summary of Contents for Philips SWW1800/27
- Page 1 Register your product and get support at www.philips.com/welcome SWW1800/27 EN User manual...
-
Page 3: Table Of Contents
Contents 1 Important Safety 2 Your SWW1800 What is in the box Overview 3 Installation Connect the transmitter to your HD devices Connect the receiver to the HDTV set 10 Install remote control batteries 4 Activate the SWW1800 function and set up the link Turn on the power of your HDTV LED indicator status of the receiver Activate the wireless link... -
Page 4: Important
1 Important Safety Know these safety symbols This ‘bolt of lightning’ indicates uninsulated material within your unit may cause an electrical shock. The ‘exclamation mark’ calls attention to features for which you should read the enclosed literature closely to prevent operating and maintenance problems. -
Page 5: Notice For Canada
is damaged, liquid has been spilled or objects have fallen into the apparatus, the apparatus has been exposed to rain or moisture, does not operate normally, or has been dropped. o Battery usage CAUTION – To prevent battery leakage which may result in bodily injury, property damage, or damage to the unit: •... -
Page 6: Compliance With Emf
One of Philips’ leading Business Principles is to take all necessary health and safety measures for our products, to comply with all applicable legal requirements and to stay well within the EMF standards applicable at the time of producing the products. -
Page 7: Your Sww1800
2 Your SWW1800 Congratulations on your purchase and welcome to Philips! To fully benefit from the support that Philips offers, register your product at www.philips. com/welcome. What is in the box Note • Make sure you have all these items in the box. -
Page 8: Overview
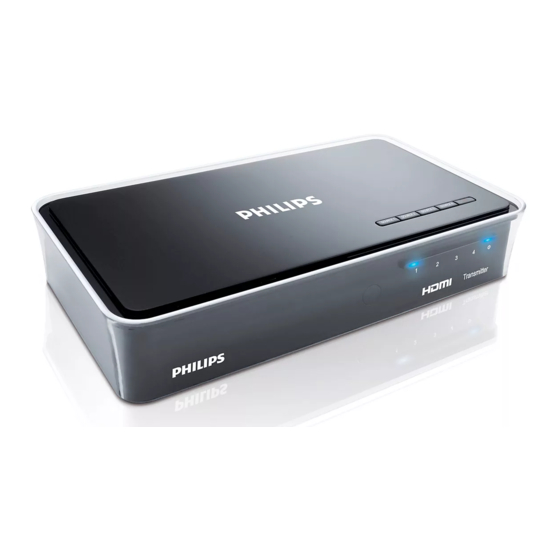
Overview SWW1800 Transmitter Front view Power indicator 1/2/3/4 Source indicators Top view SOURCE 1 SOURCE 2 Power button with LED indicators 1/2/3/4 Source selection buttons Rear view HDMI IN Component YPbPr and L/R Audio IN Power IN connector SWW1800 Receiver Front view POWER Top view... - Page 9 Note • The transmitter can support two devices running on HDMI cable and another two running on YPbPr component video signals at the same time. • Connect the receiver to your HDTV set. • Control the transmitter with the remote control.
-
Page 10: Installation
3 Installation Connect the transmitter to your HD devices You can connect 4 video sources to the transmitter at the same time: two with the HDMI connection and two with the component connection, but only one source can be selected and played. DC 5V Connect video source to the transmitter using the HDMI cable. -
Page 11: Install Remote Control Batteries
Install remote control batteries Caution • Risk of explosion! Keep batteries away from heat, sunshine or fire. Never discard batteries in fire. • Risk of decreased battery life! Never mix different brands or types of batteries. • Risk of product damage! When the remote control is not used for long periods, remove the batteries. -
Page 12: Activate The Sww1800 Function And Set Up The Link
4 Activate the SWW1800 function and set up the link Turn on the power of your HDTV Go to the source menu under the settings menu of your HDTV. Select the HDMI input to which the receiver is connected.. DC 5V Note •... - Page 13 Note • In standby mode, a red power LED displays on the transmitter. • Depending on equipment and the input selected, between input selection/start-up and being able to see the image on your TV can take up to 15 seconds. Establish the link between the transmitter and receiver A flashing blue power LED displays until...
-
Page 14: Enter The Standby Mode
Note • It takes longer time to switch from the HDMI/component connection to the HDMI connection (around 10 seconds) than from the component connection to the HDMI/ component connection to the component connection. • For more information on the LED indicator status, see the section on “LED indicator status of the transmitter”. - Page 15 To enter the listen mode, press remote control of your HDTV/projector to switch it off. » The HDTV/projector and the HD device are in standby mode. » The LED indicators of the transmitter and receiver become solid purple. Note • The power consumption in the listen mode is higher than the power consumption in the sleep mode.
-
Page 16: Position The Transmitter And Receiver
5 Position the transmitter and receiver To ensure the units are located at the optimal distance without any interference, you need to: • Place the units in the same room. • This system is built to transfer the HD signal up to 20m or 66 ft. Its performance can be affected by its environment and the obstruction between the transmitter and receiver. -
Page 17: Wallmount The Receiver
6 Wallmount the receiver You can either place the receiver near the HDTV or mount it on the wall. Choose a spot near the TV. Drill two holes in the wall. Ensure the distance between the two holes is 4.5mm. Punch the supplied plastic wall anchors into the two holes on the wall. -
Page 18: Technical Data
7 Technical data Supported resolution Video resolution frequency 480i 720(1440)x480i @ 59.94Hz 480i 720(1440)x480i @ 60Hz 480p 640x480p @ 59.94/60Hz 480p 720x480p @ 59.94Hz 480p 720x480p @ 60Hz 576i 720(1440)x576i @ 50Hz 576p 720x576p @ 50Hz 720p 1280x720p @ 50Hz 720p 1280x720p @ 59.94/60Hz... - Page 19 YPbPr input Two sets of RCA connectors Analog audio L/R Two sets of RCA input connectors HDMI input Two (Type A) HDMI output Control signal interfaces IR sensor Power interface Power input 5V DC jack Switches Front power switch Yes (One tack switch) Source selection switch Yes (Four-tack...
-
Page 20: Troubleshooting
8 Troubleshooting There is no video displayed on my TV screen. Verify the POWER LED and SOURCE LED indicator on the transmitter: Flashing blue power LED • Ensure the transmission range between receiver and transmitter is not over 20m or 66ft transmission distance (with no obstruction between the transmitter and receiver). - Page 21 • Ensure the TV volume is not set to minimum or the sound is not muted. • Ensure the audio cables of the transmitter are connected correctly. • Ensure the Audio format is recognized/ supported. • For more information, check the section on “Product specification”.
- Page 22 9 Glossary ADSL (Asymmetric Digital Subscriber Line) It is a data communications technology that enables faster data transmission over high- speed broadband networks. CEC (Consumer electronics Control) CEC is part of the HDMI standard. If CEC is available in the source and HDTV devices in your home setup, the devices will be able to pass commands through the HDMI connection.
- Page 24 0682 © 2009 Koninklijke Philips Electronics N.V. All rights reserved. Printed in Taiwan SWW1800_27_UM_V3.0...
Need help?
Do you have a question about the SWW1800/27 and is the answer not in the manual?
Questions and answers