
Related Manuals for Philips SWW1890/27


Summary of Contents for Philips SWW1890/27
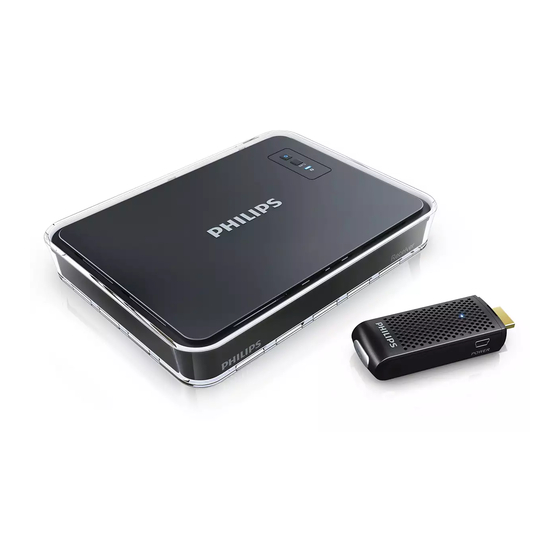
- Page 1 Register your product and get support at www.philips.com/welcome SWW1890 EN User manual...
-
Page 3: Table Of Contents
Contents Important Safety Your Philips Wireless HD Net Connect 6 What is in the box Overview The transmitter The receiver Installation Connect the transmitter to your computer Connect the receiver to the HDTV set Activate your Philips Wireless HD Net Connect and set up the link... -
Page 4: Important
1 Important Safety This ‘bolt of lightning’ indicates uninsulated material within your unit may cause an electrical shock. The ‘exclamation mark’ calls attention to features for which you should read the enclosed literature closely to prevent operating and maintenance problems. Warning •... - Page 5 m Unplug this apparatus during lightning storms or when unused for long periods of time. n Refer all servicing to qualified service personnel. Servicing is required when the apparatus has been damaged in any way, such as power-supply cord or plug is damaged, liquid has been spilled or objects have fallen into the apparatus, the apparatus has been exposed to rain or...
-
Page 6: Your Philips Wireless Hd Net Connect
Wireless HD Net Connect Congratulations on your purchase and welcome to Philips! To fully benefit from the support that Philips offers, register your product at www.philips.com/welcome. What is in the box Note • Make sure you have all these items in the box. Contact your dealer for any missing or damaged items. -
Page 7: Overview
3 Overview The transmitter Front view Displays the connection status indicator of the transmitter. Connect the transmitter to the power computer with the USB cable. jack Top view INFO Displays on the HDTV the button connection status of the transmitter. HDMI IN Plug into the HDMI port of connector... - Page 8 The Philips Wireless HD Net Connect gives you a total wireless solution to enjoy the content from your computer on your HDTV. The transmitter can transmit an uncompressed video content up to 23 feet (7 meters) without latency. The receiver can receive signals for viewing on your HDTV.
-
Page 9: Installation
4 Installation Connect the transmitter to your computer Connect the transmitter to the computer using the supplied USB cable. Connect the transmitter to the HDMI port of the computer. Connect the small end of the USB cable to the POWER jack of the transmitter; Connect the other end of the USB cable to your the USB port of your computer. -
Page 10: Activate Your Philips Wireless Hd Net Connect And Set Up The Link
5 Activate your Philips Wireless HD Net Connect and set up the link Turn on the power of your HDTV HDMI HDMI Go to the source menu under the settings menu of your HDTV. Select the HDMI input to which the receiver is connected. -
Page 11: Led Indicator Status Of The Receiver
The maximum transmission range is up to 23 feet (7 meters). • If more than one set of Philips Wireless HD Net Connect is placed in the same room, make sure that the minimum distance among each one is 6 feet (2 meters). -
Page 12: Mount Your Receiver
6 Mount your receiver You can either mount the receiver on the wall or on the back of the HDTV. Mount your receiver on the wall Select a spot near the HDTV. Drill two holes in the wall. Make sure that the distance between the two holes is ”... -
Page 13: Mount Your Receiver On The Back Of The Hdtv
Mount your receiver on the back of the HDTV Remove the white protective film from one of the supplied adhesive tapes. Secure the glued side of the adhesive tape and attach it to the central bottom area of the receiver. Select a flat location on the rear side of the HDTV. -
Page 14: Technical Data
7 Technical data Supported resolution Video format Resolution timings Primary CEA video Timing 480p 640x480p @ 59.94/60Hz 480p 720x480p @ 59.94Hz 480p 720x480p @ 60Hz 576p 720x576p @ 50Hz 720p 1280x720p @ 50Hz 720p 1280x720p @ 59.94/60Hz 1080i 1920x1080i @ 50Hz 1080i 1920x1080i @ 59.94/60Hz 1080p/60... -
Page 15: Notice
8 Notice Notice for USA This equipment has been tested and found to comply with the limits for a Class B digital device, pursuant to Part 15 of the FCC Rules. These limits are designed to provide reasonable protection against harmful interference in a residential installation. -
Page 16: Recycling
1-888-744-5477. THERE ARE NO OTHER EXPRESS OR IMPLIED WARRANTIES. Philips’ liability is limited to repair or, at its sole option, replacement of the product. Incidental, special and consequential damages are disclaimed where permitted by law. This warranty gives you specific legal rights. -
Page 17: Frequently Asked Questions
9 Frequently asked questions The power LED on the Make sure that there is power supply for the receiver. receiver is not lit up in red in standby mode. The laptop screen image is not full screen on my TV. There is no video •... - Page 18 If the picture quality is • poor, what do I do? • I cannot hear any • sound or the sound is • poor, what do I do? • • • How can I connect to my computer to enable the external display? For Windows7 operation system:...
- Page 19 For MAC operating MAC operating system detects the external display equipment and system: switches to a better resolution automatically when you plug in the display cable to MAC series. • If the MAC operation system does not detect the external display automatically, click •...
- Page 25 © 2011 Koninklijke Philips Electronics N.V. IFU_SWW1890_EN_V2.0 All rights reserved. WK11472...
Need help?
Do you have a question about the SWW1890/27 and is the answer not in the manual?
Questions and answers