Advertisement
Quick Links
Advertisement

Subscribe to Our Youtube Channel
Related Manuals for REED C-212


Summary of Contents for REED C-212
- Page 1 C-212 Model TRMS AC/DC Clamp Meter Instruction Manual reedinstruments...
-
Page 2: Table Of Contents
Features..................4 Specifications................4-6 Instrument Description..............7-8 Measurement Procedures............9-12 Battery Replacement..............13 Product Maintenance..............13 For service on this or any other REED product or information on other REED products, contact REED Instruments at info@reedinstruments.com. reedinstruments... -
Page 3: Safety
EN61010 600V CAT III 1000V CAT II When servicing this meter, use only specified replacement parts. For service (repairs or calibration) on this or any other REED product or information on other ..REED products, contact REED Instruments at info@reedinstruments.com. -
Page 4: Features
Features • True RMS measurements • 3-3/4 digit LCD with high-speed, 42-segment bargraph • Max/Min and Data Hold functions • Peak Hold function • Frequency measurement • Diode and continuity test with beeper • Polarity and overload indications • Auto or manual ranging •... - Page 5 Electrical Specifications The accuracy specification is defined as ± (…% of reading+ …count) at < 23±5°C, 80%RH TRMS for ACV and ACA accuracy are specified from 5% to 100% of the range. For the accuracy add ±(1% of reading) on Crest Factor 1.4<CF<3 at full scale &...
- Page 6 (Diode) Range Test Current Open Circuit Voltage Overload Protection 1.7mA Max. 6V Max. 600Vrms Continuity Range Active Region Overload Protection <100Ω 600Vrms Frequency (Hz) (Autorange) Function Range Resolution Sensitivity Accuracy 4KHz 2Arms ±(0.1% reading + . A-Hz 1 digits) (20~10KHz) 10KHz 10Hz 5Arms...
-
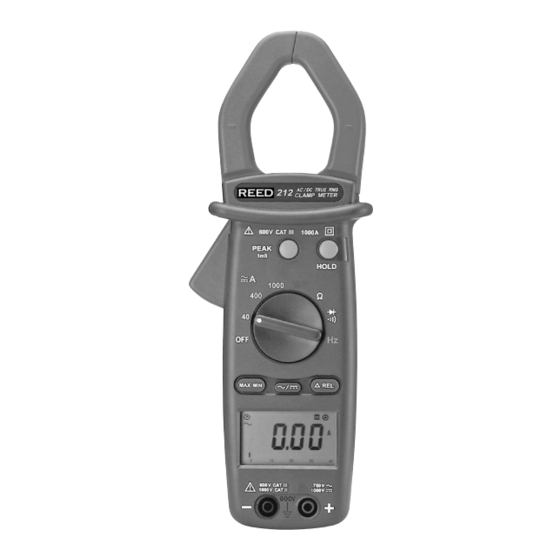
Page 7: Instrument Description
Instrument Description 1 — Current Sensing Clamp 2 — Clamp opening handle 3 — Function select dial 4 — Hold Button 5 — Peak Hold Button 6 — Maximum Minimum Button 7 — AC/DC Select Button 8 — Relative Button 9 —... - Page 8 Data Hold Function Press the “HOLD” button at any time to hold the current reading. To release the data being held, simply press the “HOLD” button again. Peak Hold Function This meter is designed with 1ms peak hold function at ACA, ACV, DCA and DCV ranges.
-
Page 9: Measurement Procedures
Measurement Procedures Current Measurement Switch the main function selector to proper current range. Open the clamp by pressing the jaw-opening handle and insert the cable to be measured into the jaw. Choose AC current measurement by press- ing the “AC/DC” button for ACA readings. To measure DC current, choose DC measurement by pressing the . - Page 10 Voltage measurement Switch the main function selector to Voltage Range. Connect the Red test lead to the “ ” terminal and the Black one to the “COM” terminal. Choose AC or DC by pressing the AC/DC button. Measure the voltage by touching the test lead tips to the test circuit where the value of voltage is needed.
- Page 11 Continuity Test Switch the main function to . the “ ” range, verify . Beeper that the power line is . disconnected from the . system. Connect the Red . test lead to the “ ” terminal . and the Black one to the . “COM”...
- Page 12 Frequency measurement from the terminals Switch the main function to the “ ” range. Connect the Red test lead to the “ ” terminal and the Black one to the “COM”. Connect the tips of the test leads to the points where the frequency of the voltage signal is required.
-
Page 13: Battery Replacement
• To clean the meter, periodically wipe the case with a dry cloth. Do not use abrasives or solvents on these instruments. For service (repairs or calibration) on this or any other REED product . or information on other REED products, contact REED Instruments at info@reedinstruments.com. - Page 14 Notes _________________________________________ ________________________________________________ ________________________________________________ ________________________________________________ ________________________________________________ ________________________________________________ ________________________________________________ ________________________________________________ ________________________________________________ ________________________________________________ ________________________________________________ ________________________________________________ ________________________________________________ ________________________________________________ ________________________________________________ ________________________________________________ ________________________________________________ ________________________________________________ reedinstruments...
Need help?
Do you have a question about the C-212 and is the answer not in the manual?
Questions and answers