Table of Contents
Advertisement
Available languages
Available languages
Advertisement
Table of Contents

Related Manuals for Duraflame DFI-550-22


Summary of Contents for Duraflame DFI-550-22
- Page 1 MODEL/ MODELE/ MODELO: DFI-550-22 Español P.13 800-318-9373 www.tsicustomerservice.com Twin-Star International, Inc; Delray Beach, FL 33445 Made in China • Printed in China • Fabricado en China • Impreso en China A435 www.tsicustomerservice.com...
- Page 2 A435 www.tsicustomerservice.com...
-
Page 3: Important Instructions
IMPORTANT INSTRUCTIONS When using electrical appliances, basic precautions should always be followed to reduce the risk of fire, electrical shock, and injury to persons including the following: 1. Read all instructions before using this appliance. 2. This appliance is hot when in use. To avoid burns, do not let bare skin touch hot surfaces. If provided, use handles when moving this appliance. -
Page 4: Getting Started
NO HAY PARTES DE SERVICIO PARA EL USUARIO EN EL INTERIOR. 2. Go to www.tsicustomerservice.com for product warranty registration. For registration use the MODEL NUMBER: DFI-550-22. If you are unable to complete registration save your proof of purchase for warranty purposes. -
Page 5: Installation Instructions
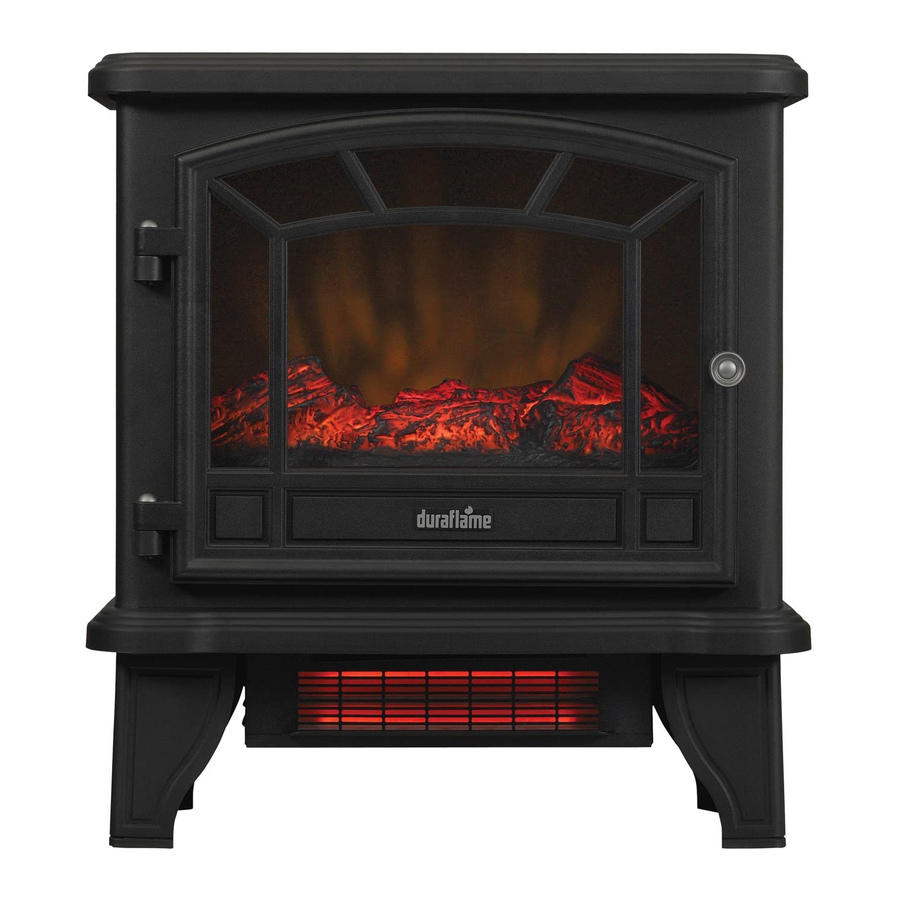
INSTALLATION INSTRUCTIONS Tools Required for Assembly Phillips Head Screwdriver Leg Assembly Align the 2 mounting tabs into the Slide the legs outward to lock in Fasten the legs to the base using the bracket. place. When locked in position included screws,1 per leg the screw hole from step 3 will be aligned. - Page 6 OPERATION INSTRUCTIONS Control Panel Location Control Panel NOTE: Please operate the remote transmitter at a slow measured pace. Press the remote control buttons with an even motion and gentle pressure. Repeatedly pressing buttons in rapid succession may cause the transmitter to malfunction. A435 www.tsicustomerservice.com...
- Page 7 OPERATION INSTRUCTIONS Description Function Icon The Power button supplies power to all of the functions of POWER the stove and will illuminate the flame effect. This switch must be lit for any of the functions to work. Use +or -to increase or decrease the flame brightness levels. FLAME Our stove consists of a infrared type heater.
-
Page 8: Bulb Replacement
BULB REPLACEMENT Tools Required for Assembly Phillips Head Screwdriver Clear, 40-watt, E12 socket base light bulb (candelabra base, B bulb). Unplug the stove. Remove the screws holding the stove back panel in place. Remove the back panel to access the light bulb. REMOVE Pinch the spring clip to loosen the spindle, and gently turn and pull the rubber gromet out of the... -
Page 9: Troubleshooting Guide
TROUBLESHOOTING GUIDE Problem Root Cause Corrective Action 1. No power, buttons Power cord was not plugged into Check that unit is plugged directly into a standard do not light up. the outlet. 120 volt outlet. 2. Stove does not 2a. No incoming power from the 2a. -
Page 10: Exploded View
EXPLODED VIEW Part Part Name Part Number Thermostat Knob P05-S Control panel Y15-S165-P85 Control panel PCBA Y15-S165-P32 Legs SL-550-BLK Emberbed Y15-S45-P02 Flame Generator Drive Motor P10-Q-S Main PCBA Y15-S165-P15 Remote control P129 A435 www.tsicustomerservice.com... -
Page 11: Fcc/Ic Information
FCC/IC INFORMATION Warning: Changes or modifications to this unit not expressly approved by the party responsible for compliance could void user’s authority to operate the equipment. NOTE: This equipment has been tested and found to comply with the limits for Class B digital device, pursuant to part 15 of the FCC Rules. -
Page 12: Year Limited Warranty
1-YEAR LIMITED WARRANTY The manufacturer warrants that your new Electric Stove is free from manufacturing and material defects for a period of one year from date of puchase, subject to the following conditions and limitations. 1. Install and operate this appliance in accordance with the installation and operating instructions furnished with the product at all times. -
Page 13: Instrucciones Importantes
INSTRUCCIONES IMPORTANTES Al utilizar aparatos eléctricos, siempre deberán tomarse precauciones básicas para reducir el riesgo de incendio, descarga eléctrica y lesiones a personas. Éstas incluyen: 1. Lea todas las instrucciones antes de usar este aparato. 2. Este aparato se calienta cuando está en uso. Para evitar quemaduras, no permita que la piel sin protección entre en contacto con superficies calientes. -
Page 14: Para Empezar
NO HAY PARTES DE SERVICIO PARA EL USUARIO EN EL INTERIOR. 2. Visitar www.tsicustomerservice.com para el registro de la garantía del producto. Para inscribirse use el NÚMERO DE MODELO: DFI-550-22. Si usted no puede completar el registro guarde el comprobante de compra para hacer válida la garantía. -
Page 15: Instrucciones De Instalación
INSTRUCCIONES DE INSTALACIÓN Herramientas requeridas para el ensamblado Destornillador de cabezal Phillips Leg Asamblea Alinee las 2 pestañas de montaje en Deslice las patas hacia fuera para Fije las patas en la base al utilizar el soporte. que encajen en su lugar. Cuando los tornillos incluidos, 1 por pata esté... - Page 16 Localización del panel de control Control Principal NOTA: Opere el transmisor remoto lentamente. Presione los botones del control remoto con un movimiento parejo y una presión suave. Presionar los botones repetidamente en una secuencia rápida puede causar un mal funcion- amiento del transmisor.
-
Page 17: Instrucciones De Operación
INSTRUCCIONES DE OPERACIÓN FUNCIÓN ICONO DESCRIPCIÓN Utilice el botón de encendido para encender o apagar la es- ENCENDIDO tufa desde el control remoto o desde el panel de control. Utilizar + o -para aumentar o disminuir los levels brillo de la LLAMA llama. - Page 18 Herramientas requeridas para el ensamblado transparentes, 40-watt, socket E12 base de Destornillador de cabezal Phillips la bombilla de luz (candelabros de base, bombilla B). Desenchufe estufa. Quite los tornillos que sujetan el panel posterior estufa en su lugar. Quite el panel posterior para acceder a la bombilla.
-
Page 19: Guía Para Solución De Problemas
GUÍA PARA SOLUCIÓN DE PROBLEMAS Problema Causa Medidas correctivas 1. Sin energía, los El cable de alimentación no estaba Compruebe que la unidad esté enchufada directamente a una toma interruptores no se enchufado en la toma de corriente. de corriente estándar de 120V. encienden. - Page 20 VISTA DESPLEGADA Pieza nombre de la pieza nombre de de pieza Perilla del termostato P05-S panel de control Y15-S165-P85 panel de Control PCBA Y15-S165-P32 Pies SL-550-BLK Lecho de brasas Y15-S45-P02 Motor de generación de llama P10-Q-S PCBA Principal Y15-S165-P15 Control remoto P129 A435 www.tsicustomerservice.com...
-
Page 21: Reemplazo De Batería
INFORMACIÓN DE FCC/IC Advertencia: Los cambios o modificaciones en esta unidad, que no sean aprobados directamente por la parte responsable del cumplimiento, podría anular el derecho de operar el equipo por parte del usuario. NOTA: Este equipo ha sido probado y cumple con los límites especificados para dispositivos digitales de Clase B, conforme a la parte. -
Page 22: Garantía Limitada De 1 Año
GARANTÍA LIMITADA DE 1 AÑO El fabricante garantiza que su nueva estufa eléctrica no presentará defectos de fabricación ni materiales durante un período de un año a partir de la fecha de compra, siempre y cuando se cumplan las siguientes condiciones y limitaciones. 1.
Need help?
Do you have a question about the DFI-550-22 and is the answer not in the manual?
Questions and answers