Table of Contents
Advertisement
Available languages
Available languages
Quick Links
Warning: This is an unvented, electric appliance.
DO NOT attempt to burn wood or manufactured
firelogs in or on this appliance or grate.
A404
MODEL/ MODELE/ MODELO:
DFS-500-0
www.tsicustomerservice.com
Distributed by • Distribuido por • Distribué par • Twin-Star International, Inc; Delray Beach, FL 33445
Made in China • Printed in China • Fabricado en China • Impreso en China • Fabriqué en China • Imprimé en Chine
Advertencia: Este es un aparato eléctrico sin
ventilación. NO intente quemar leños fabricados ni
madera dentro o sobre este aparato o su parrilla.
Avertissement : Il s'agit d'un appareil électrique
non ventilé. NE PAS tenter de faire brûler du bois
ou des bûches fabriquées dans l'appareil ou sur
la grille.
1
Español P.11
www.tsicustomerservice.com
Advertisement
Table of Contents

Related Manuals for Duraflame DFS-500-0


Summary of Contents for Duraflame DFS-500-0
- Page 1 MODEL/ MODELE/ MODELO: DFS-500-0 Español P.11 www.tsicustomerservice.com Distributed by • Distribuido por • Distribué par • Twin-Star International, Inc; Delray Beach, FL 33445 Made in China • Printed in China • Fabricado en China • Impreso en China • Fabriqué en China • Imprimé en Chine Warning: This is an unvented, electric appliance.
-
Page 3: Important Instructions
IMPORTANT INSTRUCTIONS When using electrical appliances, basic precautions should always be followed to reduce the risk of fire, electrical shock, and injury to persons including the following: 1. Read all instructions before using this appliance. 2. This appliance is hot when in use. To avoid burns, do not let bare skin touch hot surfaces. If provided, use handles when moving this appliance. -
Page 4: Getting Started
NO HAY PARTES DE SERVICIO PARA EL USUARIO EN EL INTERIOR. 2. Go to www.tsicustomerservice.com for product warranty registration. For registration use the MODEL NUMBER: DFS-500-0. If you are unable to complete registration save your proof of purchase for warranty purposes. -
Page 5: Installation Instructions
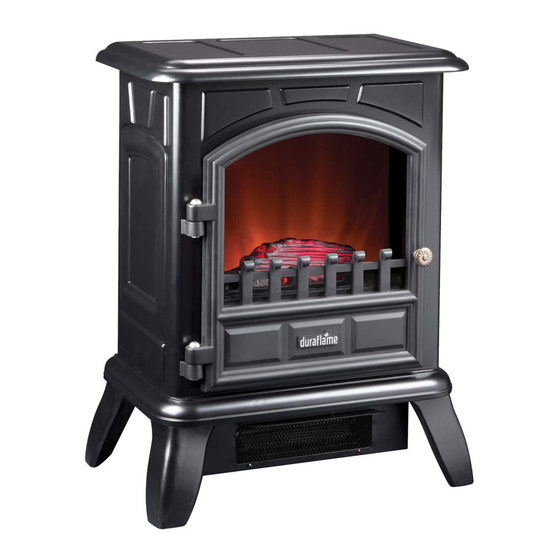
INSTALLATION INSTRUCTIONS Tools Required for Assembly Phillips Head Screwdriver Leg Assembly Align the 2 mounting tabs into the Slide the legs outward to lock in Fasten the legs to the base using the bracket. place. When locked in position included screws,1 per leg the screw hole from step 3 will be aligned. - Page 6 OPERATION INSTRUCTIONS Control Panel Location Control Panel Thermostat Dial Heater Switch Power Switch Flame Brightness Dimmer 1. Set the thermostat knob to 1. This switch turns on 1. This switch turns 1. Turning the dial clockwise turning clockwise to allow and off the heater.
-
Page 7: Bulb Replacement
BULB REPLACEMENT Tools Required for Assembly Phillips Head Screwdriver Clear, 40-watt, E12 socket base light bulb (candelabra base, B bulb). Unplug the stove. Remove the screws holding the stove back panel in place. Remove the back panel to access the light bulb. REMOVE Pinch the spring clip to loosen the spindle, and gently turn and pull the rubber gromet out of the... -
Page 8: Troubleshooting Guide
TROUBLESHOOTING GUIDE Problem Root Cause Corrective Action 1. No power, switches Power cord was not plugged into Check that unit is plugged directly into a standard do not light up. the outlet. 120 volt outlet. 2. Stove does not 2a. No incoming power from the 2a. -
Page 9: Exploded View
EXPLODED VIEW Part Part Name Part Number Thermostat switch P03-S Thermostat knob P05-S Dimmer Knob P04-S Heater ON/OFF Switch - Red Toggle P06-S Dimmer P07-S Legs Y12-C62-LG Emberbed Y15-C62-P02 Flame Generator Drive Motor P10-Q-S Note, the scale and size of your parts may be different depending on your exact model A404 www.tsicustomerservice.com... -
Page 10: Year Limited Warranty
1-YEAR LIMITED WARRANTY The manufacturer warrants that your new Electric Stove is free from manufacturing and material defects for a period of one year from date of puchase, subject to the following conditions and limitations. 1. Install and operate this appliance in accordance with the installation and operating instructions furnished with the product at all times. -
Page 11: Instrucciones Importantes
INSTRUCCIONES IMPORTANTES Al utilizar aparatos eléctricos, siempre deberán tomarse precauciones básicas para reducir el riesgo de incendio, descarga eléctrica y lesiones a personas. Éstas incluyen: 1. Lea todas las instrucciones antes de usar este aparato. 2. Este aparato se calienta cuando está en uso. Para evitar quemaduras, no permita que la piel sin protección entre en contacto con superficies calientes. -
Page 12: Para Empezar
NO HAY PARTES DE SERVICIO PARA EL USUARIO EN EL INTERIOR. 2. Visitar www.tsicustomerservice.com para el registro de la garantía del producto. Para inscribirse use el NÚMERO DE MODELO: DFS-500-0. Si usted no puede completar el registro guarde el comprobante de compra para hacer válida la garantía. -
Page 13: Instrucciones De Instalación
INSTRUCCIONES DE INSTALACIÓN Herramientas requeridas para el ensamblado Destornillador de cabezal Phillips Leg Asamblea Alinee las 2 pestañas de montaje en Deslice las patas hacia fuera para Fije las patas en la base al utilizar el soporte. que encajen en su lugar. Cuando los tornillos incluidos, 1 por pata esté... - Page 14 INSTRUCCIONES DE INSTALACIÓN Localización del panel de control Control Principal Indicador del termostato Interruptor del Interruptor de Atenuador del brillo de la 1. Fije la perilla del termostato calentador encendido/apagado llama al darle vuelta en el sentido 1. Este interruptor 1.
- Page 15 Herramientas requeridas para el ensamblado transparentes, 40-watt, socket E12 base de Destornillador de cabezal Phillips la bombilla de luz (candelabros de base, bombilla B). Desenchufe estufa. Quite los tornillos que sujetan el panel posterior estufa en su lugar. Quite el panel posterior para acceder a la bombilla.
-
Page 16: Guía Para Solución De Problemas
GUÍA PARA SOLUCIÓN DE PROBLEMAS Problema Causa Medidas correctivas 1. Sin energía, los El cable de alimentación no estaba Compruebe que la unidad esté enchufada directamente a una toma interruptores no se enchufado en la toma de corriente. de corriente estándar de 120V. encienden. - Page 17 VISTA DESPLEGADA Pieza nombre de la pieza PNúmero de Pieza arte Nombre P03-S Interruptor de Termostato Perilla del termostato P05-S Dimmer perilla P04-S Interruptor de encendido/apagado del calentador, palanca roja P06-S Dimmer P07-S pies Y12-C62-LG Lecho de brasas Y15-C62-P02 Motor de accionamiento del generador de llama P10-Q-S Tome en cuenta que la escala y el tamaño de sus partes pueden ser diferentes dependiendo de su modelo exacto A404...
-
Page 18: Garantía Limitada De 1 Año
GARANTÍA LIMITADA DE 1 AÑO El fabricante garantiza que su nueva estufa eléctrica no presentará defectos de fabricación ni materiales durante un período de un año a partir de la fecha de compra, siempre y cuando se cumplan las siguientes condiciones y limitaciones. 1.
Need help?
Do you have a question about the DFS-500-0 and is the answer not in the manual?
Questions and answers