Advertisement
Advertisement
Table of Contents

Related Manuals for Extech Instruments RH520


Summary of Contents for Extech Instruments RH520
- Page 1 User Manual Humidity-Temperature Chart Recorder Model RH520...
-
Page 2: Warranty
The optional alarm module permits automatic relay switching when alarm presets are reached. The RH520 Internal Memory can store up to 49,152 measurements for later transfer to a PC. Careful use of this instrument will provide years of reliable service. -
Page 3: Specifications
F (0 to 50 SENSOR: -20 to 140 F (-28 to 60 Operating Humidity CONTROL MODULE and DISPLAY: 90% RH max. SENSOR: 95% RH max. Dimensions 5.0 x 7.7 x 0.9" (127 x 196 x 23mm) Weight 12.6oz (357g) RH520 V2.9 3/07... - Page 4 DATA RESET button (clears recorded measurement data and alarm history) Temperature units select switch (C or F) PROGRAMMING RESET button (clears programming changes but retains measurement data and alarm history) Display CONTRAST adjust Sensor cable storage area ‘AA’ 1.5V batteries Sensor cable run Wall mount holes RH520 V2.9 3/07...
-
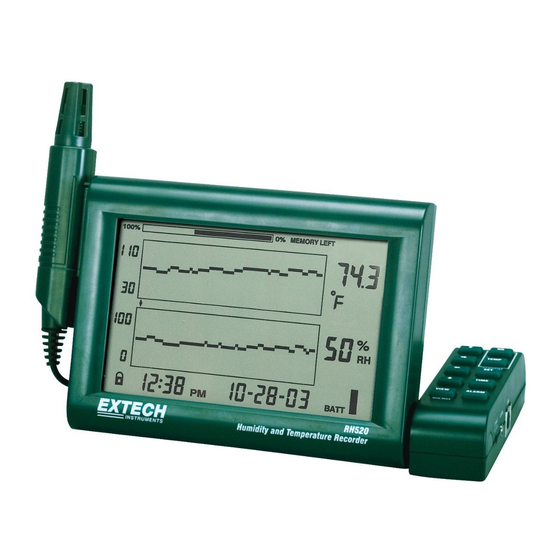
Page 5: Display Description
Vertical axis scale limits Cursor / Alarm indicators Push-button lock-out status indicator Time display Relative Humidity (RH) measurement graph Date display Function indicators 10. Numerical temperature reading display 11. Numerical RH reading display 12. Battery status indicator RH520 V2.9 3/07... - Page 6 Used in combination with the TEMP button to display Dew Point Right, left, down, and up arrow buttons for scrolling data and navigating the display KEYPAD QUICK REFERENCE (ALSO SHOWN ON REAR OF THE RH520 HOUSING) Key-press Function Second / Alternate Keystrokes...
-
Page 7: Getting Started
3. Once the batteries are installed or the adaptor properly connected, the RH520 will begin displaying. 4. In the unlikely event that the AC power AND the battery back-up fails, the RH520 will require a “Programming Reset” to reset the display. Press the RESET button located inside the battery compartment. - Page 8 Programming the RH520 SETTING THE TIME AND DATE 1. From the Standard View, press the SET and TIME buttons simultaneously 2. The SET indicator will appear 3. Use the UP and DOWN arrow buttons to set the time 4. Use the LEFT and RIGHT arrow buttons to step through the minutes, hours,...
- Page 9 SETTING THE RECORDING SAMPLE RATE The Sampling Rate is the rate at which the RH520 automatically records measurements 1. Press the SET, VIEW, and TIME arrow buttons simultaneously from the Standard View 2. The current Sample Rate (in minutes) will appear in the numerical temperature display area 3.
-
Page 10: Display Modes
Display Modes STANDARD VIEW The Standard View is the display state of the RH520 when it is turned on. Refer to the diagram in the display description section of this manual for a representation of the Standard View. To reach the Standard View at any time, press the VIEW button. Note that the display automatically reverts to the Standard View five (5) minutes after the last button press. -
Page 11: Alarm Displays
5. This procedure can continue until no further alarms exist and pressing the ALARM button will only bring up the Standard View 6. In the example diagram, the RH520 is showing a high temperature alarm (MAX and ALARM indicators on). - Page 12 Press the TEMP and the RH buttons simultaneously to view the Dew Point reading. The DEW POINT display icon will switch on above the temperature. See the diagram below. Press VIEW to return to the standard view mode. RH520 V2.9 3/07...
-
Page 13: Sample Rate Display
12 Hrs 38 minutes 10 months 28 days 3 years months/days/years. Not the actual date. Software and Data Download Software operational instructions are located on the ExTerm software disc. RH520 V2.9 3/07... -
Page 14: Factory Default Settings
3. Replace the battery compartment cover securely 4. The RH520 will require a “Programming Reset” to reset the display. Press the RESET button located inside the battery compartment. “Reset” clears all settings. Time, Date and the logging interval need to be entered. The measurement data and alarm history, however, will still be retained in the non-volatile memory. -
Page 15: Calibration And Repair Services
For the latest version of this User’s Guide, Software updates, and other up-to-the-minute product information, visit our website: www.extech.com Copyright © 2007 Extech Instruments Corporation All rights reserved including the right of reproduction in whole or in part in any form...
Need help?
Do you have a question about the RH520 and is the answer not in the manual?
Questions and answers