Table of Contents
Advertisement
Quick Links
Advertisement
Table of Contents

Related Manuals for Robe Robin DL7S Profile


Summary of Contents for Robe Robin DL7S Profile
- Page 1 Version 2.2...
-
Page 2: Table Of Contents
Robin DL7S Profile Table of contents 1. Safety instructions ......................3 2. Operating determination ....................4 3. Fixture exterior view ...................... 5 4. Installation........................6 4.1 Connection to the mains .................... 6 4.2 Replacing gobos ....................... 7 4.3 Replacing gobos ....................... 7 4.4 Rigging the fixture ...................... -
Page 3: Safety Instructions
CAUTION! Keep this device away from rain and moisture! Unplug mains lead before opening the housing! FOR YOUR OWN SAFETY, PLEASE READ THIS USER MANUAL CAREFULLY BEFORE YOU INITIAL START - UP! 1. Safety instructions Every person involved with installation and maintenance of this device have to: - be qualified - follow the instructions of this manual CAUTION! -
Page 4: Operating Determination
Do not view the light output with optical instruments or any device that may conncentrate the beam. The light source contains blue LEDs. 2. Operating determination This device is a moving head for creating decorative effects and was designed for indoor use only. This device is for professional use only. -
Page 5: Fixture Exterior View
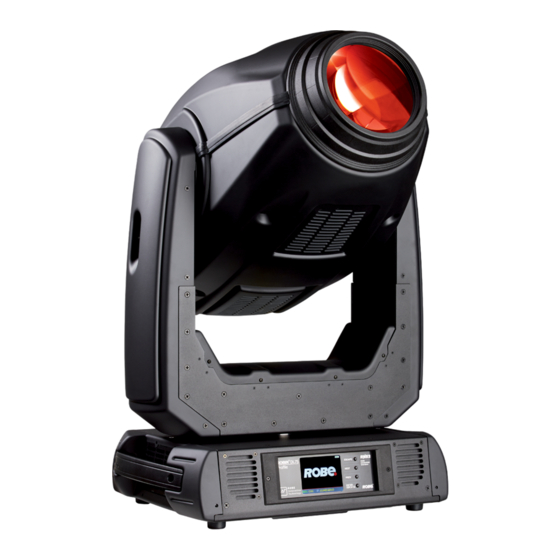
3. Fixture exterior view 1 - Moving head 2 - Front lens 3 - Pan lock 4 - Base 5 - Handle 6 - Arm 7 -Tilt lock The head should be locked for transportation- the tilt lock latch (7) and the pan lock latch (3) have to be in the locked positions. -
Page 6: Installation
4. Installation Fixtures must be installed by a Qualified electrician in accordance with all national and local electrical and construction codes and regulation. 4.1 Connection to the mains For protection from electric shock, the fixture must be earthed! The Robin DL7S is equipped with auto-switching power supply that automatically adjusts to any 50-60Hz AC power source from 100-240 Volts. -
Page 7: Replacing Gobos
5. Remove the original gobo (2) and insert the new one (glazy side towards the light source). The Robe gobo has a small position point (8) at its edge which has to aimed at the position point (4) on the gobo holder (4). Insert the spring lock to secure correct gobo position in the gobo holder. -
Page 8: Rigging The Fixture
4.4 Rigging the fixture A structure intended for installation of the fixture(s) must safely hold weight of the fixture(s) placed on it. The structure has to be certificated to the purpose. The fixture (fixtures) must be installed in accordance with national and local electrical and construction codes and regulation. - Page 9 Truss installation 1. Bolt each clamp (1) to the omega holder (2) with M12 bolt and lock nut through the hole in the holder. 2. Fasten the omega holders to the bottom of the base by inserting both quick-lock fasteners (3) into the holes of the base and tighten fully clockwise.
-
Page 10: Dmx-512 Connection
4.5 DMX-512 connection The fixture is equipped with both 3-pin and 5-pin XLR sockets for DMX input and output.The sockets are wired in parallel. Only use a shielded twisted-pair cable designed for RS-485 and 3-pin or 5-pin XLR-plugs and connectors in order to connect the controller with the fixture or one fixture with another. -
Page 11: Ethernet Connection
4.6 Ethernet connection The fixtures on a data link are connected to the Ethernet with ArtNet communication protocol.The control soft- ware running on your PC (or light console) has to support Art-Net protocol. Art-Net communication protocol is a 10 Base T Ethernet protocol based on the TCP/IP.Its purpose is to allow transfer of large amounts of DMX 512 data over a wide area using standard network technology. - Page 12 Ethernet / DMX operation Option “ Artnet" (gMaI or gMA2 or sACN) has to be selected from “Ethernet Mode” menu at first fixture. Option “Ethernet To DMX” has to be selected from the “Ethernet Mode” menu at the first fixture (connected to the Ethernet) in the fixture chain, next fixtures have standard DMX setting.
-
Page 13: Wireless Dmx Operation
4.7 Wireless DMX operation The wireless version of the Robin DL7S Spot is equipped with the Lumen Radio CRMX module and antenna for receiving DMX signal. CRMX module operates on the 2.4 GHz band. The item " Wireless " from the menu "DMX Input" allows you to activate receiving of wireless DMX (Person- ality-->... -
Page 14: Remotely Controllable Functions
5. Remotely controllable functions Colour mixing system The colour mixing system allows switching among CMY, RGB and 7 colour system ( red, green, blue, amber, cyan, light green, Congo blue). Virtual colour wheel This wheel contains 80 preset colours, and 10 user-definable colours. To save user colours: 1.Set White Point Off (Channel Colour Mix Control, range 70-79 DMX). - Page 15 Pan/Tilt Fast pan/tilt movement due to built-in electronic motion stabilizer (EMS). The electronic motion stabilizer ensures precise position of the fixture´s head during its movement and reduces its swinging when the truss shakes. Pan /Tilt movement range: 0-540°/0-270°. Framing system orientation...
-
Page 16: Control Menu Map
6. Control menu map Default settings=Bold print Level 1 Level 2 Level 3 Level 4 Level 5 Level 6 Addressing Settings DMX Address 001-512 DMX Presets Mode 1 Mode 2 Mode 3 Mode 4 View Selected Preset Ethernet Settings Ethernet Mode Disable ArtNet gMAI... - Page 17 Level 1 Level 2 Level 3 Level 4 Level 5 Level 6 Module L-C Module O Module F-A Module F-B Module G Product IDs Mac Address RDM UID RDM Label View Logs Fixture Errors Pan Errors Temp.Sensor Errors Fixture States Power On Power Off Fixture Position...
- Page 18 Level 1 Level 2 Level 3 Level 4 Level 5 Level 6 1200W 2000W 25000W Init Effect Positions 0-255 Dimmer Fine 0-255 Screen Settings Display Intensity 1-10 Screen Saver Delay Off-10min. Touchscreen Lock Off-10min. Recalibrate Touchscreen Display Orientation Normal Inverted Auto Temperature Unit °C,°F...
- Page 19 Level 1 Level 2 Level 3 Level 4 Level 5 Level 6 Dimmer Fine 0-255 Step Time 0-25,5 sec. Service Adjust DMX Values 0-255 Dimmer Fine 0-255 Calibrations Calibrate Effects 0-255 Fr.Shut. 4 Swiv 0-255 Calibrate colours Red Calibration Green Calibration Blue Calibration Amber Calibration Cyan Calibration...
-
Page 20: Control Menu
7. Control menu The Robin DL7S Light is equipped with the QVGA Robe touch screen with battery backup which allows to set the fixture´s behaviour according to your needs, obtain information on its operation, test its various parts and lastly program it, if it has to be used in a stand-alone mode. -
Page 21: Tab " Address
Touch any part of the screen or press the [ENTER/Display On] button to display the initial screen with the cur- rent stored DMX address: Note: The green icon at the top right corner of the screen indicates the level of the display battery charging. If the whole icon is green, the battery is fully charged while the red icon indicates exhausted battery. -
Page 22: Tab "Information
sACN - Fixture receives sACN protocol Ethernet To DMX - Fixture receives protocol from the Ethernet input and sends DMX data to its DMX output (fixture works as an "Ethernet/DMX converter", next fixture can be connected to its DMX output and you can build a standard DMX chain by connecting another fixtures. Only one fixture has to be connected to the Ethernet. - Page 23 Max. - A maximum temperature of the LED PCBs since the fixture has been fabricated. Max. Res. - A maximum temperature of the LED PCBs since the counter was last reset. In order to reset some counter to 0, touch desired text box under item "Max.Res." LEDs Board Temperature - The menu shows temperature in the fixture head on the LEDs control PCB.
-
Page 24: Tab "Personality
Fixture Position Fixture temperatures- Recorded temperatures which have exceeded defined levels. Note: The log buffer can contain 8000 records max. If the buffer is full, old data will be overwritten. 7.3 Tab "Personality" User mode - The Robin DL7S allows you to recall two user settings. After switching the fixture on for the first time, the User A settings is active. - Page 25 Microphone Sensitivity - Enter the menu if you want to adjust the microphone sensitivity from 1 (max.) to 20 (min.). Blackout Settings - Use the menu if you need to close the light output under certain conditions which are described below Blackout DMC - Blackout during movement correction.
-
Page 26: Tab "Manual Control
Screen Settings - Use this menu to change the touch screen settings. Display Intensity - The item allows to control the intensity of the screen (1-min., 10-max.). Screen saver Delay - The item allows you to keep the screen on or to turn it off automatically after 1-10 minutes after last touch (or pressing any button on the control panel). - Page 27 Music Trigger - Use the item to activate the sound control of the running program via the built-in microphone. Preset Playback - This menu allows you to select the program which will be played in a loop after switching the fixture on (the option is commonly used in a stand-alone operation without an external controller). None - The option disables “Presetting playback”...
-
Page 28: Tab "Service
7.6 Tab "Service" Adjust DMX Values - The menu allows you to set all effects to desired positions before fine calibration of the effects . Calibrations - This menu enables fine calibration of fixture effects and download default calibration values. Calibrate Effects - The menu allows the fine adjustment of effects. - Page 29 - with the DMX input of the fixture if you using the flash cable RS232/DMX - with the DMX output of the Robe Universal Interface if you using the USB cable. Disconnect the fixture from the other fixtures in a DMX chain. Turn both the computer and the fixture on.
-
Page 30: Rdm
3. Run the Software Uploader program. Select desired COM and then click on the Connect button. (Select COM if the serial port is used or Robe Universal Interface if the USB port is used). If the connection is OK, click on the “Start Uploading button“ to start uploading. It will take several minutes to perform software update. -
Page 31: Error And Information Messages
9. Error and information messages Information icons - Air Filters Cleaning This icon signalizes that cleaning period of the air filters has elapsed and you have to clear air filters and reset the menu item "Elapsed Time". Errors Error in the fixture is signalled by the yellow warning icon at the bottom line of the screen: Touch the warning icon or press the [ESCAPE] button to display error messages. - Page 32 Fr. Shutter 1 Error 1 (Fr. Shutter 1 Error 1 ) The messages will appear after the reset of the framing shutters module if the frame 1 is not located in the default position. Fr. Shutter 2 Error 1 (Fr. Shutter 2 Error 1 ) The messages will appear after the reset of the framing shutters module if the frame 2 is not located in the default position.
-
Page 33: Technical Specifications
Amber 1 Short Error/ Amber 2 Short Error/ Amber 3 Short Error/ Amber 4 Short Error Some amber LEDs in the light source have short circuit or are disconnected. Red 1 Short Error/ Red 2 Short Error/ Red 3 Short Error/ Red 4 Short Error Some red LEDs in the light source have short circuit or are disconnected. - Page 34 Rotating gobo wheel 6 glass gobos can be indexed and rotated in both directions at different speeds Gobo wheel continuous rotation Glass gobos: outside diameter=30.8 mm, image diameter=25 mm, max. thickness=3.5 mm, high temperature borofloat or better glass "Slot&lock" system for easy replacement of gobos Gobo order: Prism Rotating 5-facet 10°...
- Page 35 Wireless DMX/RDM module (only for Wireles DMX version) Compliance with USITT DMX-512 (1986 & 1990) and 512-A Full DMX fidelity and frame integrity Auto sensing of DMX frame rate and frame size <5ms DMX latency Operational frequency range of 2402-2480 MHz Producer: LumenRadio Pan/Tilt Pan movement range 540°...
-
Page 36: Maintenance And Cleaning
Dimensions (mm) Accessories 1 x Omega adaptor CL-regular 2 pcs in box (P/N 10980033) 1 x Power cable 1 x Frost module 20° (P/N 15050009) Optional accessories Frost 10° (exchange) DL7S - assembled (P/N 10980288) Frost 30° (exchange) DL7S - assembled (P/N 10980289) Upgrade kit CRMX Univerzal 260 (P/N 9903 0100) Doughty Trigger Clamp (P/N 17030386) Safety wire 50 kg (P/N 99011957) -
Page 37: Disposing Of The Product
Optional accessories changed 27/04/2018 DMX protocol ver. 1.9 May 9, 2019 Copyright © 2015-2019 Robe Lighting - All rights reserved All Specifications subject to change without notice Made in CZECH REPUBLIC by ROBE LIGHTING s.r.o. Palackeho 416/20 CZ 75701 Valasske Mezirici... -
Page 38: Photometric Diagrams
13. Photometric diagrams... - Page 43 DMX protocol Robin DL7S Profile - DMX protocol Version: 1.9 Mode 1-CMY/RGB, Mode 2 -CMY/RGB reduced, Mode 3 -Seven colours, Mode 4 -Seven colours reduced Mode/channel Type of Function Value control 0 - 255 Pan movement by 540° (128=default) proportional...
- Page 44 DMX protocol Mode/channel Type of Function Value control 200 - 209 Total fixture reset step 210-224 Reserved The following RoboSpot related commands are only applicable when the RoboSpot is connected: 225 - 229 RoboSpot enabled step 230 - 234 RoboSpot disabled - except handle faders and pan/tilt step 235 - 239 RoboSpot fully disabled except pan/tilt step...
- Page 45 DMX protocol Mode/channel Type of Function Value control 40°C step 41°C step 42°C step 43°C step 44°C step 45°C step 46°C step 47°C step 48°C step 49°C step 50°C step 51°C step 52°C step 53°C step 54°C step 55°C step 56°C step 57°C...
- Page 46 DMX protocol Mode/channel Type of Function Value control Filter 100 (Spring Yellow) 21-22 step Filter 101 (Yellow) 23-24 step Filter 102 (Light Amber) 25-26 step Filter 103 (Straw) 27-28 step Filter 104 (Deep Amber) 29-30 step Filter 105 (Orange) 31-32 step Filter 106 (Primary Red) 33-34...
- Page 47 DMX protocol Mode/channel Type of Function Value control Filter 248 (Half Minus Green) 117-118 step 119-120 Filter 281 (Three Quarter C.T. Blue) step 121-122 Filter 285 (Three Quarter C.T. Orange) step Filter 352 (Glacier Blue) 123-124 step Filter 353 (Lighter Blue) 125-126 step Filter 715 (Cabana Blue)
- Page 48 DMX protocol Mode/channel Type of Function Value control 0 - 255 Colour saturation control - fine (255=default) proportional Green (8 bit) 0 - 255 Colour saturation control - coarse 0-100% (255=default) proportional Green (16bit) 0 - 255 Colour saturation control - fine (255=default) proportional Blue (8 bit) 0 - 255...
- Page 49 DMX protocol Mode/channel Type of Function Value control Range 0-69 DMX - only for Output mode: CRI Virtual colours ("Virtual" has priority) step 10-19 Maximum mode (highest values have priority) step 20-29 Minimum mode (lowest values have priority) step 30-39 Multiply mode (multiply Virtual and Colour mix) step 40-49...
- Page 50 DMX protocol Mode/channel Type of Function Value control 22-23 Macro 8 (Focus=145) step 24-25 Macro 9 (Focus=114) step 26-27 Macro 10 (Focus=104) step 28-255 Reserved Static gobo wheel In range 0-64 DMX is possible fine gobo positioning - set value at channel 24/32 Continual Positioning Open/hole (0=default)
- Page 51 DMX protocol Mode/channel Type of Function Value control Open/hole (0=default) step Gobo 1 step 9-13 Gobo 2 step 14-17 Gobo 3 step 18-22 Gobo 4 step 23-26 Gobo 5 step 27-31 Gobo 6 step Rotation - set rotation on channel 26/22/33/26 32-35 Gobo 1 step...
- Page 52 DMX protocol Mode/channel Type of Function Value control 20 - 127 5-facet rotating prism step Prism/gobo macros The following channels are blocked: Prism, Prism rotation, Rotating gobo wheel, Rot. Gobo indexing and rotation. 128 - 135 Macro 1 step 136 - 143 Macro 2 step 144 - 151 Macro 3 step...
- Page 53 DMX protocol Mode/channel Type of Function Value control 0-255 Fine zooming (0=default) proportional Focus 0 - 255 Continuous adjustment from far to near (128=default) proportional Focus - fine 0- 255 Fine focusing (0=default) proportional Reserved Framing shutters module rotation 0-127 Rotation from right (0°) to 45°...
- Page 54 DMX protocol Mode/channel Type of Function Value control 52-55 Macro 13 step 56-59 Macro 14 step 60-63 Macro 15 step 64-67 Macro 16 step 68-71 Macro 17 step 72-75 Macro 18 step 76-79 Macro 19 step 80-83 Macro 20 step 84-87 Macro 21 step...
- Page 55 Colour mixing mode Colour mixing mode 7 colours Output uniformity On Output uniformity Output mode Output consistency CRI selection UV stability Wavelength correction Copyright © 2015-2018 Robe Lighting s.r.o. - All rights reserved All Specifications subject to change without notice Page 13...
- Page 56 Colour macros on Virtual Colour Wheel Light Green Amber Congo Colour name Red DMX Blue DMX Cyan DMX Green Blue DMX Filter 4 (Medium Bastard Amber) Filter 10 (Medium Yellow) Filter 19 (Fire) Filter 26 (Bright Red) Filter 58 (Lavender) Filter 68 (Sky Blue) Filter 71 (Tokyo Blue) Filter 79 (Just Blue)
- Page 57 Light Green Amber Congo Colour name Red DMX Blue DMX Cyan DMX Green Blue DMX Filter 172 (Lagoon Blue) Filter 179 (Chrome Orange) Filter 180 (Dark Lavender) Filter 181 (Congo Blue) Filter 197 (Alice Blue) Filter 201 (Full C.T. Blue) Filter 202 (Half C.T.
Need help?
Do you have a question about the Robin DL7S Profile and is the answer not in the manual?
Questions and answers