Table of Contents
Advertisement
O
m
n
i
X
L
T
O
m
n
i
X
L
I
N
S
T
I
N
S
T
●
O
m
n
i
X
L
T
1
0
●
O
m
n
i
X
L
T
1
0
●
O
m
n
i
X
L
T
1
2
7
●
O
m
n
i
X
L
T
1
2
7
S
e
r
i
e
s
T
T
S
e
r
i
e
s
R
U
C
T
I
O
N
M
R
U
C
T
I
O
N
M
2
●
O
m
n
i
X
L
T
1
0
2
2
●
O
m
n
i
X
L
T
1
0
2
●
O
m
n
i
X
L
T
1
5
0
●
O
m
n
i
X
L
T
1
5
0
e
l
e
s
c
o
p
T
e
l
e
s
c
o
p
A
N
U
A
L
A
N
U
A
L
E
D
●
O
m
n
i
X
L
T
1
2
E
D
●
O
m
n
i
X
L
T
1
2
●
O
m
n
i
X
L
T
1
5
0
●
O
m
n
i
X
L
T
1
5
0
e
s
e
s
0
0
R
R
Advertisement
Table of Contents

Related Manuals for Celestron OMNI XLT 102


Summary of Contents for Celestron OMNI XLT 102
- Page 1 ● ● ● ● ● ● ● ● ● ● ● ●...
-
Page 2: Table Of Contents
Installing the Counterweight Bar... 10 Installing the Counterweights... 11 Attaching the Slow Motion Control Knobs (Cables)... 11 Attaching the Telescope Tube to the Mount... 12 Installing the Finderscope... 13 Installing the Visual Back... 13 Installing the Star Diagonal ... 14 Installing the Eyepieces ... - Page 3 Collimation of Refractors ... 41 Collimation of a Schmidt-Cassegrain... 42 Collimation of a Newtonian ... 44 OPTIONAL ACCESSORIES ... 48 APPENDIX A - TECHNICAL SPECIFICATIONS ...51 APPENDIX B - GLOSSARY OF TERMS... 52 SKY MAPS... 55 CELESTRON TWO YEAR WARRANTY ... 61...
-
Page 4: Introduction
All this adds up to a telescope that gives you a lifetime of pleasure with a minimal amount of maintenance. Furthermore, your Celestron telescope is versatile — it will grow as your interest grows. This instruction manual covers all the different models of the Omni XLT telescopes. - Page 5 Figure 1-1 Omni XLT 102 Refractor (Omni XLT 102ED, Omni XLT 120 and Omni XLT 150R refractors are similar) Optical Tube Tube Rings Finderscope Eyepiece Equatorial Mount Latitude Adjustment Screw 1.75" Steel Tripod Accessory Tray/ Leg Brace Counterweights Counterweight Bar...
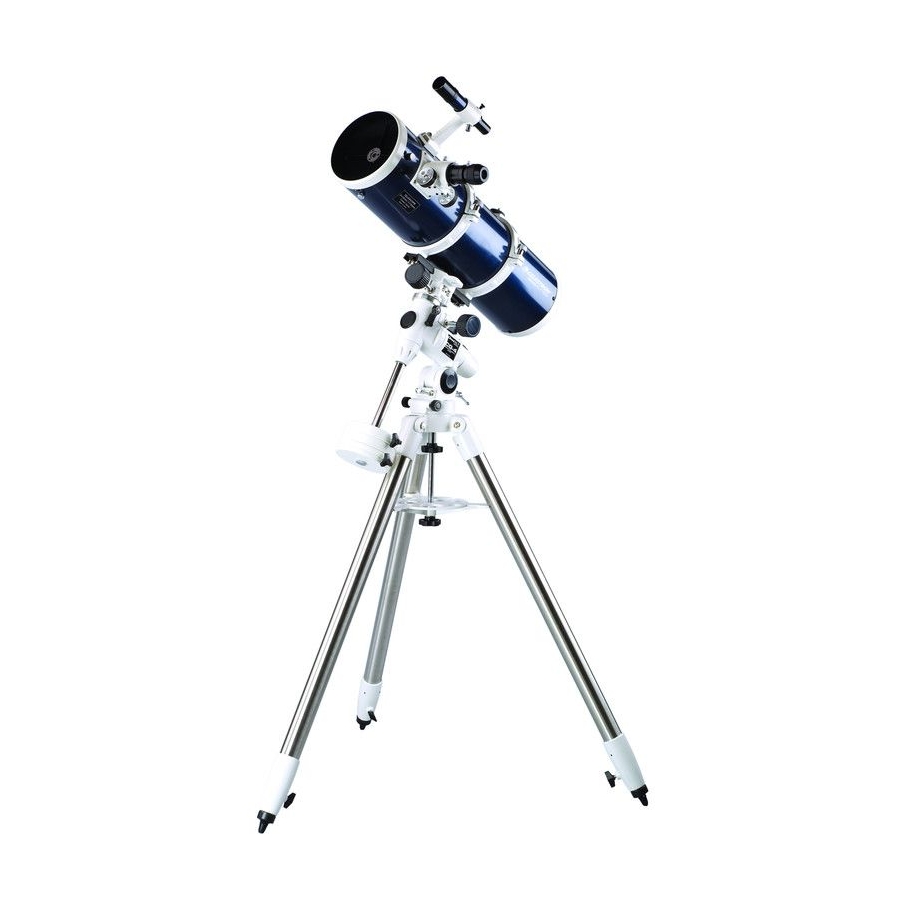
- Page 6 Figure 1-2 Omni XLT 150 Newtonian Finderscope Finderscope Bracket Focuser Eyepiece Tube Rings Equatorial Mount 1.75" Steel Tripod Accessory Tray/ Leg Brace Counterweights Counterweight Bar Dovetail Slide Bar Optical Tube - 6 -...
- Page 7 Figure 1-3 Omni XLT 127 Schmidt-Cassegrain Optical Tube Finderscope Finderscope Bracket Equatorial Mount Latitude Scale Accessory Tray/ Leg Brace 1.75" Steel Tripod Counterweights Counterweight Bar Declination Setting Circle Dovetail Slide Bar Schmidt Corrector Lens - 7 -...
-
Page 8: Assembly
Omni telescope models and the optical tubes have some differences which will be noted. Your Omni telescope should be set up indoor the first time so that it is easy to identify the various parts and familiarize you with the correct assembly procedure before attempting it outdoor. -
Page 9: Attaching The Equatorial Mount
The equatorial mount allows you to tilt the telescope’s axis of rotation so that you can track the stars as they move across the sky. The Omni mount is a German equatorial mount that attaches to the tripod head. On one side of the tripod head there is a metal alignment peg for aligning the mount. -
Page 10: Attaching The Center Leg Brace
Thread the accessory tray knob onto the central rod and tighten. To properly balance the telescope, the mount comes with a counterweight bar and two counterweights. To install the counterweight bar: 1. Remove the counterweight safety screw from the counterweight bar (opposite of the threaded end). -
Page 11: Installing The Counterweights
Since the fully assembled telescope can be quite heavy, position the mount so that the polar axis is pointing towards north before the tube assembly and counterweights are attached. alignment procedure much easier. Each Omni mount comes with two counterweights (One weighs 7 lbs./3.2kg and the other weighs 4 lbs./1.8kg). To install the counterweights: 1. -
Page 12: Attaching The Telescope Tube To The Mount
6. Put the polar axis cap over the polar axis. It is held into place by a tension fit. The telescope optical tube attaches to the mount via a dovetail slide bar mounting bracket. For the refractors and the Newtonian, the mounting bracket is the long bracket which is attached to the tube rings. For the Schmidt- Cassegrain the mounting bracket is attached along the bottom of the telescope tube. -
Page 13: Installing The Finderscope
Toward the rear of the telescope tube (on refractors and Schmidt-Cassegrain) and front of the telescope tube (Newtonian), there is a small bracket with a set screw in it. This is where the finderscope bracket will be mounted. -
Page 14: Installing The Star Diagonal
Refractors – To use the Star Diagonal with refractor telescopes, insert it into the 1 ¼” eyepiece adapter. The eyepiece, or ocular as it is also called, is an optical element that magnifies the image focused by the telescope. Without the eyepiece it would be impossible to use the telescope visually. The eyepiece fits directly into the focuser of refractors and the Newtonian or into the visual back on the Schmidt-Cassegrain. -
Page 15: Moving The Telescope Manually
To make rough adjustments, loosen the R.A. and DEC clutch knobs slightly and move the telescope in the desired direction. Both the R.A. and DEC axis have lock levers to clutch down each axis of the telescope. To loosen the clutches on the telescope, rotate the lock levers counterclockwise. -
Page 16: Balancing The Mount In Dec
(Fig 2-13) is released. To balance the telescope in DEC (all telescopes except the SCT): 1. Release the R.A. clamp and rotate the telescope so that it is on one side of the mount (i.e., as described in the previous section on balancing the telescope in R.A.). -
Page 17: Adjusting The Mount In Altitude
Adjustment Screw Azimuth Adjustment Screw For rough adjustments in azimuth, simply pick up the telescope and tripod and move it. For fine adjustments in azimuth: • Turn the azimuth adjustment knobs located on either side of the azimuth housing (see Fig 2-16). While standing behind the telescope, the knobs are on the front of the mount. -
Page 18: Telescope Basics
There light is bent forward in the tube to a single point, its focal point. Since putting your head in front of the telescope to look at the image with an eyepiece would keep the reflector from working, a flat mirror called a diagonal intercepts the light and points it out the side of the tube at right angles to the tube. - Page 19 The Schmidt-Cassegrain optical system (Schmidt-Cass or SCT for short) uses a combination of mirrors and lenses and s referred to as a compound or catadioptric telescope. This unique design offers large-diameter optics while maintaining very short tube lengths, making them extremely portable. The Schmidt-Cassegrain system consists of a zero power corrector plate, a spherical primary mirror, and a secondary mirror.
-
Page 20: Image Orientation
The image orientation changes depending on how the eyepiece is inserted into the telescope. When using the star diagonal with refractors and Schmidt-Cassegrains, the image is right-side-up, but reversed from left-to-right (i.e., mirror image). If inserting the eyepiece directly into the focuser of a refractor or the visual back of the Schmidt- Cassegrain (i.e., without the star diagonal), the image is upside-down and reversed from left-to-right (i.e., inverted). -
Page 21: Aligning The Finderscope
Although the power is variable, each instrument under average skies has a limit to the highest useful magnification. The general rule is that 60 power can be used for every inch of aperture. For example, the Omni XLT 102 is 4 inches in diameter. -
Page 22: Determining Field Of View
Continuing with our example, multiply the angular field of 1.25° by 52.5 and this produces a linear field width of 65.6 feet at a distance of one thousand yards. The apparent field of each eyepiece that Celestron manufactures is found in the Celestron Accessory Catalog (# 93685) When working with any optical instrument, there are a few things to remember to ensure you get the best possible image. -
Page 23: Astronomy Basics
Up to this point, this manual covered the assembly and basic operation of your telescope. However, to understand your telescope more thoroughly, you need to know a little about the night sky. This section deals with observational astronomy in general and includes information on the night sky and polar alignment. -
Page 24: Motion Of The Stars
The daily motion of the Sun across the sky is familiar to even the most casual observer. This daily trek is not the Sun moving as early astronomers thought, but the result of the Earth's rotation. The Earth's rotation also causes the stars to do the same, scribing out a large circle as the Earth completes one rotation. -
Page 25: Latitude Scale
1. Set the telescope up so that the polar axis is pointing north. 2. Loosen the DEC clutch knob and move the telescope so that the tube is parallel to the polar axis. When this is done, the declination setting circle will read +90°. If the declination setting circle is not aligned, move the telescope so that the tube is parallel to the polar axis. -
Page 26: Finding The North Celestial Pole
Remember, while Polar aligning, DO NOT move the telescope in R.A. or DEC. You do not want to move the telescope itself, but the polar axis. The telescope is used simply to see where the polar axis is pointing. Like the previous method, this gets you close to the pole but not directly on it. The following methods help improve your accuracy for more serious observations and photography. -
Page 27: Polar Alignment In The Southern Hemisphere
If you are observing from Sydney, which is at latitude -34°, then the celestial pole is 34° above the southern horizon. All a latitude scale does then is to point the polar axis of the telescope at the right elevation above the southern horizon. -
Page 28: Pointing At Sigma Octantis
This method utilizes Sigma Octantis as a guidepost to the celestial pole. Since Sigma Octantis is about 1° degree from the south celestial pole, you can simply point the polar axis of your telescope at Sigma Octantis.. Although this is by no means perfect alignment, it does get you within one degree. Unlike the previous method, this must be done in the dark when Sigma Octantis is visible. -
Page 29: Declination Drift Method Of Polar Alignment
Insert the cross hair eyepiece and align the cross hairs so that one is parallel to the declination axis and the other is parallel to the right ascension axis. Move your telescope manually in R.A. and DEC to check parallelism. -
Page 30: Aligning The R.a. Setting Circle
2. Center the star in the finderscope. 3. Look through the main telescope and see if the star is in the field. If not, find it and center it. 4. If you purchased an optional motor drive, start it now so that it will track the star. -
Page 31: Using The R.a. Vernier Scale
18 h 50 m mark and the 19 h 00 m mark on the R.A. setting circle! 5. Look through the telescope and the Ring Nebula should be within the field of view if you are using a low power eyepiece (assuming you have already set the DEC). -
Page 32: Celestial Observing
• To increase contrast and bring out detail on the planetary surface, try using Celestron eyepiece filters. Often, it is tempting to look at the Moon when it is full. At this time, the face we see is fully illuminated and its light can be overpowering. -
Page 33: Observing The Sun
The best time to observe the Sun is in the early morning or late afternoon when the air is cooler. • To center the Sun without looking into the eyepiece, watch the shadow of the telescope tube until it forms a circular shadow. -
Page 34: Seeing
Filters are commonly used to bring out particular planetary detail, such as the polar caps on Mars or the bands and zones around Jupiter. The use of Celestron's Minus Violet Refractor Filter (#94121) reduces the effect of chromatic aberration as well as improves contrast and resolution. -
Page 35: Astrophotography
Canon, Olympus, Nikon, Pentax, etc. have made such camera bodies. The camera must have interchangeable lenses so you can attach it to the telescope and use a variety of lenses for piggyback photography. If you can't find a new camera, you can purchase a used camera body that is not 100- percent functional. -
Page 36: Short Exposure Prime Focus Photography For Refractors & Newtonians
4. Set the shutter speed to the “B” setting and focus the lens to the infinity setting. 5. Locate the area of the sky that you want to photograph and move the telescope so that it points in that direction. -
Page 37: Eyepiece Projection For A Schmidt-Cassegrain
In order to get the image large enough, you must attach your camera to the telescope with the eyepiece in place. To do so, you need two additional accessories; a deluxe tele-extender (#93643), which attaches to the visual back, and a T-ring for your particular camera make (i.e., Canon, Nikon, Pentax, etc.). -
Page 38: Long Exposure Prime Focus Photography
To accomplish this you need a guiding ocular with an illuminated reticle to monitor your guide star. For this purpose, Celestron offers the Micro Guide Eyepiece (# 94171). Here is a brief summary of the technique:... -
Page 39: Planetary And Lunar Photography With Special Imagers
During the last few years a new technology has evolved which makes taking superb images of the planets and moon relatively easy and the results are truly amazing. Celestron offers the NexImage (# 93712) which is a special camera and included is software for image processing. You can capture planetary mages your first night out which rivals... -
Page 40: Ccd Imaging For Deep Sky Objects
Your telescope makes an excellent telephoto lens for terrestrial (land) photography. Your telescope is in essence a long focal length telephoto lens. 35mm SLR cameras are mounted directly to the telescope (using the built-in T- Adapter on the refractors and Newtonian or using the # 93633-A T-Adapter for the Schmidt-Cassegrain). For using a digital camera you will need the Universal Digital Camera Adapter (# 93626). -
Page 41: Telescope Maintenance
NOT sealed, the covers should be placed over the openings when not in use. This will prevent contaminants from entering the optical tube. Internal adjustments and cleaning should be done only by the Celestron repair department. If your telescope is in need of internal cleaning, please call the factory for information. -
Page 42: Collimation Of A Schmidt-Cassegrain
Pick a bright star and center it in the field of the telescope. Study the image of the star while racking it in and out of focus using an eyepiece that yields 30 to 60 power for every inch of aperture. If an unsymmetrical focus pattern is present, then collimation is necessary. - Page 43 2. Place your finger along the edge of the front cell of the telescope (be careful not to touch the corrector plate), pointing towards the collimation screws. The shadow of your finger should be visible when looking into the eyepiece.
-
Page 44: Aligning The Secondary Mirror
Before collimating your telescope, take time to familiarize yourself with all its components. The primary mirror is the large mirror at the back end of the telescope tube. This mirror is adjusted by loosening and tightening the three screws, placed 120 degrees apart, at the end of the telescope tube. The secondary mirror (the small, elliptical mirror under the focuser, in the front of the tube) also has three adjustment screws. - Page 45 Newtonian collimation views as seen through the focuser using the collimation cap Secondary mirror needs adjustment Both mirrors aligned with the collimating cap in the focuser. Primary mirror needs adjustment Secondary Mirror Primary Mirror Both mirrors aligned with your eye looking into the focuser.
-
Page 46: Night Time Star Collimating
After successfully completing daytime collimation, night time star collimation can be done by closely adjusting the primary mirror while the telescope tube is on its mount and pointing at a bright star. The telescope should be set up at night and a star's image should be studied at medium to high power (30-60 power per inch of aperture). If a non- symmetrical focus pattern is present, then it may be possible to correct this by re-collimating only the primary mirror. - Page 47 IMPORTANT: After making the first, or each adjustment, it is necessary to re-aim the telescope tube to re-center the star again in the center of the field of view. The star image can then be judged for symmetry by going just inside and outside of exact focus and noting the star's pattern.
-
Page 48: Optional Accessories
You will find that additional accessories for your Omni telescope will enhance your viewing pleasure and expand the usefulness of your telescope. This is just a short listing of various accessories. Visit the Celestron website for complete and detailed accessories available. - Page 49 (included). Diagonal 2" Mirror (# 93519) - Celestron offers a 2" 90° Mirror Diagonal to thread on Schmidt- Cassegrain telescopes or slides into the barrel of a 2" refractor focuser. This diagonal includes an adapter to accept 1¼"...
- Page 50 It makes guiding easier and exposures much shorter. Sky Maps (# 93722) - Celestron Sky Maps are the ideal teaching guide for learning the night sky. You wouldn’t set off on a road trip without a road map, and you don’t need to try to navigate the night sky without a map either.
-
Page 51: Appendix A Technical Specifications
Appendix A Technical Specifications Omni XLT Series 21088 Omni XLT 102 Optical Design Refractor Aperture 102mm (4.0") Focal Length 1000mm Focal Ratio Optical Coatings Starbright XLT Finderscope 6x30 Star Diagonal 1.25" Eyepiece - std. 1.25" MC 50° FOV 25mm (40x) -
Page 52: Appendix B - Glossary Of Terms
Sun against the stars". Equatorial Mount A telescope mounting in which the instrument is set upon an axis which is parallel to the axis of the Earth; the angle of the axis must be equal to the observer's latitude. - Page 53 1 and those increasingly fainter from 2 down to magnitude 5. The faintest star that can be seen without a telescope is about magnitude 6. Each magnitude step corresponds to a ratio of 2.5 in brightness. Thus a star of magnitude 1 is 2.5 times brighter than a star of magnitude 2, and 100 times brighter than a magnitude 5 star.
- Page 54 Bernhard Voldemar Schmidt (1879-1935). Sidereal Rate This is the angular speed at which the Earth is rotating. Telescope tracking motors drive the telescope at this rate. The rate is 15 arc seconds per second or 15 degrees per hour. Terminator boundary...
-
Page 61: Celestron Two Year Warranty
Celestron, is found to be defective in materials or workmanship. As a condition to the obligation of Celestron to repair or replace such product, the product must be returned to Celestron together with proof-of-purchase satisfactory to Celestron. - Page 62 Celestron 2835 Columbia Street Torrance, CA 90503 U.S.A. Tel. (310) 328-9560 Fax. (310) 212-5835 Website www.celestron.com Copyright 2008 Celestron All rights reserved. (Products or instructions may change without notice or obligation.) Item # 21088-INST Rev. 02 Printed in China $10.00...
Need help?
Do you have a question about the OMNI XLT 102 and is the answer not in the manual?
Questions and answers