Table of Contents
Advertisement
Quick Links
Advertisement
Table of Contents

Related Manuals for Celestron Cpc 800 XLT


Summary of Contents for Celestron Cpc 800 XLT
-
Page 2: Table Of Contents
INTRODUCTION......................................4 ........................................4 ASSEMBLY........................................6 CPC ....................................6 SSEMBLING THE Setting up the Tripod ....................................6 Adjusting the Tripod Height ..................................7 Attaching the CPC to the Tripod ................................7 Adjusting the Clutches .....................................8 The Star Diagonal ....................................8 The Eyepiece......................................9 The Finderscope ......................................9 Finderscope Installation......................................9 Aligning the Finderscope...................................... - Page 3 Focusing ........................................26 Calculating Magnification..................................27 Determining Field of View ..................................27 General Observing Hints..................................27 ASTRONOMY BASICS ....................................28 The Celestial Coordinate System................................28 Motion of the Stars ....................................29 Polar Alignment (with optional Wedge) ..............................30 All-Star Polar Alignment ..................................30 All-Star Polar Alignment......................................30 Finding the North Celestial Pole ................................31 Declination Drift Method of Polar Alignment ................................
-
Page 4: Introduction
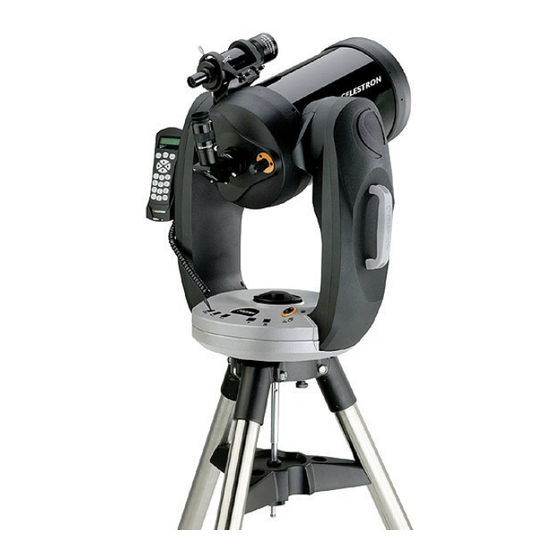
Congratulations on your purchase of the Celestron CPC telescope! The CPC GPS ushers in the next generation of computer automated telescopes. The CPC series uses GPS (Global Positioning System) technology to take the guesswork and effort out of aligning and finding celestial objects in the sky. - Page 5 Figure 2 – The CPC Series Control Panel (see below) Optical Tube Focus Knob Schmidt Corrector Lens Star Diagonal Fork Arm Hand Control Carrying Handle Eyepiece Right Ascension Locking Knob Finderscope Tripod Finderscope Quick Release Bracket Accessory Tray / Center Support Bracket Hand Control Port Auto Guider Port Auxiliary Port s...
-
Page 6: Assembly
For maximum rigidity, the Celestron heavy duty tripod has a leg support bracket/accessory tray. This bracket fits snugly against the tripod legs, increasing stability while reducing vibration and flexure. However, the tripod must be shipped with the leg support bracket detached so the tripod legs can collapse. -
Page 7: Adjusting The Tripod Height
Tripod Head Center Support Bracket / Central Column Accessory tray Tension Knob Extension Leg Clamp Figure 3-1 Figure 3-1 The tripod that comes with your CPC telescope is adjustable. To adjust the height at which the tripod stands: Loosen the extension clamp on one of the tripod legs (see figure 3-1). Extend the leg to the desired height. -
Page 8: Adjusting The Clutches
Rotate the telescope base on the tripod head until the three feet on the bottom of the base fall into the feet recesses on the top of the tripod head. Thread the three attached mounting bolts from underneath the tripod head into the bottom of the telescope base. Tighten all three bolts. You are now ready to attach the visual accessories onto the telescope optical tube. -
Page 9: The Eyepiece
The eyepiece, is the optical element that magnifies the image focused by the telescope. The eyepiece fits into either the visual back directly or the star diagonal. To install the eyepiece: Loosen the thumbscrew on the star diagonal so it does not obstruct the inner diameter of the eyepiece end of the diagonal. Slide the chrome portion of the eyepiece into the star diagonal. -
Page 10: Aligning The Finderscope
With the bracket firmly attached to the telescope, you are ready to attach the finder to the bracket. Slide the O-Ring over the back of the finderscope and position it on the tube toward the objective end of the finderscope. Alignment Screws Slide the eyepiece end of the finderscope into the front ring of the bracket (the front ring is the one without the adjustment screws),... -
Page 11: Powering The Cpc
Powering the CPC The CPC can be powered by the supplied 12v car battery adapter or optional power supply (see Optional Accessories section in the back of this manual). To power the CPC with the car battery adapter, simply plug the round post into the designated 12v power outlet located on the drive base. -
Page 12: Hand Control
The CPC is controlled by Celestron’s NexStar hand controller designed to give you instant access to all the functions the CPC has to offer. With automatic slewing to over 40,000 objects, and common sense menu descriptions, even a beginner can master its variety of features in just a few observing sessions. -
Page 13: Hand Control Operation
List – For quick access, all of the best and most popular objects in the NexStar database have been broken down into lists based on their type and/or common name: Named Stars Common name listing of the brightest stars in the sky. Alphabetical listing of over 50 of the most popular deep Named Objects sky objects. - Page 14 Align requires no knowledge of the night sky it is not necessary to know the name of the stars that you are aiming. You may even select a planet or the moon. The CPC is then ready to start finding and tracking any of the objects in its 40,000+ object database. Before the telescope is ready to be aligned, it should be set up in an outside location with all accessories (eyepiece, diagonal and finderscope) attached and lens cover removed as described in the Assembly section of the manual.
-
Page 15: Auto Two-Star Align
• Rarely SkyAlign will not be able to determine what three alignment objects were centered. This sometime happens when a bright planet or the Moon passes near one of the brighter stars. In situations like these it is best to try to avoid aligning to either object if possible. -
Page 16: One-Star Align
CPC will then ask you to select and center a second alignment star and press the ALIGN key. It is best to choose alignment stars that are a good distance away from one another. Stars that are at least 40º to 60º apart from each other will give you a more accurate alignment than stars that are close to each other. -
Page 17: Eq North / Eq South Alignment
EQ North / EQ South Alignment EQ North and EQ South Alignments assist the user in aligning the telescope when polar aligned on an optional equatorial wedge. Similar to the Altazimuth alignments described earlier, the EQ alignments gives you the choice of performing an AutoAlign, Two-Star alignment, One-Star alignment or Solar System alignment. -
Page 18: Cpc Re-Alignment
CPC Re-Alignment The CPC has a re-alignment feature which allows you to replace either of the original alignment stars with a new star or celestial object. This can be useful in several situations: • If you are observing over a period of a few hours, you may notice that your original alignment stars have drifted towards the west considerably. -
Page 19: Slewing To An Object
Once the desired object is displayed on the hand control screen, choose from the following options: • Press the INFO Key. This will give you useful information about the selected object such as R.A. and declination, magnitude size and text information for many of the most popular objects. •... -
Page 20: Rate Button
Pressing the RATE key (11) allows you to instantly change the speed rate of the motors from high speed slew rate to precise guiding rate or anywhere in between. Each rate corresponds to a number on the hand controller key pad. The number 9 is the fastest rate (3º per second, depending on power source) and is used for slewing between objects and locating alignment stars. -
Page 21: View Time-Site
Sidereal This rate compensates for the rotation of the Earth by moving the telescope at the same rate as the rotation of the Earth, but in the opposite direction. When the telescope is polar aligned, this can be accomplished by moving the telescope in right ascension only. -
Page 22: Precise Goto
Object or Messier catalogs, the hand control will let you know that the Ring Nebula (M57) is approximately 6° from your current position. Searching the Double Star catalog will reveal that Epsilon Lyrae is only 1° away from Vega. To use the Identify feature: •... -
Page 23: Slew Limits
pause when pressing the button, go with the higher value for positive, but use a lower value for negative. CPC will remember these values and use them each time it is turned on until they are changed. Slew Limits – Sets the limits in altitude that the telescope can slew without displaying a warning message. By default the slew limits are set to 0º... -
Page 24: Version
Factory Setting – Returns the CPC hand control to its original factory setting. Parameters such as backlash compensation values, initial date and time, longitude/latitude along with slew and filter limits will be reset. The hand control will ask you to press the "0" key before returning to the factory default setting. - Page 25 CPC READY MENU ALIGNMENT LIST NAMED STARS TRACKING SKY ALIGN MODE GPS LINKING CENTER ALIGNMENT OBJECT 1 ALT-AZ CENTER ALIGNMENT OBJECT 2 SOLAR SYSTEM EQ NORTH CENTER ALIGNMENT OBJECT 3 TOUR EQ SOUTH AUTO TWO-STAR ALIGN VARIABLE STARS RATE GPS LINKING ABELL SIDEREAL SELECT STAR 1...
-
Page 26: Telescope Basics
A telescope is an instrument that collects and focuses light. The nature of the optical design determines how the light is focused. Some telescopes, known as refractors, use lenses. Other telescopes, known as reflectors, use mirrors. The Schmidt-Cassegrain optical system (or Schmidt-Cass for short) uses a combination of mirrors and lenses and is referred to as a compound or catadioptric telescope. -
Page 27: Calculating Magnification
.9° by 52.5. This produces a linear field width of 47 feet at a distance of one thousand yards. The apparent field of each eyepiece that Celestron manufactures is found in the Celestron Accessory Catalog (#93685). -
Page 28: Astronomy Basics
Up to this point, this manual covered the assembly and basic operation of your CPC telescope. However, to understand your telescope more thoroughly, you need to know a little about the night sky. This section deals with observational astronomy in general and includes information on the night sky and polar alignment. -
Page 29: Motion Of The Stars
The daily motion of the Sun across the sky is familiar to even the most casual observer. This daily trek is not the Sun moving as early astronomers thought, but the result of the Earth's rotation. The Earth's rotation also causes the stars to do the same, scribing out a large circle as the Earth completes one rotation. -
Page 30: Polar Alignment (With Optional Wedge)
Even though the CPC can precisely track a celestial object while in the Alt-Az position, it is still necessary to align the polar axis of the telescope (the fork arm) to the Earth's axis of rotation in order to do long exposure astrophotography. To do an accurate polar alignment, the CPC requires an optional equatorial wedge between the telescope and the tripod. -
Page 31: Finding The North Celestial Pole
Slew the telescope to one of the original alignment stars, or another bright star if the original alignment stars are no longer in a convenient location. Press the Align button and use the Up/Down buttons on the hand controller to select Alignment Stars from the list. -
Page 32: Declination Drift Method Of Polar Alignment
Declination Drift Method of Polar Alignment This method of polar alignment allows you to get the most accurate alignment on the celestial pole and is required if you want to do long exposure deep-sky astrophotography through the telescope. The declination drift method requires that you monitor the drift of selected stars. The drift of each star tells you how far away the polar axis is pointing from the true celestial pole and in what direction. -
Page 33: Celestial Observing
See the "Seeing Conditions" section later in this section. To increase contrast and bring out detail on the planetary surface, try using Celestron eyepiece filters. -
Page 34: Observing The Sun
Although overlooked by many amateur astronomers, solar observation is both rewarding and fun. However, because the Sun is so bright, special precautions must be taken when observing our star so as not to damage your eyes or your telescope. Never project an image of the Sun through the telescope. Because of the folded optical design, tremendous heat build-up will result inside the optical tube. - Page 35 temperature layers have different densities and, therefore, bend light differently. Light rays from the same object arrive slightly displaced creating an imperfect or smeared image. These atmospheric disturbances vary from time-to-time and place-to-place. The size of the air parcels compared to your aperture determines the "seeing" quality. Under good seeing conditions, fine detail is visible on the brighter planets like Jupiter and Mars, and stars are pinpoint images.
-
Page 36: Celestial Photography
Short exposure prime focus photography is the best way to begin recording celestial objects. It is done with the camera attached to the telescope without an eyepiece or camera lens in place. To attach your camera you need the Celestron T-Adapter (#93633-A) and a T-Ring for your specific camera (i.e., Minolta, Nikon, Pentax, etc.). -
Page 37: Eyepiece Projection
Focus the telescope by turning the focus knob until the image is sharp. Set the shutter speed to the appropriate setting (see table below). Trip the shutter using a cable release. Advance the film and repeat the process. Lunar Phase ISO 50 ISO 100 ISO 200... -
Page 38: Long Exposure Prime Focus Photography
To accomplish this you need a guiding ocular with an illuminated reticle to monitor your guide star. For this purpose, Celestron offers the Micro Guide Eyepiece (#94171) Here is a brief summary of the technique. -
Page 39: Periodic Error Correction (Pec)
Thread the T-Ring onto the Radial Guider. Mount your camera body onto the T-Ring the same as you would any other lens. Set the shutter speed to the "B" setting. Focus the telescope on a star. Center your subject in the field of your camera. Find a suitable guide star in the telescope field. -
Page 40: Terrestrial Photography
Helpful Hint Once the worm gear is indexed, it will not need to be positioned again until the telescope is turned-off. So, to give yourself more time to prepare for guiding, it is best to restart PEC recording after the worm gear has found its index. After 8 minutes PEC will automatically stop recording. -
Page 41: F/6.3 With Reducer/Corrector
Blurry pictures can also result from shutter speeds that are too slow. To prevent this, use films that produce shutter speeds greater than 1/250 of a second when hand-holding the lens. If the lens is mounted on a tripod, the exposure length is virtually unlimited. Another way to reduce vibration is with the Vibration Suppression Pads (#93503). -
Page 42: Telescope Maintenance
This will prevent contaminants from entering the optical tube. Internal adjustments and cleaning should be done only by the Celestron repair department. If your telescope is in need of internal cleaning, please call the factory for a return authorization number and price quote. - Page 43 To accomplish this, you need to tighten the secondary collimation screw(s) that move the star across the field toward the direction of the skewed light. These screws are located on the secondary mirror holder (see figure 9-1). To access the collimation screws you will need remove the collimation screw cover to expose the three collimation screws underneath.
-
Page 44: Optional Accessories
Ultima eyepieces. Model #93507 is a compact achromatic Barlow lens that is under three inches long and weighs only 4 oz. It works very well with all Celestron eyepieces. - Page 45 Celestron offers filters for CPC 800 (#94162). T-Adapter (#93633-A) - T-Adapter (with additional T-Ring) allows you to attach your SLR camera to the rear cell of your Celestron CPC. This turns your CPC into a high power telephoto lens perfect for terrestrial photography and short exposure lunar and filtered solar photography.
-
Page 46: Appendix A - Technical Specifications
Appendix A - Technical Specifications Optical Specification CPC 800 - #11073 CPC 925 - #11074 CPC 1100 - #11075 Design Schmidt-Cassegrain Catadioptric Schmidt-Cassegrain Catadioptric Schmidt-Cassegrain Catadioptric Aperture 8" (203.2mm) 9.25" (235mm) 11" (279mm) Focal Length 2032mm 2350mm 2800mm F/ratio of the Optical System Primary Mirror: Material Fine Annealed Pyrex... -
Page 47: Appendix B - Glossary Of Terms
Appendix B - Glossary of Terms Absolute magnitude The apparent magnitude that a star would have if it were observed from a standard distance of 10 parsecs, or 32.6 light-years. The absolute magnitude of the Sun is 4.8. at a distance of 10 parsecs, it would just be visible on Earth on a clear moonless night away from surface light. - Page 48 Jovian Planets Any of the four gas giant planets that are at a greater distance form the sun than the terrestrial planets. Kuiper Belt A region beyond the orbit of Neptune extending to about 1000 AU which is a source of many short period comets.
- Page 49 Bernhard Voldemar Schmidt (1879-1935). Sidereal Rate This is the angular speed at which the Earth is rotating. Telescope tracking motors drive the telescope at this rate. The rate is 15 arc seconds per second or 15 degrees per hour. Terminator The boundary line between the light and dark portion of the moon or a planet.
-
Page 50: Appendix C - Rs-232 Connection (For Computerized Hand Control)
You can control your NexStar telescope with a computer via the RS-232 port on the computerized hand control and using an optional RS-232 cable (#93920). Once connected, the NexStar can be controlled using popular astronomy software programs. Communication Protocol: NexStar-i communicates at 9600 bits/sec, No parity and a stop bit. All angles are communicated with 16 bit angle and communicated using ASCII hexadecimal. -
Page 51: Appendix F - Time Zone Map
APPENDIX F – MAPS OF TIME ZONES... -
Page 59: Observational Data Sheet
Observational Data Sheet Yearly Meteor Showers Shower Date Peak Hourly Rate Quadrantids Jan 01-Jan 05 4-Jan 60-200 Lyrids Apr 16-Apr 25 21-Apr Puppids Apr 15-Apr 28 23-Apr Var. eta-Aquarids Apr 19-May 28 5-May June Bootids Jun 26-Jul 02 27-Jun Var. July Phoenicids Jul 10-Jul 16 13-Jul Var. - Page 60 Celestron warrants this telescope to be free from defects in materials and workmanship for two years. Celestron will repair or replace such product or part thereof which, upon inspection by Celestron, is found to be defective in materials or workmanship. As a condition to the obligation of Celestron to repair or replace such product, the product must be returned to Celestron together with proof-of-purchase satisfactory to Celestron.
- Page 61 Celestron 2835 Columbia Street Torrance, CA 90503 Tel. (310) 328-9560 Fax. (310) 212-5835 Web site at http//www.celestron.com Copyright 2009 Celestron All rights reserved. (Products or instructions may change without notice or obligation.) Item # 11073- INST $10.00 08-09...
Need help?
Do you have a question about the Cpc 800 XLT and is the answer not in the manual?
Questions and answers