Table of Contents
Advertisement
Available languages
Available languages
Quick Links
Please read all instructions before installing
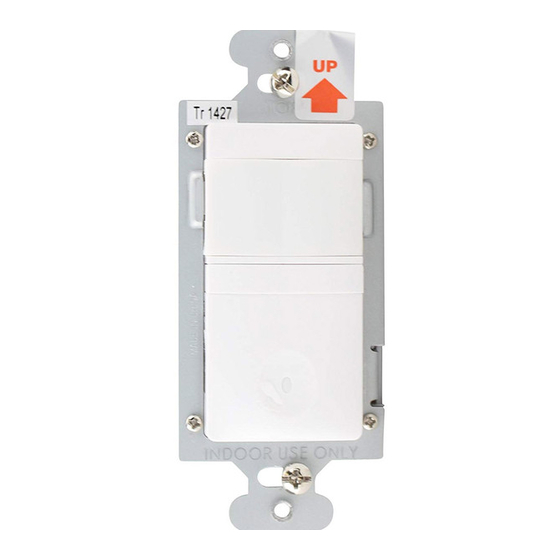
Universal Application Wall Switch
with Manual ON/OFF
SPECIFICATIONS
Voltage ............................................................... 120VAC, 60Hz
Load (Single Pole Circuit)
Incandescent or fl uorescent ............................ 0-600 Watts
Fan motor .................................................................. 1/6 hp
Time Delay Adjustment ....................15 seconds to 30 minutes
Light Level Adjustment ....................................... 10 fc to 150 fc
Environment ..................................Residential Indoor use only
Operating Temperature ............... 32° to 131°F (0° to 55°C)
Humidity ...................................... 95% RH, non-condensing
Tools Needed
Insulated Screwdriver
Wire Strippers
DESCRIPTION AND OPERATION
The RS-250-N Universal Application Wall Switch Vacancy Sensor is designed to
replace a standard light or fan switch. It is ideal for living and dining rooms, family
rooms, bedrooms, bathrooms and any other indoor area in a residential space
where occupancy sensor-based manual ON/OFF controls are desirable.
Like a standard switch, you press the ON/OFF button to turn the light or
fan (controlled load) ON and OFF. Unlike a standard switch, the RS-250-N
automatically turns OFF the controlled load after the coverage area has been
vacant for a period of time (Time Delay). If motion is detected within 30 seconds
after it automatically turns OFF, the RS-250-N automatically turns the load back
ON.
While the sensor is factory preset as a Vacancy Sensor with manual ON operation,
it can be adjusted to work as an Occupancy Sensor that turns the controlled load
ON automatically upon detection of occupancy in the area.
Night Light
While the controlled load is OFF, the nightlight built into the RS-250-N is ON.
When the load is ON, the nightlight is OFF.
Operating Modes
There are two operating modes to select from during set up:
MODE 1
Vacancy sensor (Manual-ON/OFF, Auto-OFF): The user must press
the ON/OFF button to turn the load ON. The RS-250-N keeps the load ON until no
motion is detected for the selected time delay period (adjustable from 15 seconds
to 30 minutes). There is a 30 second reset delay. If motion is detected during this
time, the sensor turns the load back on automatically. After the reset delay time
has elapsed, the ON/OFF button must be pressed to turn ON the load.
MODE 2
Occupancy sensor (Auto-ON/OFF with manual control and reset to
auto after 5 minutes of vacancy): The load turns ON and OFF automatically based
on occupancy detection. The RS-250-N keeps the load ON until no motion is
detected for the selected time delay period. If the load is turned OFF manually,
automatic-ON is re-enabled when no motion is detected for 5 minutes. This
prevents the load from being turned ON after it was deliberately turned OFF.
Call 888.817.0571 for Technical Support
RS-250-N
Vacancy Sensor
and Nightlight
Lens
Nightlight
ON/OFF button
Santa Clara, CA 95050
Advertisement
Table of Contents

Related Manuals for LEGRAND Watt Stopper RS-250-N


Summary of Contents for LEGRAND Watt Stopper RS-250-N
- Page 1 Please read all instructions before installing RS-250-N Universal Application Wall Switch Vacancy Sensor with Manual ON/OFF and Nightlight Lens Nightlight ON/OFF button SPECIFICATIONS Voltage ............... 120VAC, 60Hz Load (Single Pole Circuit) Incandescent or fl uorescent ......0-600 Watts Fan motor ..............1/6 hp Time Delay Adjustment ....15 seconds to 30 minutes Light Level Adjustment ........
-
Page 2: Installation And Wiring
Time Delay The time delay can be selected by the user during set up. It can be adjusted from 15 seconds up to 30 minutes. For additional information on how to adjust it, please read the SENSOR ADJUSTMENT & PROGRAMMING section of this installation manual. - Page 3 4. Wire the sensor. Twist the existing wires Red – > LOAD (power together with the wire leads Black – > HOT (power to lamp or fan) from circuit box) on the RS-250-N sensor as indicated below. Cap them securely using the wire nuts provided (See Fig 4).
-
Page 4: Test Mode
Adjusting the Light Level This feature is factory set at maximum, so that even the brightest light will not prevent the sensor from turning the load ON when it detects occupancy. If this feature is not needed, leave the light level at maximum, fully clockwise. 1. -
Page 5: Warranty Information
WARRANTY INFORMATION Watt Stopper/Legrand warranties its products to be free of defects in materials and workmanship for a period of fi ve (5) years. There are no obligations or liabilities on the part of Watt Stopper/Legrand for consequential damages arising out of, or in connection with, the use or performance of this product or other indirect damages with respect to loss of property, revenue or profi... -
Page 6: Especificaciones
Por favor leer todas las instrucciones antes de realizar la instalación RS-250-N Sensor de Desocupación de pared confi gurable con Luz Nocturna y control manual de ENCENDIDO/APAGADO Lente Luz Nocturna Botón de ENCENDIDO/APAGADO ESPECIFICACIONES Voltaje ................120VAC, 60Hz Carga (Circuito unipolar) Lámparas incandescentes o fl... - Page 7 MODO 2 Sensor de Ocupación (ENCENDIDO/APAGADO automático con control manual y retorno a ENCENDIDO AUTOMATICO después de 5 minutos de desocupación): la carga se enciende y se apaga automáticamente por detección de ocupación. El RS-250-N mantiene la carga encendida hasta que deje de detectar movimiento por un periodo de tiempo igual al defi...
- Page 8 largo de aproximadamente 1/2 pulgada y de Strip Gage acuerdo a como se indica en esta guía de longitud Fig. 3. 1/2" 12.7 mm 4. Conecte el sensor. Fig. 3: Pelado Tuerza conjuntamente los cables existentes en apropiado del la caja de conexiones con los cables del sensor cable RS-250-N utilizando los conectores (“wire nuts”) provistos de acuerdo al...
-
Page 9: Modo De Prueba
Selección del Modo de Operación Seleccione el Modo de Operación presionando el Botón de Selección de Modos. La Luz Nocturna parpadeará en un patrón determinado que le indicará el modo seleccionado: • Un patrón de un solo parpadeo repetido 3 veces, indicará Modo 1 (Operación como Sensor de Desocupación), ENCENDIDO/APAGADO manual, APAGADO automático. -
Page 10: Solucion De Problemas
(5) años. No existen obligaciones o responsabilidades por parte de Watt Stopper / Legrand por daños ocasionados por o en conexión con el uso o desempeño de este producto u otros daños indirectos en materia de pérdida de propiedad, ventas o ganancias, o...
Need help?
Do you have a question about the Watt Stopper RS-250-N and is the answer not in the manual?
Questions and answers