LEGRAND Wattstopper DSW-301 User Manual
Dual technology multi-way wall switch occupancy sensor
Hide thumbs
Also See for Wattstopper DSW-301:
- Manual (19 pages) ,
- Installation instructions manual (19 pages) ,
- Installation instructions manual (19 pages)
Table of Contents
Advertisement
Available languages
Available languages
No: 24049 – 06/16 rev. 1
Catalog Numbers • Les Numéros de Catalogue • Los Números de Catálogo: DSW-301/DSW-301-347/DSW-302/DSW-302-347
Country of Origin: Made in China • Pays d'origine: Fabriqué en Chine • País de origen: Hecho en China
Models ending in -U are BAA and TAA compliant (Product produced in the U.S.)
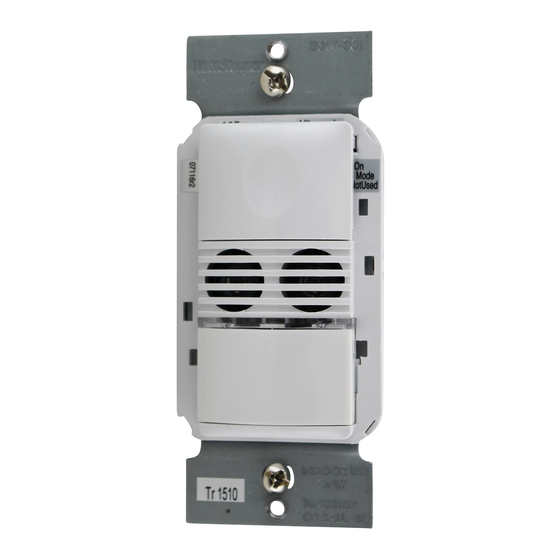
DSW-301
DSW-302
The DSW Dual Technology Multi-Way Wall Switch sensors combine advanced passive infrared (PIR) and ultrasonic technologies into
one unit. The combined technologies help to eliminate false triggering even in difficult applications.
Selectable operating modes allow the sensor to turn a load ON, and hold it ON as long as either or both technologies detect occupancy.
It allows for up to 4 sensors to be connected to the same circuit. The first sensor to detect occupancy will turn ON all the lights that are
connected to the same circuit. After the room is unoccupied, the last sensor that detected occupancy turns OFF all the lights once the
time delay has expired. The occupant can turn OFF the load at any time by pressing the ON/OFF button of any sensor that is connected
to the circuit. A "walk-through" mode can turn lights OFF after only 3 minutes if no activity is detected after 30 seconds following an
occupancy detection.
The DSW-301 has one relay and one ON/OFF button. The DSW-302 contains two relays and two ON/OFF buttons to allow control of
one or two loads independently. Pressing a button toggles the state of the corresponding relay. Optional Neutral is also available on all
models.
DSW sensors contain a light level sensor. If adequate daylight is present, the sensor holds the load OFF until light levels drop, even if
the area is occupied. In the DSW-302, light level only affects the load on Relay 2. Users can override this function by pressing the
ON/OFF button. See the Light Level Adjustment section.
Turning Load(s) ON (ON Mode)
The relays are programmed independently for either Auto ON or Manual ON. In either mode, the load can be turned ON or OFF using
the ON/OFF button.
Manual ON
DIP 8 ON for Relay 1
DIP 9 ON for Relay 2
Auto ON
DIP 8 OFF for Relay 1
DIP 9 OFF for Relay 2
Model #
Relay
Default ON
Mode
DSW-301
1
Manual ON
DSW-302
1
Auto ON
2
Manual ON
Time Delays
The DSW sensor holds the load ON until no motion is detected for the selected time delay. Select the time delay using DIP switch
settings. In the DSW-302, both relays use the same delay. See DIP SWITCH SETTINGS for more information.
Test/20 min
(DIP 1, 2, OFF)
Time Delay
(15 min. DIP 1 ON & 2 OFF)
Wattstopper
Dual Technology Multi-Way Wall Switch Occupancy Sensor
Interrupteur mural multiple à double technologie Détecteurs de mouvement
Interruptor de pared de múltiples vías con tecnología doble Sensores de ocupación
Installation Instructions • Instructions d'Installation • Instrucciones de Instalación
DSW-301-347
DSW-302-347
DESCRIPTION AND OPERATION
With an ON Mode DIP switch in the ON position, the occupant must press the ON/OFF button to turn ON
the load. The sensor keeps the load ON until no motion is detected for the selected time delay. There is a
30 second re-retrigger delay. If occupancy is detected during the delay, the sensor turns the load back ON.
After the re-trigger delay elapses the ON/OFF button must be pressed to turn ON the load.
With an ON Mode DIP switch in the OFF position, the load turns ON and OFF automatically based on
occupancy. If the load is turned OFF manually, Presentation Mode operation applies. This prevents the load
from turning ON automatically after it was deliberately turned OFF. Pressing the button to turn lights ON
returns the sensor to Auto ON mode.
DIP switch
#
8
8
9
A Test Mode with a short time delay of five seconds is set when DIP switches 1 & 2 are OFF. It
cancels automatically after ten minutes, or when you set a fixed time delay. When the Test Mode
times out, the sensor will assume a 20 minute time delay. To restart Test Mode, change the time delay
setting to any fixed amount and then return it to the Test setting.
Time delays are 5, 15, or 30 minutes are available. The default is a 15 minute delay.
®
Voltages:
DSW-301 & DSW-302 ...................................... 120/277 VAC, 50/60 Hz
DSW-301-347 & DSW-302-347 ...............................347 VAC, 50/60 Hz
Load Limits for relay 1:
@120 VAC ............... 1000-W tungsten, ballast, E-ballast, LED, 1/4 HP
@277 VAC ............................... 1200-W ballast, E-ballast, LED, 1/4 HP
@347 VAC ............................................... 1500-W ballast, LED, 1/4 HP
Load Limits for relay 2:
@120 VAC ................. 800-W tungsten, ballast, E-ballast, LED, 1/6 HP
@277 VAC ............................... 1200-W ballast, E-ballast, LED, 1/6 HP
@347 VAC ............................................... 1500-W ballast, LED, 1/6 HP
Time Delay Adjustment ......................................................... 5 to 30 minutes
Walk-Through Mode ...............................3 minutes if no activity after 30 sec.
Test Mode ...................................................... 10 min. with 5 -sec. time delay
PIR Adjustment ............................................................................High or Low
Ultrasonic Adjustment ........................................... Minimum to Maximum, Off
Frequency ...................................................................................40 kHz
Light Level Adjustment .............................................................. 8fc to 180+fc
Alerts .................................................................. Selectable Audible & Visual
Optional Neutral .............................................................................All models
Multi-Way Capability .......................................................................All models
Terminal screw torque .................................................... 16 lbf-in (18 kgf-cm)
Setting
ON
OFF
ON
SPECIFICATIONS
Advertisement
Table of Contents

Subscribe to Our Youtube Channel
Related Manuals for LEGRAND Wattstopper DSW-301


Summary of Contents for LEGRAND Wattstopper DSW-301
-
Page 1: Specifications
Wattstopper ® Dual Technology Multi-Way Wall Switch Occupancy Sensor Interrupteur mural multiple à double technologie Détecteurs de mouvement Interruptor de pared de múltiples vías con tecnología doble Sensores de ocupación No: 24049 – 06/16 rev. 1 Installation Instructions • Instructions d’Installation • Instrucciones de Instalación Catalog Numbers •... - Page 2 Presentation Mode Presentation Mode is a feature of the Auto ON mode.When both relays are manually turned OFF the DSW holds the lights OFF until no motion has been detected for the duration of the Time Delay. With subsequent occupancy, the DSW turns the load ON. If both relays are ON and one relay is manually turned OFF this relay remains OFF until both the Time Delay and retrigger delay expires for the relay that is ON, after that time the ON Mode control settings again apply.
- Page 3 4. Step away from the sensor. After 10 seconds a beep sounds, indicating that the threshold level is set. This threshold is retained, even if power is lost, until it is re-set or disabled. In the DSW-302, light level control only affects Relay 2. To disable light level control, press and hold the Relay 1 button for 7 seconds until a double beep tone sounds.
-
Page 4: Dip Switch Settings
SENSOR OPERATING MODES Sensor #1 Sensor #2 Light Fixture Auto-ON Auto-ON The load turns ON and OFF automatically based on occupancy detection by either one of the sensors. The sensors keep the load ON until no motion is detected and will use the time delay of the sensor with the lowest value. - Page 5 INSTRUCTIONS EN FRANÇAIS DESCRIPTION ET FONCTIONNEMENT CARACTÉRISTIQUES DE L’UNITÉ Tensions : Les détecteurs interrupteurs muraux multiples à DSW-301 & DSW-302 ............. 120/277 VCA, 50/60 Hz double technologie DSW allient les technologies DSW-301-347 & DSW-302-347 ............. 347 VCA, 50/60 Hz de l’infrarouge passif (IRP) et des ultrasons en une Charges maximales pour le relais 1 : seule unité.
- Page 6 relais reste COUPÉ jusqu’à l’expiration de la temporisation et du délai de re-déclenchement pour le relais qui est ACTIF, au bout de ce délai, les réglages de régulation du mode MARCHE sont de nouveau applicables. Alarmes Le DSW peut activer des alarmes sonores qui lancent un avertissement avant la COUPURE de la charge. Alarmes sonores L’unité...
- Page 7 5. Testez et réglez le détecteur si nécessaire. 6. Fixez le cache. Câblage du DSW-301 et du DSW-301-347 DSW-302 et DSW-302-347Câblage à deux niveaux DSW-302 et DSW-302-347 Câblage double circuit Neutre Noir Rouge Charge Noir Charge Rouge Circuit 1 Circuit Noir Rouge Charge...
- Page 8 MODES DE FONCTIONNEMENT DU DÉTECTEUR Détecteur 1 Détecteur 2 Luminaire MARCHE MARCHE La charge est automatiquement ACTIVÉE et DÉSACTIVÉE en fonction de la détection d'une présence automatique automatique par l'un des détecteurs. Les détecteurs garderont la charge allumée jusqu’à ce qu’il n’y ait plus de mouvement et utiliseront le délai du détecteur avec la temporisation la plus courte.
- Page 9 INSTRUCCIONES EN ESPAÑOL DESCRIPCIÓN Y FUNCIONAMIENTO DE ESPECIFICACIONES LA UNIDAD Voltajes: Los sensores del interruptor de pared de múltiples DSW-301 y DSW-302 ............120/277 V CA, 50/60 Hz vías con tecnología doble DSW combinan las DSW-301-347 y DSW-302-347 ..........347 V CA, 50/60 Hz tecnologías infrarroja pasiva (PIR) avanzada y la Límites de carga para el relé...
- Page 10 Ajuste de sensibilidad infrarroja pasiva (PIR) El sensor DSW monitorea constantemente el entorno controlado y ajusta automáticamente el PIR para evitar las condiciones ambientales comunes que pueden causar falsas detecciones, al tiempo que proporciona una máxima cobertura. Alta (Conmutador sensor para bascular N.º 4 OFF) Configuración predeterminada.
- Page 11 3. Adjunte el DSW a la caja de la pared mediante la inserción de tornillos en los dos orificios grandes que se encuentran en la parte superior e inferior del soporte metálico adjunto. Únalos con los orificios en la caja de pared y ajuste. Calibre AWG N.°...
- Page 12 No. 24049 – 06/16 rev. 1 © Copyright 2016 Legrand All Rights Reserved. 800.879.8585 © Copyright 2016 Tous droits réservés Legrand. www.legrand.us/wattstopper © Copyright 2016 Legrand Todos los derechos reservados.
Need help?
Do you have a question about the Wattstopper DSW-301 and is the answer not in the manual?
Questions and answers