Frymaster McDonald's LOV M3000 Operation Manual
Hide thumbs
Also See for McDonald's LOV M3000:
- Technical reference manual (51 pages) ,
- Quick reference (2 pages)
Table of Contents
Advertisement
Quick Links
FRYMASTER MANUAL LOV™ M3000 CONTROLLER
This equipment chapter is to be
installed in the Fryer Section of the
Equipment Manual.
INSTALLATION INSTRUCTIONS ........................................................................................ Page 1-1
MANUAL LOV™ M3000 OPERATING INSTRUCTIONS ..................................................... Page 2-1
OPERATOR TROUBLESHOOTING ..................................................................................... Page 3-1
PRINTED IN THE UNITED STATES
www.frymaster.com
OPERATION MANUAL
MANUFACTURED
8700 Line Ave.
SHREVEPORT, LOUISIANA 71106
PHONE: 1-318-865-1711
TOLL FREE: 1-800-551-8633
1-800-24 FRYER
TABLE OF CONTENTS
Frymaster L.L.C., 8700 Line Avenue, Shreveport, LA 71106
PHONE 318-865-1711
SERVICE HOTLINE 1-800-24-FRYER
Email:
service@frymaster.com
BY
07/2022
*8196964
Advertisement
Table of Contents

Related Manuals for Frymaster McDonald's LOV M3000


Summary of Contents for Frymaster McDonald's LOV M3000
- Page 1 TABLE OF CONTENTS INSTALLATION INSTRUCTIONS ..................Page 1-1 MANUAL LOV™ M3000 OPERATING INSTRUCTIONS ............. Page 2-1 OPERATOR TROUBLESHOOTING ..................Page 3-1 Frymaster L.L.C., 8700 Line Avenue, Shreveport, LA 71106 PHONE 318-865-1711 SERVICE HOTLINE 1-800-24-FRYER 07/2022 PRINTED IN THE UNITED STATES *8196964 www.frymaster.com...
- Page 2 RECEIVED FROM AN UNAUTHORIZED SERVICE CENTER. NOTICE This appliance is intended for professional use only and is to be operated by qualified personnel only. A Frymaster Dean Factory Authorized Servicer (FAS) or other qualified professional should perform installation, maintenance, and repairs. Installation, maintenance, or repairs by unqualified personnel may void the manufacturer’s warranty.
- Page 3 MANUAL LOV™ M3000 CONTROLLER CHAPTER 1: INSTALLATION INSTRUCTIONS Installation Before attempting to operate your unit, read the instructions in this manual thoroughly before installation. Installation of the Manual LOV™ (Low Oil Volume) M3000 controller requires some extra steps prior to use. This controller uses network cables for communication between controllers. The controllers also require locator connectors which identify the position of the controllers in the bank of fryers.
- Page 4 A list of Frymaster Factory Authorized Servicers (FAS’s) is located on the Frymaster website at www.frymaster.com. If you do not have access to this list, contact the Frymaster Service Department at 1-800-551-8633 or 1-318-865-1711 or by email at service@frymaster.com.
- Page 5 CHAPTER 2: MANUAL LOV™ M3000 CONTROLLER OPERATION INSTRUCTIONS M3000 General Information Welcome to the Manual LOV™ M3000, a controller that retains the one-button ease of the M2000 and 100B and the utility of 40-product menu capability. The controller is easy to use. One button push starts a cook cycle for an item cooked in a dedicated vat.
- Page 6 Basic Operation...
- Page 7 Cooking with Multi-Product Display...
- Page 8 Cooking with Dedicated Display...
- Page 9 Changing from Breakfast Setup to Lunch...
- Page 10 Changing from Lunch Setup to Breakfast...
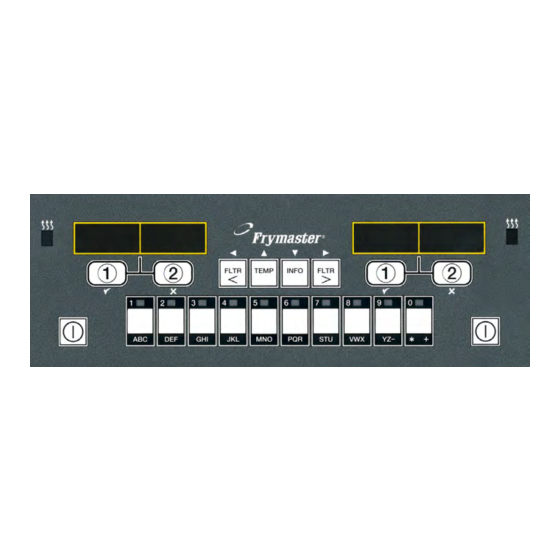
- Page 11 M3000 Button Description and Functions 2.7.1 Navigation Buttons The menu on the M3000 uses buttons to navigate the various menus and submenus. When programming, the left screen shows a menu or submenu item. The right screen is for data entry. Data is Left Display Right Display entered with alpha-numeric characters, scrolling through...
-
Page 12: Table Of Contents
Manual LOV™ M3000 Menu Summary Tree Reflected below are the major programming sections in the M3000 and the order in which submenu headings will be found under the sections in the controller operation chapter. Adding New Product Menu Items (Product Selection) See section 2.10.2 Storing Product Menu Items in Product Buttons See section 2.10.3... - Page 13 Fryer Setup Mode Programming Ensure the fryer is OFF and follow the steps below to navigate the options. The setup mode sets the time, date, date format, language, fryer type, vat type, oil system type and the temperature scale. These settings should only be changed by a technician. Left Display Right Display Action Press the TEMP and INFO buttons simultaneously for THREE...
-
Page 14: Level 1 Program
Fryer Setup Mode Programming cont. Left Display Right Display Action Press the u button. NONE SYSTEM Press the u button. DISPOSE NONE SYSTEM Press the tu buttons to scroll and edit any additional fields. LANGUAGE ENGLISH (2) button to exit. Press the setup complete... - Page 15 Adding New Product Items to the Menu (PRODUCT SELECTION) cont. Left Display Right Display Action Use the number keys to enter the first letter of the new product. Each key has three letters. Press until derived character is displayed. The full product name is limited to eight characters including spaces (ex.
-
Page 16: Product Selection
Adding New Product Items to the Menu (PRODUCT SELECTION) cont. Left Display Right Display Action ASSIGN With the chosen product displayed on the right and ASSIGN Product name BTN on the left, press a button between 1-0 to assign the product. - Page 17 When cooking oil is exhausted, drain the oil into an appropriate container for transport to the disposal container. Frymaster recommends a McDonald’s Shortening Disposal Unit (MSDU). Do not drain deep clean (boil-out) solution into an MSDU. NOTE: If using an MSDU built before January 2004 the filter pan cover must be removed to allow the unit to be positioned beneath the drain.
- Page 18 Oil Disposal cont. Left Display Right Display Action Close the drain valve. CLOSE DRAIN VALVE Blank None required. 2.11 Filter Menu The filter menu selections are used for filtering, draining, filling and disposing. 2.11.1 Accessing the Filter Menu 1. With the controller on, press and hold the filter button for the selected vat for three seconds.
- Page 19 2.11.2 Quick Filter Prepare the filter for use using the instructions that accompanied the fryer. Quick Filtration is a feature that, after a number of cook cycles, will automatically prompt to filter a frypot. Alternatively pressing and holding the filter button with the fryer on and at setpoint will also prompt a demand filtration.
- Page 20 2.11.3 Filter Busy If FILTER BUSY is displayed, another controller has not completed a process, or is waiting on another vat to be filtered. Wait 15 minutes to see if problem is corrected. If not, call your local FAS. WARNING The filter pump is equipped with a manual reset switch in case the filter motor overheats or an electrical fault occurs.
- Page 21 Maintenance (Manual) Filtration cont. Left Display Right Display Action WASH VAT? Blank (1) button. Press the alternating with CONFIRM OPEN RETURN VALVE Blank Open the return valve and press the alternating with CONFIRM (1) button. WASHING None required. Close drain valve Blank Close the drain valve.
- Page 22 The DRAIN TO PAN and FILL VAT FROM DRAIN PAN functions are used primarily for diagnostic purposes. They are used to drain oil to the filter pan or returned to the frypot. 2.11.5 Drain to Pan The drain to pan function drains the oil from the frypot to the filter pan. Turn the fryer off and follow the steps below: Left Display Right Display...
- Page 23 2.12 Programming Level One Level one programming is used to enter new products, control when AIF (filter prompt clock) is disabled and perform deep clean (boil-out) and high-limit test. Ensure the fryer is off and follow the steps below: Left Display Right Display Action Press the TEMP and INFO buttons...
-
Page 24: Aif Clock (Suppress Filter Prompt)
2.12.1 AIF CLOCK The AIF Clock (suppress filter prompt) mode allows programming of times to lock out the filter prompt. This is useful for busy times of the day, like the noon rush. Ensure the fryer is off and follow the steps below: Left Display Right Display Action... -
Page 25: Deep Clean Mode
2.12.2 DEEP CLEAN MODE (BOIL-OUT) The deep clean mode is used to remove carbonized oil from the frypot. NOTE: Refer to the MRC Deep Clean (boil out) instructions to clean the fryer. DANGER When draining oil into a disposal unit, do not fill above the maximum fill line located on the container. - Page 26 Left Display Right Display Action Fill frypot to be cleaned with water and cleaning SOLUTION ADDED? solution mix. Referring to maintenance requirement Blank alternating with card and Kay Chemical provided instructions “Fryer CONFIRM Deep Clean Procedure” for McDonald’s deep clean (boil-out) procedure and press the (1 ) button.
-
Page 27: High-Limit Test
Left Display Right Display Action Vat and pan Blank Dry the vat and filter pan thoroughly and press the dry? alternating with (1) button when complete. CONFIRM DANGER Ensure that the frypot and filter pan are completely dry and free of water before filling with oil. - Page 28 Left Display Right Display Action When the temperature reaches 410°F ± 10° F (210°C ± 12°C)*, the controller displays hot hi-1 alternating with hot hi-1 the actual temperature (ex. 410F) and continues heating. Blank alternating with the actual temperature NOTE: In controllers used in the European Union (those with the CE mark), the temperature is 395°F (202°C).
- Page 29 2.13.1 PRODUCT COMP MODE The product comp mode allows the product compensation (sensitivity) to be changed. Some menu items may need an adjustment, depending on their cooking characteristics. Use caution when changing the product compensation, as it could have an adverse affect on the products cooking cycles.
- Page 30 Left Display Right Display Action E-LOG Blank Press the (1) button. Press the u (INFO) and u (TEMP) buttons to scroll through the ten most recent error codes starting with “A” through “J”. If no errors exist, the controller displays NO ERRORS.
-
Page 31: Fryer Setup
2.13.3 PASSWORD SETUP MODE The password mode allows a restaurant manager to change passwords for various modes and levels. Left Display Right Display Action Press the TEMP and INFO buttons simultaneously for TEN seconds until LEVEL 2 is displayed. ENTER CODE Blank Enter 1234. - Page 32 Left Display Right Display Action Press the u (INFO) button to scroll to alert Prod COMP Blank tone. alert tone Blank Press the (1) button. Use the number keys to set volume level. Select from volume 1-9 nine levels of volume with 1 being the softest and 9 the loudest.
-
Page 33: Level 2 Program (Manager Level)
Left Display Right Display Action Press the u (INFO) button to scroll to FILTER Prod COMP Blank AFTER. Press the (1) button. Use the 3and 4buttons to toggle between disabled or enabled. FILTER AFTER DISABLED Default setting is disabled. Set this function to enabled if filter prompts are desired. -
Page 34: Info Mode
2.14 INFO Mode The INFO button is used to display information and navigate menus. Pressed once, it shows each vat’s recovery time. Press for three seconds and it displays usage, filter statistics and last cook cycles. Left Display Right Display Action Press and hold the INFO button for THREE seconds until info MODE is displayed. -
Page 35: Last Load
2.14.2 REVIEW USAGE MODE The review usage displays total cook cycles per vat, number of cook cycles per vat, number of cook cycles exited prior to completion, the number of hours the vat(s) have been on and the date of last usage reset. - Page 36 Left Display Right Display Action Press the u (INFO) button. Actual cooking time Actual TIME 3:15 including stretch time. Press the u (INFO) button. Programmed cook time. progtime 3:10 Press the u (INFO) button. Maximum oil temperature Max temp 337° recorded during the cook cycle.
- Page 37 Although the chapter covers the most common problems reported, you may encounter problems that are not covered. In such instances, the Frymaster Technical Services staff will make every effort to help you identify and resolve the problem.
- Page 38 Troubleshooting 3.2.1 Controller and Heating Problems Problem Probable Causes Corrective Action Press the ON/OFF switch to turn Controller not turned on. the controller on. Verify controller power cord is No power to the fryer. plugged in and that circuit breaker is not tripped.
- Page 39 Problem Probable Causes Corrective Action Problem with the temperature Shut the fryer down and call your FAS M3000 display shows measuring circuitry including the probe for assistance. TEMP PROBE or damaged controller wiring harness or FAILURE. connector. M3000 display shows Call your FAS for assistance.
- Page 40 3.2.3 Filtration Problems Problem Probable Causes Corrective Action Change or overwrite the filter after Fryer filters after each Filter after setting incorrect. setting by re-entering the filter after cook cycle. value in level two. See section 2.13.6 on page 2-28. MAINT FILTER Ensure fryer is at setpoint before Temperature too low.
- Page 41 THIS PAGE INTENTIONALLY LEFT BLANK...
- Page 42 Welbilt offers fully-integrated kitchen systems and our products are backed by KitchenCare aftermarket parts and service. Welbilt’s portfolio of award-winning ® brands includes Cleveland , Convotherm , Crem , Delfield , Frymaster , Garland ™ ® ® ® ® ®...
Need help?
Do you have a question about the McDonald's LOV M3000 and is the answer not in the manual?
Questions and answers