Table of Contents
Advertisement
Quick Links
Advertisement
Table of Contents

Subscribe to Our Youtube Channel
Summary of Contents for Hertz S8 DSP
- Page 1 S8 DSP Digital Interface Processor USER’S MANUAL rev. 1a hertz-audio.com...
-
Page 2: Table Of Contents
6.1.1 INSTALLAZIONE SOFTWARE ..............................13 6.1.2 SOFTWARE UNINSTALL ................................15 6.2 MAC OS ........................................16 6.2.1 macOS ......................................16 6.3 S8 DSP APP INSTALLATION ON MOBILE DEVICES ..........................17 6.3.1 ANDROID .....................................17 6.3.2 APPLE iOS ....................................17 7. S8 DSP SET UP WITH PC/MAC ..................................18 7.1 OFFLINE MODE .....................................18 7.1.1 CREATE NEW SETUP ..................................19... -
Page 3: Product Description
1. PRODUCT DESCRIPTION S8 DSP is a digital signal processor essential to maximize the acoustic performance of your car audio system. It features 13 signal inputs, 6 Hi-Level, 6 Pre-In and 1 S/PDIF 24bit/96kHz digital coaxial and provides 8 PRE OUT analog outputs. -
Page 4: S8 Dsp Installation
USER’S MANUAL / 3. S8 DSP INSTALLATION Mounting dimensions External dimensions 118 mm / 4,6 in. 130 mm / 5.11 in. Installation WARNING for all INPUT/OUTPUT cables... -
Page 5: Connections Panel
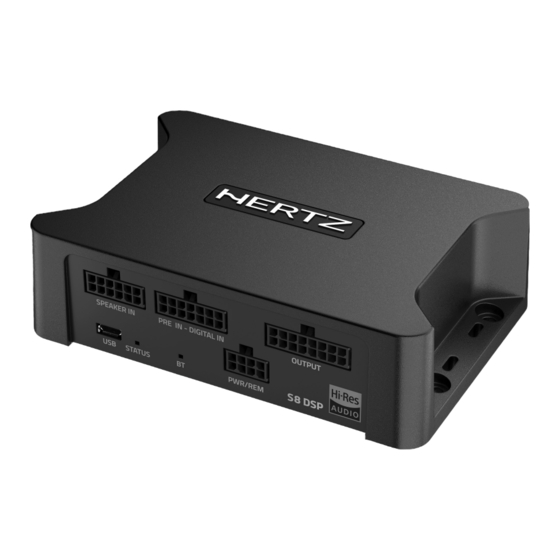
USER’S MANUAL / 4. CONNECTIONS PANEL - DESCRIPTION Connection socket (Micro USB female) to connect the processor to a PC/MAC and manage the functions via the S8 DSP software . The connection standard is compatible with USB 1.1/ 2.0/3.0. (see sect. 5.4) -
Page 6: Pwr/Rem
REM IN: terminal to turn on the S8 DSP via the Remote Out output of the audio signal source. The applied voltage must be between 6 and 20 VDC. If you are using a source with BTL amplified outputs, the S8 DSP can turn on automatically , so you will not need to connect the REM IN terminal. -
Page 7: Output
The cable is provided to connect the signal from your source with digital output via a specific coaxial cable for digital signals with RCA connection. S8 DSP accepts PCM signals at its input with a maximum sampling frequency up to 96 kHz 24 bit, therefore it is not possible to reproduce DOLBY DIGITAL (AC3) encoded multichannel signals from audio/video sources (such as the audio of a film in DVD) or DTS. -
Page 8: Speaker In
USER’S MANUAL / SPEAKER IN high level input: IN1 - IN2 - IN3 - IN4 - IN5 - IN6 The cable is provided to be connected to the amplified signals coming from the analog Master source. Through the software it will be possible to specialize the inputs by assigning the desired input (see sections 7.5.4 - 7.5.5 - 8.2.2) Input sensitivity adjustable from 2,5 to 21 VRMS. -
Page 9: Connections
How to turn the S8 DSP on and off The S8 DSP is on when the logo is lit green. It can be turned on/off using the following methods: By connecting the REMOTE IN terminal with a Remote Out signal coming from an after market audio source. -
Page 10: Input Signals
By selecting the DIGITAL input using the S8 DSP software (see section. 8.9) By usung the IN SEL terminal (see section. 4.4) With the function Automatic switch to digital input, to be enabled using the S8 DSP software (see section. 8.2.4) 75 Ohm Coax Cable for digital audio... -
Page 11: Speaker In - Ch1/Ch6 (Alto Livello)
IN 6 - How to select the SPEAKER IN Input By selecting the ANALOG input previously set on HIGH LEVEL via the S8 DSP software (see section 8.9) (see section 8.2.2) By using the IN SEL terminal (see section. -
Page 12: Output Signals
20 Hz @ 12dB / 80 Hz @ 12dB CONNECT S8 DSP TO THE PC/MAC SPEAKER IN PRE IN - DIGITAL IN USB Cable Supplied OUTPUT PWR/REM STATUS S8 DSP can be connected to PC/MAC: 1. Using the USB cable 2. Using a Bluetooth connection. -
Page 13: Guide For Installing S8 Dsp Software
USER’S MANUAL / 6. GUIDE FOR INSTALLING S8 DSP SOFTWARE Inside the S8 DSP setup USB device, there are all the files necessary for the setup of the S8 DSP: • Software S8 DSP (PC Windows) • This User’s Manual (.pdf) •... - Page 14 USER’S MANUAL / Windows 10/11: select Next to go on with the installation, Cancel to interrupt it. Windows 10/11 Windows 10/11: select Next to go on with the installation, Cancel to interrupt it. Windows 10/11 Windows 10/11: select Install to go on with the installation, Cancel to interrupt it. Windows 10/11...
-
Page 15: Software Uninstall
Windows 10/11: follow and complete the installation procedure and select Finish at the end of the installation. Windows 10/11 The PC software is now installed in your system. 6.1.2 SOFTWARE UNINSTALL To uninstall the S8 DSP PC Software for WINDOWS you can follow the below procedure: Windows 10/11: Start/Settings/App/S8 DSP/Uninstall. -
Page 16: Macos
USER’S MANUAL / macOs 6.2.1 INSTALLATION macOs 1. Search for S8 DSP on the Apple App Store then select “Get” and “Install”. S8 DSP Mobile The S8 DSP Mobile App allows the user to manage the S8 DSP signal interface Elettromedia SRL processor from smartphone /tablet. -
Page 17: S8 Dsp App Installation On Mobile Devices
USER’S MANUAL / S8 DSP APP INSTALLATION ON MOBILE DEVICES 6.3.1 ANDROID 1. Search for S8 DSP Mobile on Google Play Store then select “install”. S8 DSP Mobile Install 2. Scan the QR code printed on the giftbox to access the download... -
Page 18: S8 Dsp Set Up With Pc/Mac
OFFLINE MODE In this case even if the S8 DSP processor is connected to the PC/MAC, it does not interact with the software. The OFFLINE mode can be used to work on the software to get familiar with the processor multiple functions without connecting the S8 DSP to the PC/MAC and it is possible to open a saved setup*.s8c or simulate three different configurations:... -
Page 19: Create New Setup
USER’S MANUAL / 7.1.1. CREATE NEW SETUP Select Create new setup, to access the System Selection menu where you can select one of the below options: Motorcycle: to simulate a system installed in a motorbike. Car: to simulate a system installed in a car. Free placement: to simulate a system with free placement. - Page 20 USER’S MANUAL / Motorcycle OFFLINE How does the S8 DSP software look like when starting up in mode. How does the S8 DSP software look like when starting up in Car OFFLINE mode. Remark: in the CAR option the driving side can be set up: Left drive for left-hand drive car (default).
-
Page 21: Open A Saved Setup
7.1.2. OPEN A SAVED SETUP This function loads the complete configuration of the S8 DSP from a previously saved file (.“S8 DSP setup file.s8c”). CONNECT USB MODE To use this function the S8 DSP processor must be turned on and connected to the PC/MAC. The connection between PC/MAC and S8 DSP can be established via USB cable or Bluetooth. - Page 22 USER’S MANUAL / The software will start with S8 DSP connected via USB. Important remark If S8 DSP is not detected: check that S8 DSP is on and correctly connected to the PC/MAC via USB cable USB (aqua green led status, BT led off)
-
Page 23: Connect Bt Mode
Start S8 DSP (green led status, blue BT led flashing). Enable the Bluetooth function on the PC/MAC. Press Connect - BT to open the pop up Select a BT device, and start the search for the S8 DSP processor. press Close to stop the search. - Page 24 (see section.8.2.8) press Yes to connect S8 DSP automatically in the future and access the control software. press No not to connect S8 DSP automatically in the future and access the control software . press Cancel to cancel the operation.
-
Page 25: S8 Dsp Default Setup
USER’S MANUAL / S8 DSP DEFAULT SETUP By default, the S8 DSP is configured as shown below: After market Source IN 1 FRONT IN 2 1 2 3 4 5 6 7 8 1 2 3 4 5 6 7... -
Page 26: I/O Configuration Wizard
USER’S MANUAL / I/O CONFIGURATION WIZARD Before starting the “I/O Configuration Wizard” connect the source loudspeakers’ outputs to the SPEAKER IN input or the source PRE OUT outputs to the S8 DSP PRE IN input (see section 5.2.3) (see section 5.2.1) -
Page 27: System Selection
It is possible to configure S8 DSP in 3 different types of system: - Motorcycle: this option provides the ability to configure the S8 DSP for a system installed on a motorcycle. - Car: this option provides the ability to configure S8 DSP for a system installed in a car. -
Page 28: Speaker Selection
USER’S MANUAL / 7.5.2. SPEAKER SELECTION Motorcycle / CAR option In Motorcycle or Car mode, through the appropriate screen, you can select the speakers in your system, to be activated or deactivated by clicking on them. The software assumes that if you select the left tweeter, midrange, woofer or coaxial, the right ones will also be activated automatically. -
Page 29: Passive Crossover Selection - Output Channels Assignment /Output Channels Name
USER’S MANUAL / 7.5.3. PASSIVE CROSSOVER SELECTION - OUTPUT CHANNELS ASSIGNMENT / OUTPUT CHANNELS NAME - Passive crossover selection: In Motorcycle or Car mode it is possible to indicate the presence of passive crossovers by enabling the 2Ways / 3Ways options. E.g.: the front 3-way can be operated as: - multi-amplified (6 output channels would be needed);... - Page 30 - Output channels assignmet In Motorcycle or Car mode it is possible to change the order in which the outputs of the S8 DSP have been automatically assigned by the software. The software will report if in the event of an error the same output will be assigned to multiple speakers, in this case the vehicle image will turn from white to red and the NEXT button will disappear from the screen, until the correct assignment of the outputs.
-
Page 31: Analog Inputs Configurations
USER’S MANUAL / - Output channels names In Free Placement mode it is possible to rename each output channel with a maximum of 15 characters, so as to facilitate their recognition while using the software. - press Next to continue with the configuration. - press Back to go back to the previous window. -
Page 32: Analog Inputs-Outputs Routing
(this means that an input channel can be sent to one or more output channels and vice versa), and adjust the mixing percentages. The mixer is structured as a matrix: In1-In2-In3-In4-In5-In6 are the S8 DSP input channels Remark: hovering the mouse cursor over an input channel, the associated output channels will be highlighted OUT1-OUT2-OUT3-OUT4-OUT5-OUT6-OUT7-OUT8 are the S8 DSP output channels. - Page 33 USER’S MANUAL / ROUTING/PRESET: it is possible to assign inputs to outputs in two ways (STEREO) or (CUSTOM). STEREO (default) does not allow to operate on the mixer. The system will be configured using the inputs In1 and In2, the assignment to the outputs is automatic and cannot be changed.
- Page 34 USER’S MANUAL / MIXER: It is possible to assign the mixing percentages of the inputs in two ways: (Auto/Man). Mixer Auto Mixer Man It is possible to switch from the mode (default), to the mode and vice versa clicking on Auto keys, upon clicking a warning pop up will appear on the screen.
-
Page 35: Inputs Sensitivity Setup
INPUTS SENSITIVITY SETUP The calibration of the input levels is essential to adapt the sensitivity of the S8 DSP to the signal coming from the source, the sensitivity scale will vary according to the selection made previously in the Analog inputs configurations menu: (see section 7.5.4 - 8.2.2) -
Page 36: Inputs Eq Setup (Analog Inputs Equalizer)
INPUTS EQ SETUP (ANALOG INPUTS EQUALIZER) The S8 DSP software provides an input equalizer, which can be managed by a maximum of 7 parametric equalization bands per channel, this operation is useful for correcting the outputs of OEM HU sources when they are equalized. - Page 37 : allow fine adjustment of the selected slider. WARNING: if you proceed with the inputs equalization, S8 DSP will enable the audio outputs, the general volume will be set by default to -42dB to avoid damaging the speakers when starting calibration.
-
Page 38: Wizard Completed
USER’S MANUAL / 7.5.8 WIZARD COMPLETED System setup is complete. Press DONE. -
Page 39: S8 Dsp Setup Using A Pc/Mac
8. S8 DSP SETUP USING A PC/MAC The software transfers the settings selected during the wizard to the processor’s main memory. If you are using S8 DSP when connecting for the first time it is advisable to FINALIZE the product, to avoid losing the data stored during the calibration phase (see section 8.1.5) -
Page 40: Main Menu "File
Press PC/MAC to DSP to load the settings made so far in the memory of the S8 DSP. Press DSP to PC/MAC to load the settings in the memory of the S8 DSP on the Control software. - Press BACK to go back to the “File” menu. - Page 41 S8 DSP. This operation allows the S8 DSP to work without being connected to the PC / MAC. When Finalize to DSP is run, the software warns...
- Page 42 Bluetooth function is disabled: if no S8 DSP is detected nearby. if the BT interface of the PC / MAC is not active. if S8 DSP is connected to PC / MAC via USB. S8 DSP connection to PC/MAC via Bluetooth connection.
- Page 43 Invalid PIN: if the PIN entered is incorrect, the bluetooth connection operation must be repeated from the beginning. press Dismiss to return to the main screen. WARNING: if the pin is not available, it is still possible to connect the S8 DSP to the software via the USB connection.
- Page 44 Press DSP to PC/MAC to load the settings stored in the S8 DSP memory onto the software. Press PC/MAC to DSP to load the settings made so far on the software into the memory of the S8 DSP. Disconnect the Bluetooth connection between...
-
Page 45: Main Menu "Settings
Help Languages: to change the language, select the desired item from the menu, among the available ones. Check Update (online): this function checks the presence of S8 DSP software / firmware updates by connecting to the “hertz-audio.com” site . In order to perform this operation, the PC must have an active (see section 9.2) - Page 46 (see section. 7.5.5) Sensitivity It is possible to calibrate the correct sensitivity of the S8 DSP inputs to adapt them to the signal coming from the source. . The sensitivity scale will vary according to the type of analog input selected: (see section 7.5.6)
- Page 47 USER’S MANUAL / Digital Input Digital input functions • Automatic switch to digital input: by activating this function it is possible to select the optical digital input automatically when the digital audio signal is detected. • Extra gain: it is possible to set the gain of the optical digital input to +0dB (default), + 3dB, +6dB. Outuput channel names It is possible to name each output channel with a maximum of 15 characters.
- Page 48 USER’S MANUAL / Output Limiter By activating this function it will be possible to enable the signal limiter on the S8 DSP output. This function is essential to compensate for transient clipping phenomena, which lead to saturation of the outputs. The function is disabled by default.
- Page 49 USER’S MANUAL / Remote It is possible to manage the ART function (Auto Remote Turn-On) and the turn on and off settings of the S8 DSP. ART (Auto Remote Turn-on) Turn on delay Shut of delay - press Back to go back to the settings menu.
- Page 50 REMOTE OUT signal towards the amplifiers and the switching off of the S8 DSP. It is generally not necessary to act on this parameter but it can be useful if you have amplifiers that produce a “Bump”...
- Page 51 USER’S MANUAL / Bluetooth PIN It provides the ability to manage the PIN for the connection between S8 DSP and the PC/MAC. By selecting No on the Enabled drop-down menu, the 6-digit pin request for the bluetooth connection is disabled.
-
Page 52: Main Menu "Memory
USER’S MANUAL / MAIN MENU “MEMORY” The S8 DSP manages the system configuration by working by default on memory A, giving the ability to save and recall four memories (A, B, C, D). (see section.8.10) In the memories the following data will be stored: the filter, time delay and phase settings for each channel;... -
Page 53: Channel Map
USER’S MANUAL / Reset current memory file: It restores the crossover, equalization and volume levels of the standard outputs, those that would be proposed at the end of the configuration procedure. press Yes to confirm. press No to cancel. - press Back to go back to the Memory menu. - press Close to go back to the main window. -
Page 54: Crossover Settings
Linkwitz When starting the software, S8 DSP proposes Butterworth as a standard filter model. By changing the model in Linkwitz or Bessel, the change will be made only to the channel (mono) or channels (stereo - Xover Link activated) concerned. - Page 55 0/6/12/18/24/30 dB/Oct. (Bessel). 0/12/24 dB/Oct. (Linkwitz). When starting the software, the S8 DSP proposes Butterworth with a standard slope of 12 dB/Oct. By changing the filter slope, the change will only be made to the channel you are working on.
- Page 56 It displays the time in ms (milliseconds) calculated based on the distance. FINE SET ms It displays the time in ms (milliseconds) calculated based on the distance. The S8 DSP’s time delay calculation system also allows manual fine-tuning. The “Fine set” box can be set with the cursor using the buttons.
-
Page 57: Output Equalizer
OUTPUT EQUALIZER The S8 DSP software provides an output equalizer, which can be managed by up to 15 equalization bands for each channel. Through the EQ Fine Tuning function it is possible to make a parametric adjustment for each band. -
Page 58: Output Level
OUTPUT LEVEL This section shows the settings relating to the output levels of the S8 DSP active channels on the screen. By operating on one of the sliders belonging to the output channels, it will be possible to adjust the output level (-30 ÷... -
Page 59: Select Input
The window will show and give the possibility to select the active input source when connecting with the PC/MAC. 8.10 MEMORY The S8 DSP manages the system configuration by working by default on memory A, but provides the ability to save and recall four memories (A, B, C, D). 8.11 DEVICE INFO This window shows: ●... -
Page 60: Troubleshooting
2. Connection lost between S8 DSP and PC/MAC If, while calibrating the system with the PC/MAC connected to S8 DSP, the processor is turned off and back on again, the connection is lost and the software cannot finalize the adjustments that were set. To avoid losing the settings, proceed as follows: a- Save the setup to a file on the PC/MAC using the FILE/SAVE function. -
Page 61: Firmware Upgrade
PRE IN - DIGITAL IN WARNING: S8 DSP Firmware update procedure may be delicate. It is extremely important that it is performed under the best possible conditions. If the operation is started and prematurely interrupted ( E.g.: PC locked up, accidental disconnection of the USB cable during update ), our After Sales Service might need to be contacted to reprogram the S8 DSP. - Page 62 “safe removal of hardware and eject media” to eject the USB device “HERTZS8DSP (X :)”; disconnect the USB from the processor 7. Turn S8 DSP on Start the PC/MAC software and connect the processor (see section.7.2 - .7.3) Check that the firmware version (FW: v.
-
Page 63: Technical Specifications
USER’S MANUAL / 10. TECHNICAL SPECIFICATIONS POWER SUPPLY Nominal Power supply voltage / fuse: 7 ÷ 20 VDC 1A Pulse operating voltage: 5 ÷ 24 VDC Idling current: 0.34 A OFF current (ART = OFF): <80 µA OFF current (ART = ON): <80 µA Remote IN:... - Page 64 PART OF ELETTROMEDIA 62018 Potenza Picena (MC) Italy T +39 0733 870 870 - F +39 0733 870 880 elettromedia.com...
Need help?
Do you have a question about the S8 DSP and is the answer not in the manual?
Questions and answers
I cannot access the S8 DSP processor on my bike via the app as it says I need to minimally have firmware v1.0.6. When i try to upload the firmware file via usb on my computer it states that the s8 dsp doesn't have any space. Can you please help
To free up space on your Hertz S8 DSP processor to upload firmware v1.0.6, follow these steps:
1. Turn off the S8 DSP (LED status off).
2. Connect the S8 DSP to your PC/MAC using a USB cable.
3. The S8 DSP will appear as a USB mass storage device named “HERTZS8DSP (X:)” on your computer.
4. Open the device and locate the file named “software.hs8”.
5. Delete the “software.hs8” file to free up space.
6. You can now copy the new firmware file (e.g., “Hertz_S8_DSP_1_0_6.dsp”) to the device.
This answer is automatically generated