
Related Manuals for Philips HTS3377/51


Summary of Contents for Philips HTS3377/51
- Page 1 Register your product and get support at Register your product and get support at www.philips.com/welcome www.philips.com/welcome HTS3377...
-
Page 2: Table Of Contents
4 Get started Insert the remote control batteries Find the correct viewing channel Select menu display language Turn on Progressive Scan Change speaker settings Use Philips EasyLink Select a play source 5 Play Play a disc Play video Play music... -
Page 3: Important
1 Important Safety and important notice Warning • Risk of overheating! Never install the Home Theater System in a conÀ ned space. Always leave a space of at least 4 inches around the Home Theater System for ventilation. Ensure curtains or other objects never cover the ventilation slots on the Home Theater System. -
Page 4: Trademark Notice
Copyright notice This product incorporates copyright protection technology that is protected by method claims of certain U.S. patents and other intellectual property rights owned by Macrovision Corporation and other rights owners. Use of this copyright protection technology must be authorised by Macrovision Corporation, and is intended for home and other limited viewing uses only unless otherwise authorised by Macrovision Corporation. - Page 5 Windows Media and the Windows logo are trademarks, or registered trademarks of Microsoft Corporation in the United States and/or other countries. HDMI, and HDMI logo and High-DeÀ nition Multimedia Interface are trademarks or registered trademarks of HDMI licensing LLC. The USB-IF Logos are trademarks of Universal Serial Bus Implementers Forum, inc.
-
Page 6: Your Home Theater System
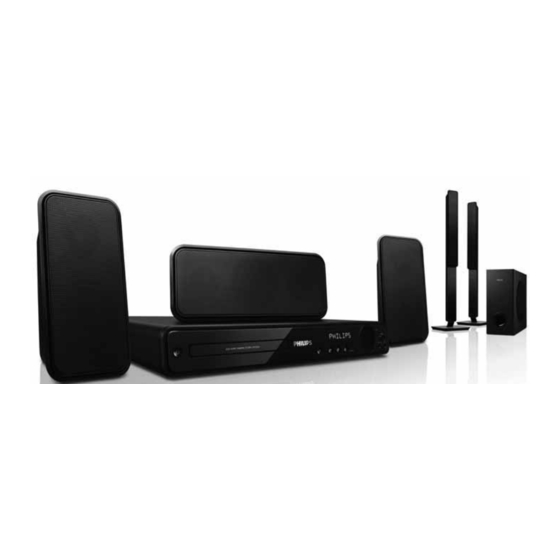
2 Your Home Theater System Congratulations on your purchase, and welcome to Philips! To fully beneÀ t from the support that Philips offers, register your product at www.philips.com/welcome. Feature highlights Video upscaling to 1080p Enjoy watching discs in the highest picture quality available for your HDTV. -
Page 7: Product Overview
Product overview Main unit c d e f g h ( Standby-On ) • Turns on the Home Theater System or switches to standby mode. b Disc compartment ( Open/Close ) • Opens or closes the disc compartment. ( Play/Pause ) •... -
Page 8: Remote Control
Remote Control ( Standby-On ) • Turns on the Home Theater System or switches to standby mode. • Press and hold to turn off the Home Theater System and all HDMI CEC compliant devices. ( Open/Close ) • Opens or closes the disc compartment. - Page 9 o Source buttons • AUDIO SOURCE : Selects an audio input source. • RADIO : Switches to FM band. • USB : Switches to the USB source. • DISC : Switches to the disc source. p OK • ConÀ rms an entry or selection. BACK •...
-
Page 10: Connect
Different types of connectors may be used to connect this product to your TV, depending on availability and your needs. A comprehensive interactive guide to help you connect your product is available at www. connectivityguide.philips.com. Place the Home Theater System •... -
Page 11: Connect Video Cables
• If your device supports HDMI CEC, you can control compliant devices with a single remote control. (see ‘Get started’ > ‘Use Philips EasyLink’). • If the TV has a DVI connection only, connect via a HDMI/DVI adaptor. Connect an audio cable for sound output. - Page 12 Option 2: Connect to the component video jack Connect the component video cable (not supplied) to the Y Pb Pr jacks on this Home Theater System and the COMPONENT VIDEO input jacks on the • If a progressive scan TV is used, you may turn on the progressive scan mode.
-
Page 13: Connect Speaker Cables To Speakers
Connect speaker cables to speakers For the rear speakers only Connect the speaker cables to the matching color jacks on the speakers (or speaker stands). Connect speaker to speaker stand For the rear speakers only Attach the speakers to the speaker stands and secure the position with screws. -
Page 14: Connect Radio Antenna
Connect radio antenna Connect the FM antenna to the FM75 jack on this Home Theater System (for some models, this cable is already connected). Extend the FM antenna and À x its ends to the wall. • For better FM stereo reception, connect to an external FM antenna. - Page 15 Connect audio from cable box/ recorder/game console You can choose to connect to analog or digital jack depending on the device capabilities. Connect to analog jacks Connect the audio cables (not supplied) to the AUDIO IN-AUX2 jacks on the Home Theater System and the AUDIO output jacks on the device.
-
Page 16: Connect Power Cord
Note • To listen to the audio output from this connection, press AUDIO SOURCE repeatedly until ‘OPTI IN’ is displayed on the display panel. Connect portable media player Connect a 3.5mm stereo audio cable (not supplied) to the MP3 LINK jack on this Home Theater System and the phone jack on the portable media player (such as MP3 player). -
Page 17: Get Started
4 Get started Insert the remote control batteries Slide the battery cover off the back of the remote control. Insert the 2 supplied batteries (AAA). Be sure the + and - ends of the batteries line up with the markings inside the case. Slide the cover back into position. -
Page 18: Find The Correct Viewing Channel
• Go to the lowest channel on your TV, then press the Channel Down button until you see the Philips screen. • Press SOURCE button repeatedly on the remote control of your TV. -
Page 19: Turn On Progressive Scan
Turn on Progressive Scan If the TV supports progressive scan output, you can connect this Home Theater System and the TV using component video connection. (see ‘Connect video cables’ > ‘Option 2: Connect to the component video jack’). Turn on the TV and ensure that the TV progressive scan mode is deactivated (see the TV user manual). -
Page 20: Change Speaker Settings
Change speaker settings Ideally, the distance between listening position and all the speakers should be the same. If not, change the speaker settings based on their distance from the listening position to obtain the best possible surround sound. Press DISC . Press SETUP . -
Page 21: Use Philips Easylink
Use Philips EasyLink Your Home Theater System supports Philips EasyLink, which uses the HDMI CEC (Consumer Electronics Control) protocol. EasyLink-compliant devices that are connected through HDMI connectors can be controlled by a single remote control. Note • Philips does not guarantee 100% interoperability with all HDMI CEC devices. - Page 22 Map the audio inputs to the connected devices Note • Before you start, ensure that the audio output of the HDMI TV and other HDMI devices have been connected to the audio input jacks on this Home Theater System. Press DISC . Press SETUP .
-
Page 23: Select A Play Source
Select a play source On the main unit • Press SOURCE button repeatedly to select: DISC > USB > FM > AUX 1 > AUX 2 > COAX IN > OPTI IN > MP3 LINK > DISC ... On the remote control •... -
Page 24: Play
5 Play Play a disc Caution • Never place any objects other than discs into the disc compartment. • Never touch the disc optical lens inside the disc compartment. Press to open the disc compartment. Insert a disc with its label facing up. •... - Page 25 Change video play Play a title. Use the remote control to change the video play. Button Action AUDIO Selects an audio language or SYNC channel on a disc. SUBTITLE Selects the subtitle language on a disc. REPEAT Selects or turns off repeat or shufÁ...
-
Page 26: Sync Audio Output With Video Play
Access VCD menu or preview menu The PBC (Playback Control) for VCD is activated by default in the factory. When you load in a VCD, the contents menu is displayed. Press to select a play option, then press OK to start play. •... - Page 27 Repeat play a speciÀ c section During playback, press » The disc status menu is displayed. Select [Repeat] in the menu, then press . Move to [ A-B] in the menu, then press OK to set the starting point. Press OK again to set the ending point. »...
-
Page 28: Play Music
Play music Control audio track play Play a track. Use the remote control to control the track. Button Action Starts, pauses or resumes disc play. Stops disc play. Skips to the next track. Skips to the beginning of the current track. Press twice to jump to the previous track. -
Page 29: Play Photo
Play photo Play photo as slideshow This Home Theater System can play JPEG photos (À les with .jpeg or .jpg extensions). Insert a disc or USB that contains the JPEG photos. Press DISC or USB . » Slideshow begins (for Kodak disc) or a contents menu (for JPEG disc) is displayed. -
Page 30: Play From Usb Device
Play musical slideshow Play MP3/WMA music À les and JPEG photo À les simultaneously to create musical slideshow. The MP3/WMA and JPEG À les must be stored on the same disc or USB device. Play MP3/WMA music. Navigate to the photo folder/album and press OK to start slideshow play. -
Page 31: Play From Portable Media Player
Play from portable media player Simply connect your portable media player (e.g. MP3 player) to this Home Theater System to enjoy superb sound quality from your music collections. Connect a 3.5mm stereo audio cable (not supplied) from the MP3 LINK jack on this Home Theater System to the ‘headphone’... -
Page 32: Listen To Radio
Listen to radio Press RADIO . Use the remote control to control the radio. Button Action Selects a preset radio station. Tunes the radio frequency up or down. Press and hold this button to erase the current radio station from the preset list. -
Page 33: Advanced Features
6 Advanced features Create MP3 audio À les You can convert audio CDs into MP3 audio À les with this Home Theater System. The created MP3 audio À les are saved in your USB device. Option Description [Speed] Selects the write-to-À le speed. If [Normal] speed is selected, music play can be heard while creating the MP3 À... -
Page 34: Adjust Sound
7 Adjust sound Control the volume Press VOL +/- to increase or decrease the volume. • To mute, press • To restore the volume, press or press VOL + . Select surround sound Press SURR repeatedly to select the best surround output that’s available on the disc. -
Page 35: Adjust Microphone Volume Level
Adjust microphone volume level Connect a microphone (not supplied) to MIC jack on this Home Theater System. Turn on the microphone output. (see ‘Karaoke settings’.) Press MIC ( VOL +/- ) to adjust the microphone volume. » ‘MIC XX’ is displayed. •... -
Page 36: Adjust Settings
8 Adjust settings You can customize various kinds of settings as you prefer. Refer to the following instructions to navigate through the setup menus. Symbol Options [General Setup] [Audio Setup] [Video Setup] [Preferences] Note • If the setup option is grayed out, it means the setting cannot be changed at the current state. - Page 37 You must turn on the HDMI CEC operations on the TV/devices before you can enjoy the EasyLink controls. See the TV/devices manual for details. • Philips does not guarantee 100% interoperability with all HDMI CEC compliant devices. [Disc Lock] Sets play restriction for a speciÀ c discs.
-
Page 38: Audio Setup
[Screen Saver] Turns off or on the screen saver mode. Helps to protect the TV screen from being damaged due to over exposure to a static image for too long. • [On] – Sets the screen saver to appear after 5 minutes of inactivity (for example, in pause or stop mode). - Page 39 [Speakers Delay] Sets the delay time for the center and rear speakers if they are placed closer to the listening position, so that the sound output from all speakers reach the listening position at the same time. 1) To start, press OK . 2) Select a speaker in the menu, then press to set the delay time.
-
Page 40: Video Setup
Video setup Press SETUP . » [General Setup] menu is displayed. Press to select [Video Setup] , then press Select an option, then press OK Select a setting, then press OK . • To return to the previous menu, press BACK . - Page 41 [HDMI Setup] Selects the HDMI video setting when you connect this Home Theater System and the TV with a HDMI cable. • [Wide Screen Format] – DeÀ nes the wide screen format for disc play. Option Description [Superwide] Center position of the screen is stretched less than the side.
-
Page 42: Preferences
Preferences Note • Stop disc play before you can access to Press SETUP . » [General Setup] menu is displayed. Press to select [Preferences] , then press Select an option, then press OK . Select a setting, then press OK . •... - Page 43 Displays the software version of this Home Theater System. • This information is required when you want to À nd out if a newest software version is available at the Philips website that you may download and install on this Home Theater System. [Default]...
-
Page 44: Additional Information
OK . Write down the version number, then press SETUP to exit the menu. Go to www.philips.com/support to check the latest software version available for this Home Theater System. If the latest software version is higher than the software version of this Home Theater System, download it and store onto a CD-R or USB Á... -
Page 45: Specià Cations
10 Specifications Note • SpeciÀ cation and design are subject to change without notice Playback media • DVD-Video, DVD+R/+RW, DVD-R/-RW, DVD+R DL, CD-R/CD-RW, Audio CD, Video CD/SVCD, Picture CD, MP3-CD, WMA-CD, DivX-CD, USB Á ash drive AmpliÀ er • Total output power: •... - Page 46 Subwoofer • Impedance: 4 ohm • Speaker drivers: 165 (6.5”) woofer • Frequency response: 40 Hz ~ 150 Hz • Dimensions (WxHxD): 163 x 363 x 369 (mm) • Weight: 4.7 kg Laser speciÀ cation • Type: Semiconductor laser GaAIAs (CD) •...
-
Page 47: Troubleshooting
Home Theater System and get support at www.philips.com/ welcome. If you contact Philips, you will be asked for the model and serial number of your Home Theater System. The model number and serial number are on the back or bottom of your Home Theater System. - Page 48 Sound No sound. • Ensure that the audio cables are connected and press the correct input source (for example, AUDIO SOURCE , USB ) to select the device you want to play. No sound on HDMI connection. • Sound cannot transmit through HDMI connection if the connected device is non- HDCP compliant or only DVI-compatible.
-
Page 49: Glossary
12 Glossary Aspect ratio Aspect ratio refers to the length to height ratio of TV screens. The ratio of a standard TV is 4:3, while the ratio of a high-deÀ nition or wide TV is 16:9. The letter box allows you to enjoy a picture with a wider perspective on a standard 4:3 screen. - Page 50 A À le format with a sound data compression system. MP3 is the abbreviation of Motion Picture Experts Group 1 (or MPEG-1) Audio Layer 3. With the MP3 format, one CD-R or CD-RW can contain about 10 times more data than a regular CD.
- Page 51 Abkhazian 6566 Afar 6565 Afrikaans 6570 Amharic 6577 Arabic 6582 Armenian 7289 Assamese 6583 Avestan 6569 Aymara 6589 Azerhaijani 6590 Bahasa Melayu 7783 Bashkir 6665 Belarusian 6669 Bengali 6678 Bihari 6672 Bislama 6673 Bokmål, Norwegian 7866 Bosanski 6683 Brezhoneg 6682 Bulgarian 6671 Burmese...
- Page 55 © 2009 Koninklijke Philips Electronics N.V. All rights reserved. sgpjy_906/51_02...
Need help?
Do you have a question about the HTS3377/51 and is the answer not in the manual?
Questions and answers