Advertisement
Quick Links
Advertisement

Subscribe to Our Youtube Channel
Related Manuals for Kingtec D30A


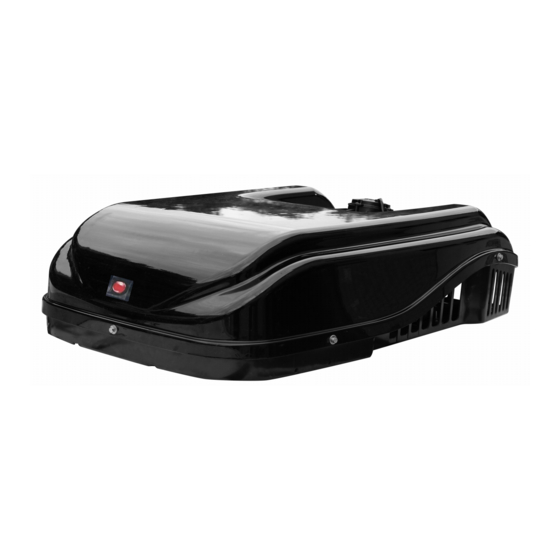
Summary of Contents for Kingtec D30A
- Page 1 D 30A RV Air Conditioning Installation Manual...
- Page 2 Preface In order to ensure the best use effect of the products of the company, improve the reliability, economy and reduce the fault frequency, a scientific and reasonable installation process is particularly important. This manual provides technical guidance for the pre-sale and after-sales service personnel of the company, Please all service personnel implement it carefully.At the same time, this manual can also provide reference for the installation of relevant supporting manufacturers.
-
Page 3: Ⅰ. Safety Precautions
Ⅰ. Safety precautions ⒈ Special work clothes and anti-skid shoes must be worn, and slippers, shorts and vests are strictly prohibited for installation operation; ⒉ Be sure to wear eyeglasses or safety glasses to prevent dust, iron chips and impurities from falling into the eyes when working with the head up;... - Page 4 Ⅱ. Preparations before the installation 1. Determine the installation position of the air conditioning The air conditioning unit shall be installed on the top of the car, the return air of the unit is inhaled from bottom to up, and the outlet air is discharged into the vehicle from top-down. 2.
- Page 5 7. The inner air duct is beautiful and generous, the air supply can be adjusted the direction at will to ensure the air supply uniformity. 8. High shock resistance,normal operation in vibration and bumpy sections. 9. Light weight, simple and easy to install. Ⅳ.
- Page 6 Ⅴ. Outline of installation dimension drawing Outline dimension drawing 2. Installation of hole opening dimension drawing 3. Outline dimension drawing of the inner air duct...
- Page 7 Ⅵ. Unit installation instructions 1. Car roof strength The weight of air conditioner is bout 45KG.Before installation, confirm whether the strength of the installation position can carry the unit, so as not to cause personnel injury and equipment damage. 2. Open the hole As much as possible to Install the unit in the middle and front of the roof to ensure that the outdoor exhaust of the unit is not affected.Open a vent with the size of 355x355mm (please...
- Page 8 affect the normal discharge of air conditioning condensate, seriously, will lead to air conditioning leakage into the car.So before installation, try to use rubber and plastic sponge board to stick it flat, and then measure the height between the front and rear position of the air conditioning bottom plate and the car roof, to maintain the same size.
- Page 9 5. Fixed to the mounting plate of air guide duct Align the four installation holes on the ③ air guide duct mounting plate with the installation holes of the air conditioning outdoor unit, fix it with the outdoor unit of air conditioning using the ④...
- Page 10 ⑨.M6 Gasket ⑩.M6 gasket ⑪.M6 bolt 6. Fix the inside air duct mounting plate Fix the four M8-holes on the air conditioning outdoor under plate with the ⑤ internal air duct mounting screw first.The ⑥ fixed profile is fixed with the ⑦ hexagon thread mounting column, and the tightness can be adjusted according to the usage situation.
- Page 11 ①, key function: 16. Power supply switch: Short press power on , long press 3 seconds shut off.During the shutdown state, press for 10 seconds all the settings will be restored to the factory settings. 15. Wind speed +:Increase air supply volume; increase low voltage protection value. 14.
- Page 12 Press [temperature +] to increase low pressure protection recovery value and [temperature-] to reduce low pressure protection recovery value ④, operating mode : 1. Wind supply mode: the wind speed is adjustable from 1 to 5, the temperature is not adjustable, the green line voltage =0V.
- Page 13 remote control appearance Ⅷ. Return air filter grill maintenance Clean the return air filter grill regularly, usually once a month, but weekly in dirty environments.The return air filter grill can be observed by the naked eye whether is dirty or not. If in the black or light gray appearance,please clean it.
- Page 14 Check and repair the leakage refrigerant Insufficient or parts, and recharge leakage refrigerant 2. Temperature setting is too Readjust the temperature high interior temperature Do not control sensor (thermistor) is Check and replace refrigeration open circuit defrosting temperature control is not reset thermostat regulator Check and replace...
- Page 15 2. Air conditioning air duct is Clean the air duct blocked 4. The evaporation fan fuse is Check and replace fused or the relay is damaged 5. Evaporation fan is damaged Check and replace 6. The input voltage of the Check the air conditioning wiring and evaporation fan is low grounding...
- Page 16 Ⅹ. Electrical schematic diagram According to the different control panel, the schematic diagram is also different, there are mainly one kind of electrical schematic diagram. During electrical repair, view the appropriate schematic diagram according to the fitted panels. 1. Touch-type panel...
- Page 17 Attached 1 Technical parameter sheet Model D30A Refrigerating capacity 10200BTU Power 110VAC or 12VDC Consumed power 750W Running current Refrigerant R 134a /700g Evaporative air volume 450m outline size (long * width * 1009*721*270mm height) Unit weight 74kg ● Refrigeration condition: indoor dry ball temperature80.6℉, wet ball temperature 67.1℉...
- Page 18 Attached 2 Customer information: Name Address zip code telephone Date of purchase Model of unit Serial number Install Place of purchase Address zip code telephone...
Need help?
Do you have a question about the D30A and is the answer not in the manual?
Questions and answers