Table of Contents
Advertisement
Available languages
Available languages
INSTRUCTION MANUAL
MODE D'EMPLOI
MANUAL DE INSTRUCCIONES
10" CHAINSAW / POLE SAW
SCIE À CHAÎNE / SCIE À LONG
MANCHE 10 PO
SIERRA DE CADENA / SIERRA
DE POSTE DE 10"
BECSP601
Please read before returning this product for any reason.
À lire avant de retourner ce produit pour quelque raison que ce soit.
Lea el manual antes de devolver este producto por cualquier motivo.
Advertisement
Table of Contents

Related Manuals for Black & Decker BECSP601


Summary of Contents for Black & Decker BECSP601
- Page 1 MANCHE 10 PO SIERRA DE CADENA / SIERRA DE POSTE DE 10" BECSP601 Please read before returning this product for any reason. À lire avant de retourner ce produit pour quelque raison que ce soit. Lea el manual antes de devolver este producto por cualquier motivo.
- Page 2 English (original instructions) Français (traduction de la notice d’instructions originale) Español (traducido de las instrucciones originales)
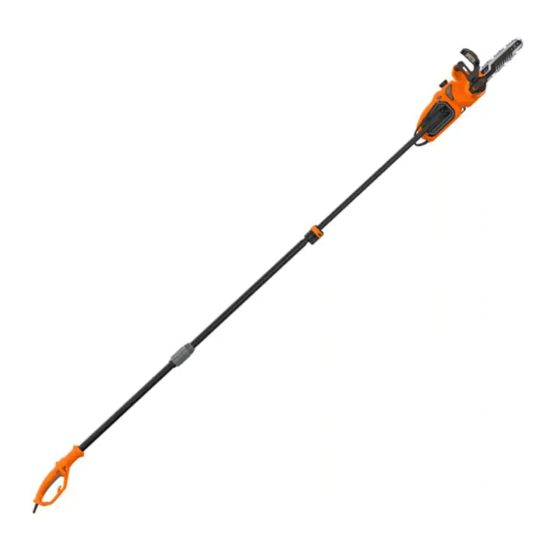
- Page 3 Fig. A BECSP601 Components Power cord Handle assembly Trigger switch Extension cord retainer Coupling end Lock-off button Extension cord slot Extension assembly Front hand guard Extension cord adapter Threaded sleeve Guide bar Oil cap Pole saw adapter Saw chain Oil level indicator (not shown)
- Page 4 Composants Enrouleur de la rallonge Assemblage du manche extensible Gâchette Fente de la rallonge Manchon fileté Bouton de verrouillage Adaptateur de la rallonge Adaptateur de la scie à long manche Protecteur de la poignée avant Capuchon de l’huile Plaque de l’adaptateur de la scie à Guide-chaîne Indicateur du niveau d’huile (pas long manche...
- Page 5 Fig. D Fig. E 1/8" (3 mm) Fig. F Fig. G Fig. H Fig. I...
- Page 6 Fig. J Fig. K Fig. L Fig. M Fig. N Fig. O Fig. P Fig. Q...
- Page 7 Fig. R Fig. S Fig. T Fig. U Fig. W Fig. V .025" (0.635 mm) Fig. T 60° Fig. X...
-
Page 8: General Power Tool Safety Warnings
English Electrical Safety WARNING: Read all safety warnings and all instructions. Failure to follow the warnings and a ) Power tool plugs must match the outlet. Never instructions may result in electric shock, fire and/or modify the plug in any way. Do not use any serious injury. -
Page 9: Causes And Operator Prevention Of Kickback
English h ) Do not let familiarity gained from frequent use of b ) Always hold the chain saw with your right hand tools allow you to become complacent and ignore on the rear handle and your left hand on the front tool safety principles. - Page 10 English Tip contact in some cases may cause a sudden reverse could hit while you are cutting through a particular log reaction, kicking the guide bar up and back towards or branch. the operator. 10 . Keep your saw chain sharp and properly tensioned. A loose or dull chain can increase the chance of Pinching the saw chain along the top of the guide bar may kickback.
-
Page 11: Chain Saw Names And Terms
English Saw Chain ‑ A loop of chain having cutting teeth, that cut • Do not cut vines and/or small under brush. • the wood,and that is driven by the motor and is supported • Use extreme caution when cutting small size brush and by the guide bar. -
Page 12: Specific Safety Rules
English SAVE THESE INSTRUCTIONS reduce the risk of disconnection of appliance cord from the extension cord during operating: WARNING ‑ Do not operate near electrical power i) Make a knot as shown in Figure Y; or lines. The unit has not been designed to provide protection from electric shock in the event of contact ii) Secure the extension cord to the appliance plug as with overhead electric lines, Consult local regulations... - Page 13 English permanent respiratory or other injury. Always attachment. Do not use more than one extension pole. Do use approved respiratory protection appropriate for not use the extension pole with any other attachments. the dust exposure. Direct particles away from face • Stay alert.
-
Page 14: General Safety Rules
English ‑ while on aerial booms, buckets or platforms. • Use devices such as reduced kickback chain, chain braking system and special guide bars that reduce the risks ‑ during high wind or storming weather. associated with kickback. GENERAL SAFETY RULES • Only use replacement bars and chains specified by the manufacturer or the equivalent. -
Page 15: Additional Safety Information
English Reduced Kickback Chain ‑ A chain that complies with • respiratory or other injury. Always use NIOSH/OSHA the kickback performance requirements. (when tested on a approved respiratory protection appropriate for representative sample of chain saws. the dust exposure. Direct particles away from face Reduced Kickback Guide Bar ‑... -
Page 16: Assembly And Adjustments
English Motor from the guide bar 4 with light force from the middle finger and thumb as shown in Fig. D. There should be no Be sure your power supply agrees with the nameplate “sag” between the guide bar and the saw chain on the marking. -
Page 17: Filling The Oil Reservoir
English guard Against Kickback, to avoid the risk the tool from the power source and refill with the correct type of oil. Always empty oil tank when finished cutting. of kickback. nOTE: Use a high quality bar and chain oil for proper saw •... - Page 18 English Limbing • A retreat path should be planned and cleared as necessary before cuts are started. The retreat path should Removing the branches from a fallen tree. When limbing, extend back and diagonally to the rear of the expected leave larger lower limbs to support the log off the ground.
- Page 19 English Joining Extension Assembly to the Handle CUT FROM TOP (OVERBUCK) Assembly (Fig. K) AVOID CUTTING EARTH The two assemblies which make up the extension pole assembly are keyed to insure a correct assembly. If an assembly does not smoothly attach to another do not force fit. To attach the handle assembly to the extension assembly: 1.
- Page 20 English 3. Place the pole saw adapter plate 29 on the outside 3. Remove the pole saw adapter plate 29 from the of the chainsaw handle 10 and push the two sections pole saw adapter 28 by twisting the locking knob completely together so the chainsaw handle is clasped counterclockwise.
-
Page 21: Maintenance
English MAINTENANCE Electrocution Hazard. To prevent shock, do not operate • within 50' (15 m) of overhead electrical lines. Always check WARNING: To reduce the risk of serious personal surrounding area for hidden electrical lines. injury, turn unit off and disconnect it from Do not extend pole saw switch handle above •... -
Page 22: Register Online
English TWO-YEAR LIMITED WARRANTY 1. For best results use a 4.5 mm file and a file holder or filing guide to sharpen your saw chain. This will ensure you Black & Decker (U.S.) Inc. warranties this product to be free always get the correct sharpening angles. from defects in material or workmanship for a period of two 2. -
Page 23: Utilisation Prévue
FRAnçAis 1) Sécurité du lieu de travail AVERTISSEMENT : lire tous les avertissements de sécurité et toutes les directives. Le non‑respect a ) Tenir l’aire de travail propre et bien éclairée. des avertissements et des directives pourrait se Les lieux encombrés ou sombres sont propices solder par un choc électrique, un incendie et/ou une aux accidents. - Page 24 FRAnçAis e ) Gardez les poignées et surfaces d’emprise propres antidérapantes, un casque de sécurité ou des et libres de tout produit lubrifiant. Vérifier si les protecteurs auditifs lorsque la situation le requiert pièces mobiles sont mal alignées ou coincées, réduira les risques de blessures corporelles.
- Page 25 FRAnçAis blessures corporelles causées par les débris projetés ou L’un ou l’autre de ces réactions peut faire en sorte que le contact accidentel avec la scie à chaîne. perdiez le contrôle de la scie ce qui pourrait entraîner une blessure corporelle grave. Ne vous fiez pas exclusivement aux e ) Ne pas utiliser la scie à...
- Page 26 FRAnçAis 9 . Tenez la surface de travail libre de débris tels que • Ne pas tenter des opérations au‑delà de votre capacité ou d’autres arbres, des branches, des pierres, des votre expérience. Lisez soigneusement et comprenez toutes clôtures, des souches, etc. Éliminez ou évitez toute les instructions décrites dans ce guide.
-
Page 27: Consignes Importantes De Sécurité
FRAnçAis Rebond, rotatif ‑ Mouvement rapide vers le haut et 3 . Gardez les enfants éloignés : tous les visiteurs doivent • l'arrière de la scie à chaîne, qui peut se produire lorsque être tenus à une distance sécuritaire de l'aire de travail. la chaîne en mouvement près de la partie supérieure de 4 . -
Page 28: Règles De Sécurité Spécifiques
FRAnçAis 12 . Gardez toujours la rallonge éloignée de la zone de la Les lames glissent une fois l’outil éteint. Un moment coupe et placez la rallonge de manière à ce qu’elle ne d’inattention pendant l’utilisation de la scie à long manche soit pas prise dans les branches, et d’autres matériels, peut entraîner une blessure corporelle grave. - Page 29 FRAnçAis Pendant l’utilisation de la scie à long peut causer des lésions respiratoires graves et permanentes ou d’autres blessures. Utilisez manche toujours une protection respiratoire appropriée pour DANGER : Afin de réduire le risque de choc l’ e xposition à la poussière. Dirigez les particules loin du électrique, ne pas utiliser sur des surfaces visage et du corps.
-
Page 30: Règles Générales De Sécurité
FRAnçAis • Gardez les pieds et un équilibre bien solides. Ne pas trop • Avant de démarrer l’ o util, assurez‑vous que la chaîne n’ e st s’ é tirer. Trop s’ é tirer peut entraîner une perte d’ é quilibre ou pas en contact avec tout objet. - Page 31 FRAnçAis Chaîne de scie de remplacement : chaîne conforme • Commencez et continuez la coupe seulement avec la • chaîne se déplaçant à pleine vitesse. Si la chaîne se déplace aux exigences de performance de rebond de la norme à une vitesse lente, il y a un risque plus élevé qu’un rebond lorsqu’...
-
Page 32: Assemblage Et Ajustements
FRAnçAis • l’arsenic et le chrome provenant du bois de L’ é tiquette sur votre outil peut comporter les symboles suivants. construction traité chimiquement. Les symboles et les définitions sont les suivants : Pour réduire votre exposition à ces produits chimiques, BPM .... - Page 33 FRAnçAis ATTENTION : Chaîne tranchante. Portez toujours des vous assurant que les dents sont placées dans la bonne direction (Fig. F). gants protecteurs lorsque vous manipulez la chaîne. La chaîne est aiguisée et peut vous couper lorsqu'elle ne 5. Assurez-vous que la chaîne est placée correctement dans fonctionne pas.
-
Page 34: Utilisation De La Scie À Chaîne
FRAnçAis 2. Remettez le capuchon de l’huile et serrez dans le sens • Tenez fermement la poignée avant 11 de la main des aiguilles d’une montre. gauche et la poignée arrière de la main droite 10 afin de vous placer sur la gauche du guide‑chaîne. 3. - Page 35 FRAnçAis de retrait doit s’étendre à l’arrière et en diagonale vers l'arrière de la ligne prévue de la chute, comme illustré ci-dessous. SENS DE LA CHUTE 2 pi (51 mm) RETRAIT TRAIT D’ A BATTAGE 45° SENS ENTAILLE 2 pi (51 mm) LA CHUTE ARBRE 45°...
- Page 36 FRAnçAis de fixations ou accessoires.. Un démarrage 3. Mettez la scie à chaîne, puis tournez la chaîne de la scie et le guide vers le bas dans l’arbre, en utilisant le picot accidentel peut causer des blessures. comme une charnière. AVERTISSEMENT : Assemblez toujours complètement 4.
-
Page 37: Utilisation De La Scie À Long Manche
FRAnçAis AVERTISSEMENT : Assemblez toujours complètement extensible 31 pour fixer le manche extensible en place. l’assemblage du long manche ensemble avant de fixer Assurez-vous que le manche extensible ne se déplace la scie à chaîne à l’assemblage du long manche. pas avant d’utiliser. Ajouter l’assemblage du manche extensible ... - Page 38 FRAnçAis Utiliser la scie à long manche (Fig. A) Élaguer avec la scie à long manche (Fig. A, S, U) AVERTISSEMENT : Lisez et comprenez toutes les instructions. Ne pas suivre toutes les instructions AVERTISSEMENT : Laissez l'outil fonctionner à son indiqués ci‑dessous peut conduire à un choc électrique, propre rythme.
- Page 39 FRAnçAis Nettoyage 1. Pour les meilleurs résultats, utilisez une lime de 4,5 mm et un porte-lime ou un guide de limage pour aiguiser AVERTISSEMENT : enlever les saletés et la poussière la chaîne de votre scie. Cela assurera que vous obteniez hors des évents au moyen d’air comprimé...
-
Page 40: Garantie Limitée De Deux Ans
FRAnçAis GARANTIE LIMITÉE DE DEUX ANS Black & Decker (U.S.) In. garantit que ce produit est libre de défaut de matériau et de main-d'œuvre pour une durée de deux (2) ans suivant la date d'achat, à condition qu'il ait été utilisé en milieu domestique. La présente garantie limitée ne couvre pas les pannes causées par abus d'utilisation, dommage accidentel ou si une réparation a été... -
Page 41: Uso Pretendido
EsPAñOl 1) Seguridad en el Área de Trabajo ADVERTENCIA: Lea todas las advertencias de seguridad e instrucciones. El incumplimiento de las a ) Mantenga el área de trabajo limpia y bien advertencias e instrucciones puede provocar descargas iluminada. Las áreas abarrotadas y oscuras eléctricas, incendios o lesiones graves. - Page 42 EsPAñOl d ) Guarde la herramienta eléctrica que no esté en como máscaras para polvo, calzado de seguridad uso fuera del alcance de los niños y no permita antideslizante, cascos o protección auditiva, reducirá que otras personas no familiarizadas con ella o las lesiones personales.
- Page 43 EsPAñOl contacto con cableado oculto. Las cadenas de sierra El contacto de la punta en algunos casos puede causar una que hagan contacto con cable "vivo" pueden tener reacción inversa repentina, pateando la barra guía hacia partes de metal expuestas de la herramienta eléctrica arriba y hacia atrás hacia el operador.
- Page 44 EsPAñOl 7 . Utilice únicamente barras y cadenas de repuesto de metal expuestas de la herramienta estén “vivas” y dará especificadas por el fabricante o equivalentes. una descarga eléctrica al operador. 8 . Nunca permita que la cadena en movimiento haga •...
- Page 45 EsPAñOl Retroceso, rotacional ‑ El movimiento rápido hacia 3 . Mantenga a los niños alejados – Todos los visitantes • arriba y hacia atrás de la sierra que puede ocurrir cuando la deben mantener una distancia del área de trabajo. cadena de sierra en movimiento cerca de la parte superior 4 .
-
Page 46: Reglas De Seguridad Específicas
EsPAñOl de forma que no quede atrapado en ramas, y otro Lleve la sierra de poste por la manija con la cadena • material, durante el corte. de sierra detenida. Cuando transporte o almacene la sierra de poste, siempre ajuste la cubierta del dispositivo 13 . - Page 47 EsPAñOl Antes de operar la sierra de poste • Mantenga el área de trabajo limpia. Las áreas desordenadas pueden provocar lesiones. Para una operación segura, lea y comprenda todas • • Siempre desconecte el suministro de energía de la sierra las instrucciones antes de usar la sierra de poste.
-
Page 48: Reglas Generales De Seguridad
EsPAñOl un centro de servicio autorizado. ConsulteAccesorios el control de la sierra, lo que podría ocasionar lesiones en Mantenimiento. personales graves al usuario. Se deben seguir las siguientes precauciones para ‑ si tiene prisa. minimizar el retroceso: ‑ mientras está en un árbol o en una escalera. •... -
Page 49: Información De Seguridad Adicional
EsPAñOl Información de Seguridad Adicional ha demostrado que una barra guía de retroceso reducido reduce significativamente el número y la gravedad de los ADVERTENCIA: Nunca modifique la herramienta retrocesos cuando se prueba de acuerdo con los requisitos eléctrica o ninguna parte de ella. Podría resultar en de seguridad para las sierras eléctricas de cadena. -
Page 50: Montaje Y Ajustes
EsPAñOl ADVERTENCIA: Cadena móvil filosa. Para evitar la de identificación. Si tiene duda, use el calibre más pesado siguiente. Cuanto menor sea el número de calibre, más operación accidental, desconecte la herramienta de pesado será el cable. la fuente de energía antes de realizar las siguientes operaciones. -
Page 51: Llenado Del Depósito De Aceite
EsPAñOl 4. Revise la tensión de la cadena de la sierra, ajuste si es y la barra guía constantemente lubricadas. El indicador de necesario. nivel de aceite muestra el nivel de aceite en la sierra de 5. No tense demasiado la cadena de sierra ya que esto cadena. -
Page 52: Interruptor De Encendido/Apagado
EsPAñOl La posición adecuada de las manos requiere la mano 2. Para mantener la unidad en operación, debe continuar izquierda sobre la manija delantera 11 , con la mano derecha oprimiendo el gatillo. Para apagar la unidad, libere el gatillo. en la manija trasera 10 ... - Page 53 EsPAñOl de que el árbol no caiga en la dirección deseada o se 1. Siempre comience un corte con la cadena de sierra balancee y adhiera a la cadena de la sierra, detenga el funcionando a toda velocidad. corte antes de que se complete el corte y use cuñas para 2.
- Page 54 EsPAñOl ENSAMBLE Y AJUSTES DE SIERRA DE POSTE Unión de sierra de cadena y ensamble de poste de extensión (Fig. A, M–P) ADVERTENCIA: Para reducir el riesgo de lesiones personales serias, apague la unidad y desconecte de ADVERTENCIA: Cuchilla móvil filosa. Para evitar una la fuente de alimentación antes de realizar cualquier operación accidental, asegúrese que la unidad esté...
- Page 55 EsPAñOl Colocación adecuada de manos (Fig. S) 2. Con una mano sujetando firmemente el ensamble de extensión 26 , deslice el poste de extensión 32 hacia ADVERTENCIA: Para reducir el riesgo de lesiones afuera con la otra mano como se muestra en la Fig. R. personales serias,SIEMPRE use la posición de las Esto revelará...
-
Page 56: Mantenimiento
EsPAñOl Limpieza 1. Para encender la herramienta, presione el botón de bloqueo con su pulgar y después oprima el ADVERTENCIA: Sople la suciedad y el polvo de todos interruptor de gatillo con sus dedos como se los conductos de ventilación con aire seco, al menos muestra en la Fig. - Page 57 EsPAñOl 1. Para obtener los mejores resultados, use una lima de 4.5 MOnTERREY, n.l. mm y un soporte de lima o guía de lima para afilar su Av. Francisco I. Madero 831 Poniente - Col. ( 818 ) 375 23 13 cadena de sierra. Esto garantizará que siempre obtenga Centro los ángulos de afilado correctos.
- Page 58 EsPAñOl GARANTÍA LIMITA DE DOS AÑOS Excepciones Esta garantía no será válida en los siguientes casos: Black & Decker (EUA) Inc. garantiza que este producto está • Cuando el producto se hubiese utilizado en condiciones libre de defectos en material o mano de obra por un periodo distintas a las normales;...
- Page 60 Black & Decker (U.S.) Inc. 701 East Joppa Road, Towson, MD 21286 Copyright © 2020 10/20 Part No. N868347...
Need help?
Do you have a question about the BECSP601 and is the answer not in the manual?
Questions and answers