Table of Contents
Advertisement
Quick Links
MANUAL | TAGARNO FHD ZAP
VERSION: 1.9.1 | FIRMWARE 5.8 | 2021-06-15
CONTENTS
1.
2.
3.
4.
5.
6.
7.
8.
Go to tagarno.com/productmanuals to find manuals and tutorial videos.
9.
2
10.
2
11.
2
12.
2
13.
3
14.
4
13.
14.
6
7
10
12
14
15
15
15
16
17
1
Advertisement
Table of Contents

Related Manuals for tagarno FHD ZAP


Summary of Contents for tagarno FHD ZAP
-
Page 1: Table Of Contents
PC REQUIREMENTS LASER POINTER WARNING MAINTENANCE YOU HAVE RECEIVED WARRANTY ASSEMBLING - FLEX ARM ERGONOMICAL RECOMMENDATIONS ASSEMBLING - OTHER MOUNTING DECLARATION OF CONFORMITY OPTIONS COMPLIANCE STATEMENTS ASSEMBLING - LASER BEAM (US ONLY) Go to tagarno.com/productmanuals to find manuals and tutorial videos. -
Page 2: Intended Use
Do not dismantle any parts of the microscope, except where noted in the manual Never disassemble or clean internal optical surfaces 10. Use only the power supply provided from TAGARNO 11. Always turn off the system before unplugging, when possible 3. -
Page 3: You Have Received
5. YOU HAVE RECEIVED XKEY Control box Smart guide Camera head with lens Handles Power supply OPTIONS Flex arm advanced Flex arm inline... -
Page 4: Assembling - Flex Arm
6. ASSEMBLING - FLEX ARM TIP! Find the “How to Install” tutorial video here: www.tagarno.com/installzap ASSEMBLING | FLEXARM (1/2) Mount the table mount using the table clam. Assemble the bottom Mount the microscope to the top of the flex arm using the vesa of the flex arm and the table mount. - Page 5 ASSEMBLING | FLEX ARM (2/2) To increase stability, adjust the flex arm weight with the included For extra stability in locked positions, remove the rubber covering allen key. Turn it clockwise to decrease stability or counter on the side of the flex arm. clockwise to increase stability.
-
Page 6: Assembling - Other Mounting 13. Options
7. ASSEMBLING - OTHER MOUNTING OPTIONS ASSEMBLING | OTHER MOUNTING OPTIONS Alternatively, mount the microscope on a wall with an angle bracket or similar solution suitable for your process environment. These mounting options are not included with your delivery. To use angle bracket, detach Vesa mount and mount the angle bracket to the microscope. -
Page 7: Assembling - Laser Beam (Us Only)
8. ASSEMBLING - LASER BEAM (US ONLY) IMPORTANT! Laser beam attenuator. Unmount lens protection cap when using this microscope. - Page 8 Use only control boxes supplied by TAGARNO Power supply DC Jack Power socket 3000mm Input: 12V 0.5A (DC) Use only the power supply provided by TAGARNO: Brand/Model: Mean Well/GEM18I12 Protection class II 0.45-0.2A, 50/60Hz Input: 100-240V Overvoltage category ll 1.5A Max Output: 12V...
- Page 9 ASSEMBLING & CONNECTING (3/3) Connect USB 3.0 cable from the microscope to a PC. Connect the microscope to the XKEY Control box. Connect grounding cable to grounding point, to ensure ESD of the Connect the power supply cable to the power supply battery and microscope.
-
Page 10: Operation
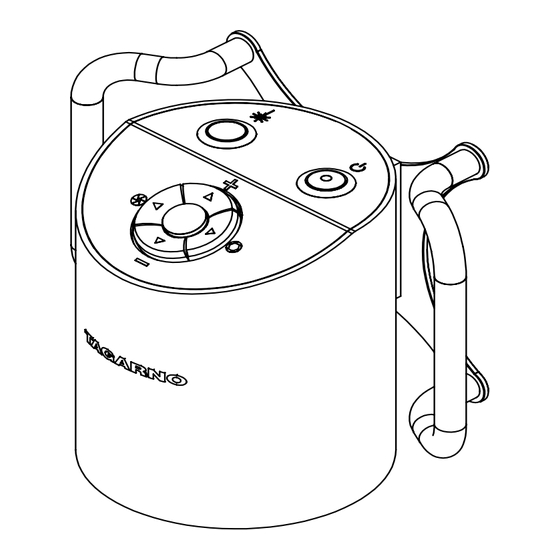
CONTROL OPTION | XKEY CONTROL BOX Control buttons for TAGARNO functions. XKEY Control box for TAGARNO functions. Do only connect equipment distributed by TAGARNO. Do only connect equipment distributed by TAGARNO. Short push switches between Iris, Gain and Preset mode. - Page 11 Continue by pressing the down arrow. 1. Open the OSD menu To open the TAGARNO On Screen Display Menu, press and hold the 8. Flip picture center button for approximately 5 seconds.
-
Page 12: Technical Specifications
10. TECHNICAL SPECIFICATIONS TECHNICAL SPECIFICATIONS (1/2) H: 121mm/4.76”, D: 100mm/3.94” Dimensions 1.5 kg/3.3 lbs Weight FHD 1080p, 1920x1080p at 59,94/50/29,97/25Hz Camera resolution HD 720p, 1280x720p at 59,94/50Hz 30x optical Camera zoom Autofocus Min: 78mm/3.07” Max: 645mm/25.39’’ (depends on flexarm) Work height Adjustable (depends on flexarm and mounting) Work depth Auto Monitor Detect... - Page 13 Response time 2 ms FHD 1920x1080 Signal format ACCESSORIES Lens +2, +3, +4, +5 and +10 (Plan - 1x) TAGARNO Ring light White Height Adjustment Table Magnetic lens ring TAGARNO Ring light IR XY table XKEY Control Box TAGARNO Ring light UV...
-
Page 14: Pc Requirements
11. PC REQUIREMENTS FULL HD 1080P @ 59,94/50HZ Desktop Laptop Windows 7, 8 or 10 (with DirectX 11) Memory Intel® Core™ i5 or i7 @2.4GHz, CPU: Intel® Core™ i5 or i7 (4th generation named 4xxx @2.4GHz (4th generation or newer) named 4xxx or newer) Hard Disc Space 1GB required (SSD type recommended) -
Page 15: Maintenance
• Clean the product with a damp cloth. Never use strong cleaning agents or chemicals - these may damage the microscope. Clean the lens regularly with isopropyl alcohol and a microfiber cloth or with the TAGARNO • cleaning kit. WARRANTY 13. -
Page 16: Declaration Of Conformity
COUNTRY Denmark PHONE +45 76251111 DESCRIPTION TAGARNO A/S hereby declares that the product listed above, consisting of a camera unit and a 12V power supply, is in compliance with the following European directives: Artificial Optical Radiation 2006/25/EU 2014/30/EU Electromagnetic Compatibility... -
Page 17: Compliance Statements
14. COMPLIANCE STATEMENTS INDUSTRY CANADA COMPLIANCE STATEMENT CAN ICES-3 (B)/NMB-3(B) This Class B digital apparatus meets the requirements of the Canadian Interference- Causing Equipment Regulations. Cet appareil numérique de la Classe B respecte toutes les exigences du Règlement sur le Matériel Brouilleur du Canada. FCC COMPLIANCE STATEMENT (UNITED STATES) Federal Communications Commission (FCC) Statement This equipment has been tested and found to comply with the limits for a Class B digital...
Need help?
Do you have a question about the FHD ZAP and is the answer not in the manual?
Questions and answers