Table of Contents
Advertisement
Quick Links
Advertisement
Table of Contents

Subscribe to Our Youtube Channel
Related Manuals for Permobil LapStacker XD Power


Summary of Contents for Permobil LapStacker XD Power
- Page 1 zip.clip.go Installation Guide...
-
Page 2: Welcome
Welcome Congratulations and thank you for choosing the LapStacker ® Please read this Installation and User Guide carefully to ensure you install and use the LapStacker correctly and safely. ® Once you’ve installed your LapStacker we’d love to see how you use it. Please feel ®... -
Page 3: Table Of Contents
Contents Page Contents Page Welcome .......................1 Contents .......................2 Warnings General ......................3 Injury ........................3 Wheelchair Balance & Vision ................4 Installation ......................4 Care of your LapStacker ..................4 ® LapStacker Installation ..................5 ® Trouble Shooting ....................7... -
Page 4: Warnings General
Warnings - Please read carefully ● Do not install or operate the LapStacker without first reading and understanding ® this Installation and User Guide. The current version is available online at lapstacker.com/installation ● Failure to do so may cause injury to you or those around you. ●... -
Page 5: Wheelchair Balance & Vision
Warnings - Please read carefully Warnings - Wheelchair Guidelines & Vision ● Please do not exceed your wheelchair manufacturer’s guidelines for loading or usage of attachments. ● Please do not stack items too high on your lap so as to reduce your ability to see where you are going. -
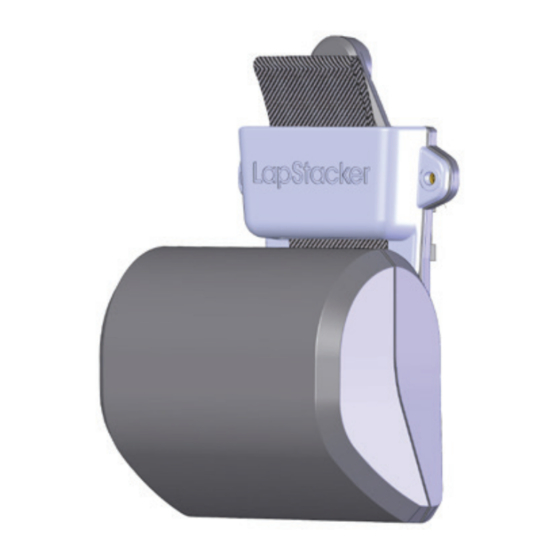
Page 6: Lapstacker ® Installation
XD POWER - Installation Component Set 4.0mm 3.0mm 2.0mm M3 x 6mm Allen Key Allen Key Allen Key screw LapStacker Assembly LapStacker Position Ideally, the LapStacker is positioned central to where items will be carried. BRACKET WEBBING CENTRE OF WEBBING KEEPER EXTRUSION RETRACTOR... - Page 7 Remove end cap. Slide Bracket Assembly onto the seat extrusion. Items Required: ● LapStacker Assembly Adjust to ideal position and tighten screws. WARNING! Avoid over tightening the Items Required: fasteners as this will strip the ● LapStacker Assembly threads. ● 4.0mm Allen Key Attach Keeper to Bracket with 2 x M3 fasteners.
-
Page 8: Trouble Shooting
Trouble Shooting Retractor Unit Assembly and Main Components. ● Please reference this illustration when using the trouble shooting guide on the following page. TOP HOUSING WEBBING SPOOL RETRACTOR WEBBING LOCKING TAB BASE HOUSING FASTENERS... - Page 9 Trouble Shooting NEED HELP? If your LapStacker problem is not listed below OR you are having trouble fixing the ® issue and need help, please contact Adaptdefy directly and our staff will work with ® you to get your LapStacker working correctly.
- Page 10 Trouble Shooting Buckles come off of the webbing If the webbing has retracted into the housing as a result of the Buckles coming off, please view section 2 of the trouble shooting guide (page 8). With the webbing outside of the housing, feed the webbing loop back through the Keeper slot.
Need help?
Do you have a question about the LapStacker XD Power and is the answer not in the manual?
Questions and answers