Gigamon GigaVUE H Series Installation Manual
Hide thumbs
Also See for GigaVUE H Series:
- Hardware installation manual (136 pages) ,
- Installation manual (82 pages) ,
- Installation manual (83 pages)

Related Manuals for Gigamon GigaVUE H Series


Summary of Contents for Gigamon GigaVUE H Series
-
Page 1: Gigavue-Hc1 Hardware Installation Guide
GigaVUE-HC1 Hardware Installation Guide GigaVUE H Series Product Version: 5.16 Document Version: 1.0 (See Change Notes for document updates.) - Page 2 Gigamon Inc.. Trademark Attributions Gigamon and the Gigamon logo are trademarks of Gigamon in the United States and/or other countries. Gigamon trademarks can be found at www.gigamon.com/legal- trademarks.
-
Page 3: Change Notes
GigaVUE-HC1 Hardware Installation Guide Change Notes When a document is updated, the document version number on the cover page will indicate a new version and will provide a link to this Change Notes table, which will describe the updates. Product Document Date Change Notes... -
Page 4: Table Of Contents
GigaVUE-HC1 Hardware Installation Guide Contents GigaVUE-HC1 Hardware Installation Guide Change Notes Contents About the GigaVUE H Series and TA Series Introducing the GigaVUE-HC1 GigaVUE-HC1 Overview Introducing the GigaVUE-HC1 Chassis Software Upgrade Using USB Drive Chassis Cooling Air Flow Direction AC- and DC-Powered GigaVUE-HC1 GigaVUE-HC1 Base Chassis Port Numbering Module Status LEDs... - Page 5 Command-Line Modes Entering Commands in the CLI Command-Line Syntax – Entering Commands The Basic Commands Completing the Initial GigaVUE H Series H Series Setup Enter the Configure Command-Line Mode Enabling the GigaVUE H Series H Series Web Server Initial User Account Configuration Configuring the GigaVUE H Series H Series Host Name...
- Page 6 Communication Equipment Grounding Bonding of Battery Return (BR) Input Terminals Connections Maintenance Additional Sources of Information Documentation How to Download Software and Release Notes from My Gigamon Documentation Feedback Contact Technical Support Contact Sales Premium Support The Gigamon Community Glossary...
-
Page 7: About The Gigavue H Series And Ta Series
GigaVUE-HC1 Hardware Installation Guide About the GigaVUE H Series and TA Series The Gigamon Visibility and Analytics Fabric provides 1Gb/10Gb/40Gb/100Gb support. The GigaVUE H Series H Series and TA Series include the following models that run GigaVUE-OS: GigaVUE-HC1 ■ GigaVUE-HC2 ■ GigaVUE-HC3 ■ GigaVUE H Series-TA10 ■... -
Page 8: Introducing The Gigavue-Hc1
GigaVUE-HC1 Hardware Installation Guide Introducing the GigaVUE-HC1 This chapter introduces the GigaVUE-HC1 of Gigamon Traffic Platform nodes, describes their features and functions, and provides an orientation to the physical layout of the GigaVUE-HC1. Refer to the following sections for details: About the GigaVUE H Series and TA Series... -
Page 9: Introducing The Gigavue-Hc1 Chassis
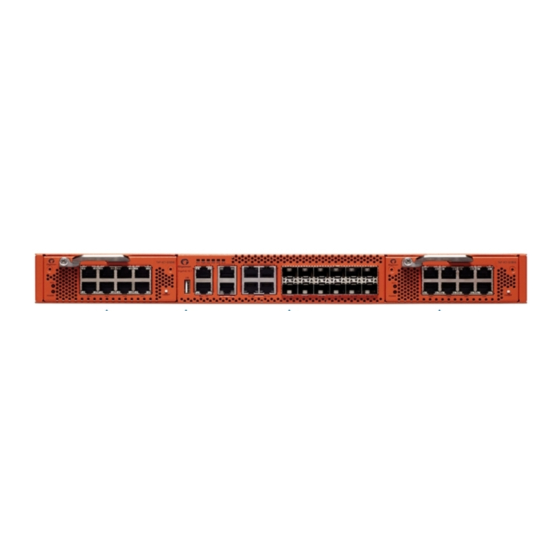
GigaVUE-HC1 Hardware Installation Guide Introducing the GigaVUE-HC1 Chassis The fully-assembled GigaVUE-HC1 chassis consists of a 1RU, rack-mountable, 19in-wide chassis with management, network, and tool ports at the front and power connections and fans at the rear. Figure 1Front View of the GigaVUE-HC1 Chassis summarizes the bays and components at the front and Figure 2Rear View of the GigaVUE-HC1 Chassis... -
Page 10: Software Upgrade Using Usb Drive
GigaVUE-HC1 Hardware Installation Guide Figure 2 Rear View of the GigaVUE-HC1 Chassis Table 1: GigaVUE-HC1 Chassis Components Front Components on the GigaVUE-HC1 Chassis Module Bays The base chassis is in the center and numbered 1. Slots (bays) are numbered 2-3 from left to right. -
Page 11: Chassis Cooling
GigaVUE-HC1 Hardware Installation Guide Insert the drive into a GigaVUE-HC1 with network access and use the image fetch CLI ■ command with the usb download parameter. Chassis Cooling The fans on the GigaVUE-HC1 run at 100% of their maximum speed on power up, then drop to approximately 65% during normal operations. -
Page 12: Air Flow Direction
-----------------------------------------------------------... Air Flow Direction The air flow direction is from the front of the GigaVUE H Series chassis to the rear. The rear- mounted fans pull air from the front to the back of the chassis. For environments with hot/cold aisles, install the chassis so the intake air at the front of the chassis is cold. -
Page 13: Port Numbering
GigaVUE-HC1 Hardware Installation Guide Figure 3 GigaVUE-HC1 Management Ports Port Numbering The base chassis uses standard conventions for identifying network/ tool ports, both on the modules themselves, as well as in the CLI: Introducing the GigaVUE-HC1 GigaVUE-HC1 Base Chassis... -
Page 14: Module Status Leds
GREEN indicates the link is operationally up Breakout Panels Breakout panels let you connect ports on a GigaVUE H Series node to a tool or network port or TAP for port breakout or aggregation. The following breakout panels are available: PNL-M341/PNL-M341T ■... -
Page 15: Tap-Hc1-G10040 Module
GigaVUE-HC1 Hardware Installation Guide Module Description Section The PRT-HC1-Q04X08 line card module increases the port PRT-HC1-Q04X08 PRT-HC1-Q04X08 density and allows GigaVUE-HC1 to connect with GigaVUE- Module Module TA Series and GigaVUE HC Series nodes with higher-speed (40Gb) links Generation 3 GigaSMART module, (SMT-HC1-S), gives 80Gb SMT-HC1-S (Gen 3 Generation 3 throughput and can be used to provide the ThreatINSIGHT... -
Page 16: Bps-Hc1-D25A24 Bypass Combo Module
To use the copper bypass functionality, the GigaVUE-HC1 must be running GigaVUE-OS version 4.8 or higher. For configuration information, refer to the chapter “Configuring Inline Bypass Solution on GigaVUE H Series TAP Modules” in the GigaVUE-OS CLI Reference Guide. Using TAP-HC1-G10040 Module for Gigamon Resiliency for Inline Protection Gigamon Resiliency for Inline Protection (GRIP)™... - Page 17 GigaVUE-HC1 Hardware Installation Guide Bypass Combo Module with two SX/SR (50/125μm multimode) inline network port pairs ■ and four regular SFP+ and SFP+ copper port cages (BPS-HC1-D25A24) (Figure 5Bypass Combo Module BPS-HC1-D25A24) Before installing the BPS-HC1-D25A24 Bypass Combo Module, the GigaVUE-HC1 must be running software version 5.0 or higher.
- Page 18 GigaVUE-HC1 Hardware Installation Guide Figure 5 Bypass Combo Module BPS-HC1-D25A24 Module Status LEDs The following module status LEDs are located on the front of the bypass combo module: RDY is the Ready LED. It has the following states: ■ RED indicates system booting or module down GREEN indicates normal condition POWER is the Power LED.
-
Page 19: Prt-Hc1-X12 Module
: In the CLI, the inline network ports are referred to as x5 to x8. Using Bypass Combo Modules for Gigamon Resiliency for Inline Protection Gigamon Resiliency for Inline Protection (GRIP)™ is an inline bypass solution that connects two GigaVUE-HC1 nodes together so that one node provides high availability to the other node when there is a loss of power. -
Page 20: Smt-Hc1-S (Gen 3 Gigasmart Card)
GigaVUE-HC1 Hardware Installation Guide SMT-HC1-S (Gen 3 GigaSMART Card) GigaVUE-HC1 now supports an additional module called the Generation 3 GigaSMART card (SMT-HC1-S), which gives 80Gb throughput and can be used to provide the ThreatINSIGHT solution for security detection. Integrate this module with Threat Detection and Response functionality on GigaVUE-HC1 using GigaVUE-FM to enable faster provisioning and easier maintenance. For more information, refer to 'Threat Detection and Response' from GigaVUE Fabric Management Guide. -
Page 21: Prt-Hc1-Q04X08 Module
GigaVUE-HC1 Hardware Installation Guide Upgrade Instructions The SMT-HC1-S card was introduced with GigaVUE-OS 5.10.00 to be inserted on the GigaVUE-HC1 Chassis. The OS software is embedded on the GigaVUE-HC1 Chassis. The addition of Threat Detection and Sensor image to GigaVUE HC1 in GigaVUE-OS 5.10.01 increased the size of the downloaded file, which can cause failures when extracting the expanded image on the target. - Page 22 GigaVUE-HC1 Hardware Installation Guide Features All ports ,including breakout ports of this module, can be used as network ,tool, hybrid, circuit, inline network and tool ports. 2. The ports can be used for 10G/40G/4x10G stacking. 3. The module supports 4x10G breakout on the 40G ports using SR4 optics or PLR4/PSM4 optics 4.
- Page 23 GigaVUE-HC1 Hardware Installation Guide Color Description LED Q1….Q4 Port is administratively disabled, or the link is down. Solid Green Link up Port LED X1…X8 Port is administratively disabled, or the link is down. Solid Green Link up Activity LED Unused Introducing the GigaVUE-HC1 GigaVUE-HC1 Modules...
-
Page 24: Gigavue-Hc1 Installation Roadmap
GigaVUE-HC1 Hardware Installation Guide GigaVUE-HC1 Installation Roadmap This chapter provides a flow chart of the major steps you need to perform to get a GigaVUE-HC1 node unpacked, rack-mounted, installed, and connected. It also describes what you should do once you have completed the initial setup of the node. Refer to the following sections for details: First Steps –... -
Page 25: Next Steps
GigaVUE-HC1 Hardware Installation Guide Figure 1 Getting Started Roadmap Next Steps Once you have performed the initial configuration of the GigaVUE-HC1 node, installing, connecting, and configuring the node, you are ready to get started mapping traffic between network and tool ports. Refer to the GigaVUE-OS CLI Reference Guide, GigaVUE Administration Guide, and online help for information. -
Page 26: Assembling The Gigavue-Hc1 Node
3. Open the additional boxes containing the ordered modules and set them aside for assembly (each module is shipped in separate boxes). 4. Leave all protective filler panels in place in the chassis. DO NOT install the modules yet. Gigamon recommends rack-mounting the GigaVUE-HC1 chassis empty. Figure 1 GigaVUE-HC1 Out of the Box... -
Page 27: Rack-Mounting The Gigavue-Hc1 Chassis
GigaVUE-HC1 Hardware Installation Guide Rack-Mounting the GigaVUE-HC1 Chassis This section describes how to rack-mount the GigaVUE-HC1 chassis in a standard 1RU rack space using the hardware provided with the chassis. You can install the GigaVUE-HC1 chassis in two-post or four-post racks with a minimum depth of 16in (40.64cm). Safety Precautions Before you get started rack-mounting the GigaVUE-HC1 chassis, make sure you have read the following safety precautions:... -
Page 28: Four-Post Rack Mounting
GigaVUE-HC1 Hardware Installation Guide 2. Make sure you have not installed any modules in the chassis yet. Gigamon recommends rack-mounting the GigaVUE-HC1 chassis before installing modules to make it easier to handle the chassis during the installation. 3. Select a suitable location for the rack that will hold the GigaVUE-HC1 chassis. Choose a location that is clean, dust free, and well-ventilated. -
Page 29: Installing And Removing Modules Procedure
Removal). Install proper software versions prior to inserting any new modules. Gigamon often makes new modules available for GigaVUE-HC1 nodes. New modules are usually introduced starting with a new software release. Make sure you install the supporting software release before physically installing the new module. -
Page 30: Module Removal And Replacement Procedure (Hot Removal)
: The first time you install a module in the node, you need to configure the node to recognize it with the card command and save your changes with write memory. Refer to Configuring Basic GigaVUE H Series H Series Settings details. This completes the installation of the modules on the GigaVUE-HC1. -
Page 31: Fan Replacement Procedure
Insert the fan module into the empty slot and slide it until it is flush with the rear of the chassis and will not slide in any further. Next Steps Refer to Configuring Basic GigaVUE H Series H Series Settings for information on getting connected with the GigaVUE-OS to make your initial configuration settings. Assembling the GigaVUE-HC1 Node... -
Page 32: Basic Gigavue H Series Connections And Configuration
Entering Commands in the CLI Command-Line Syntax – Entering Commands The Basic Commands ■ Completing the Initial GigaVUE H Series H Series Setup ■ Grounding the GigaVUE-HC1 Chassis Locate the grounding holes near the left corner at the rear of the chassis... -
Page 33: Connecting Power To The Gigavue-Hc1
However, connecting both modules in a 1+1 configuration provides redundant power. The procedure for connecting power to the GigaVUE-HC1 is similar to the other GigaVUE H Series H Series nodes: GigaVUE H Series Chassis Number of Power Supply Type Modules GigaVUE-HC1 1. -
Page 34: Removing A Power Supply Module
GigaVUE-HC1 Hardware Installation Guide Note: For information on connecting the optional DC power supply modules, refer to Figure 4Connecting DC Power Supply Module Figure 2 Connecting AC Power (GigaVUE-HC1) 2. Plug the other end of the power cables into a power source that can supply adequate power. -
Page 35: Connecting Serial Console And Mgmt Ports
GigaVUE-HC1 Hardware Installation Guide To connect a -48V DC input to the DC power supply module: Plug the DC power cable adapter into the DC power supply. : Terminal block supports 10AWG. 2. If PSM grounding is required, connect earth ground to the SAFETY GROUND (green/yellow) terminal using a straight blade screwdriver. -
Page 36: Configuring Basic Gigavue H Series H Series Settings
Configuring Basic GigaVUE H Series H Series Settings This section describes how to perform the initial configuration of basic GigaVUE H Series H Series node settings over a serial terminal connection to the console port. The system administrator must initially log in with a default admin account using a default password, and then must immediately change the password through the jump-start script. -
Page 37: Run The Jump-Start Script
Initial User Account Configuration. Run the Jump-Start Script Gigamon provides GigaVUE H Series H Series nodes with a jump-start script that walks you through the process of configuring basic settings. Run this script as follows: Switch to Configure mode. Basic GigaVUE H Series Connections and Configuration... - Page 38 GigaVUE-HC1 Hardware Installation Guide The GigaVUE H Series H Series provides three command entry modes, each with increasingly powerful rights – Standard, Enable, and Configure. The jump-start script is only available in Configure mode: a. Type en <Enter> to switch to Enable mode.
- Page 39 Mgmt and Cluster Management port, keep in mind that NTP is also used over the eth0 Mgmt port on the GigaVUE H Series H Series node. In a case like this, you can only use one or the other.
-
Page 40: Configure Modules And Enable Ports
2. Wait at least two minutes after the system prompt appears for the modules to be initialized and then switch to Configure mode. The GigaVUE H Series H Series provides three command entry modes, each with increasingly powerful rights – Standard, Enable, and Configure. The jump-start script is only available in Configure mode: a. -
Page 41: Command-Line Basics
GigaVUE-HC1 Hardware Installation Guide show cards Output: Corrective Action Config does not show yes for any (config) # chassis box-id <integer>(config) modules (including base chassis) # card all Config shows yes for base chassis (config) # card all but not one or more modules The card all command configures the node for all currently unconfigured modules. - Page 42 GigaVUE-HC1 Hardware Installation Guide Differences in Commands for admin and default Level Users The commands available in the GigaVUE-OS are also different depending on whether you are logged in as admin or default level user. Commands listed in bold in Figure 6GigaVUE-OS Command-Line Modes are only available to admin level users.
-
Page 43: Entering Commands In The Cli
Figure 6 GigaVUE-OS Command-Line Modes : If you are working simultaneously with multiple GigaVUE H Series nodes, you may want to assign each a separate hostname so its easy to identify separate terminal sessions from the system prompt. Admin users can do this in Configure mode with the hostname <name>... -
Page 44: Command-Line Syntax - Entering Commands
GigaVUE-HC1 Hardware Installation Guide Technique Description only one command starting with the letter d, so you only have to enter d. If you have partially typed a command, you can press Tab and Command Completion the CLI will attempt to complete the command for you based on what has been entered so far. - Page 45 GigaVUE-HC1 Hardware Installation Guide Configure Mode Syntax Users of GigaVUE H Series nodes may be accustomed to entering the word config before many commands – config map, config port-filter, and so on. When using the GigaVUE-OS, the “config” part of the command is implied whenever you are working in Configure mode.
-
Page 46: The Basic Commands
GigaVUE-HC1 Hardware Installation Guide Figure 7 Viewing Paging Options The Basic Commands The following table lists each of the top level commands for the GigaVUE-OS in Configure mode. As described in Entering Commands in the CLI, the commands available in Configure mode are a superset of those available in Standard and Enable modes. - Page 47 Enters Configure mode. coreboot Upgrades the BIOS image on GigaVUE H Series-TA100 and GigaVUE-HC1. crypto Manages X.509 certificates for the GigaVUE H Series H Series node’s Web server. debug Generates a dump file for use in debugging issues with Gigamon Technical Support. disable Exits Enable mode and returns to Standard mode.
- Page 48 Creates a group of ports. port-pair Configures a port-pair on a pair of network ports within the same GigaVUE H Series H Series node. A port-pair is a bidirectional connection in which traffic arriving on one port in the pair is transmitted out the other (and vice-versa) as a pass-through TAP.
-
Page 49: Completing The Initial Gigavue H Series H Series Setup
Enables and disables SSH access, as well as manages settings. stack-link Configures a stack-link between two GigaVUE H Series H Series nodes in a cluster. Stack-links are used to carry data traffic between nodes in a GigaVUE H Series H Series cluster. -
Page 50: Enter The Configure Command-Line Mode
Enter the Configure Command-Line Mode. ■ Configure SSH access to the node.Refer to SSH. ■ Enable the GigaVUE H Series Web server for Web-based GUI access.Refer to Enabling ■ the GigaVUE H Series H Series Web Server. Configure some basic user accounts.Refer to Initial User Account Configuration. - Page 51 Host keys uniquely identify a server, helping guarantee that the server you are connecting to is the server you think it is. GigaVUE H Series includes default RSA v1/v2 and DSAv2-encrypted public host keys (SSH2 supports both RSA and DSA encryption algorithms). The first time you connect to GigaVUE H Series with an SSH2 client, the client will warn you that the host keys are not in your local cache and show you the actual host key presented by the GigaVUE-HC1.
-
Page 52: Enabling The Gigavue H Series H Series Web Server
GigaVUE-FM is Gigamon’s Web-based management interface for the GigaVUE H Series H Series. Use GigaVUE-FM for many node configuration, management, and operations tasks. To use GigaVUE-FM with a GigaVUE H Series H Series node, you must enable its Web server with the web enable command. For example: (config) # web enable Check the status of the Web server using the show web command. - Page 53 GigaVUE-HC1 Hardware Installation Guide : You can configure whether the GigaVUE H Series H Series node redirects all incoming HTTP connections to the HTTPS port with the web http redirect command. Open a supported browser. Refer to the GigaVUE Fabric Management Guide.
-
Page 54: Initial User Account Configuration
Next, you will probably want to set a few user accounts with different access levels. The GigaVUE H Series H Series node has a local account database that can optionally integrate with an LDAP, RADIUS, or TACACS+ server for authentication. Any account you want to authenticate using an external AAA server must have a matching account name in the local database. -
Page 55: Configuring The Gigavue H Series H Series Host Name
Configuring the GigaVUE H Series H Series Host Name It is generally a good idea to configure the GigaVUE H Series H Series node’s name, date, and time as part of your initial configuration. The following command shows how to set the node name. - Page 56 (Reserved for future use) Setting Time Manually The easiest way to set the GigaVUE H Series H Series node’s time is manually with the clock set command. For example: (config) # clock set 05:18:38 2015/01/06 : Even if you are using NTP, configure time manually as well. The GigaVUE H Series H Series node will automatically fall back to the manual time setting if it is...
-
Page 57: Configuring Automatic Email Notifications
GigaVUE-HC1 Hardware Installation Guide (config) # ntp enable 3. The GigaVUE H Series H Series node connects to the specified NTP server and synchronizes to its time. 4. NTP reports times in UTC. Because of this, it is a good idea to specify the GigaVUE H Series H Series node’s timezone so that UTC can be converted to the local timezone. - Page 58 We are going to start with the all setting and tune settings as necessary later on. Basic GigaVUE H Series Connections and Configuration Completing the Initial GigaVUE H Series H Series Setup...
-
Page 59: Using A Custom Banner
(config) # banner login "Pacific Call Center" : You only need to use quotation marks for the <string> if it includes spaces. The next time you log in or out of the GigaVUE H Series H Series node, you will see the customizable banner. - Page 60 In Figure 9Showing the Current Configuration File, you can tell that the GigaVUE H Series H Series node is currently operating with the initial configuration file. Refer to the GigaVUE-OS CLI Reference Guide for details on using configuration files.
-
Page 61: Connecting Gigavue-Hc1 Ports
“GigaVUE-OS Compatibility and Interoperability Matrix”. Transceiver Installation Instructions Gigamon transceivers are keyed and can only be installed in one direction. Transceivers are hot-swappable – they can be installed or removed with the power on or off. Use the following procedures to install and remove SFPs from GigaVUE H Series modules. -
Page 62: Installing Transceivers
GigaVUE-HC1 Hardware Installation Guide Installing Transceivers Remove the dust cap from the port and set it aside for future use. 2. Orient the transceiver with the opening in the module and insert it into the slot. 3. Push gently but firmly until the transceiver is seated in the slot. 4. -
Page 63: Connecting Gigavue-Hc1 Ports
GigaVUE-HC1 Hardware Installation Guide Table 3: Loss Summary per Bypass Combo Modules Type Operating Cable Insertion Type Fiber Receiver Loss Wavelength Length Sensitivity (nm) Typical LC to LC (dB) BPS-HC1- 550m D25A24SX/SR 10Gb -11.1 50/125 Connecting GigaVUE-HC1 Ports Connecting network and tool ports on GigaVUE-HC1 base chassis ports and modules is generally as simple as connecting a cable between the source/destination device and the GigaVUE-HC1 port. - Page 64 GigaVUE-HC1 Hardware Installation Guide 3. Use the following command to check module status: (config) # show cards 4. Check the values in the Config Status and Oper Status columns for all modules and verify that they read Yes for configured and Up for inserted. This is your indication that the node is ready for further configuration.
-
Page 65: Setting Port Parameters Manually
Specifies the port's duplex configuration. Only full duplex is supported. Starting in software version 5.2, half duplex support is removed from all GigaVUE H Series nodes. If half duplex was configured in a previous software version, it will remain intact following the upgrade to 5.2 or higher release. - Page 66 GigaVUE-HC1 Hardware Installation Guide Argument Description forcelinkup Forces connection on an optical port. Use this option when an optical tool port is connected <disable | to a legacy optical tool that does not transmit light. enable> Available as follows: Optical 1Gb/10Gb tool ports Not available for 10Gb-capable ports with a 1Gb SFP installed.
-
Page 67: Gigavue-Hc1 Specifications
GigaVUE-HC1 Hardware Installation Guide GigaVUE-HC1 Specifications This appendix provides the physical specifications, power requirements, and environmental specifications for GigaVUE-HC1 nodes. Compliance for safety, emissions, and immunity are also provided. Refer to the following sections for details: Physical Dimensions and Weight ■... -
Page 68: Compliance
GigaVUE-HC1 Hardware Installation Guide Compliance This section provides compliance information for GigaVUE-HC1. Safety GigaVUE-HC1 is compliant with the following safety regulations: UL 60950-1, 2nd Edition ■ CAN/CSA C22.2 No. 60950-1-07, 2nd Edition ■ EN 60950-1:2006/A11:2009/A1:2010/A12:2011/A2:2013 ■ IEC 60950-1:2005 (2nd Edition) + Am 1:2009 + Am 2:2013 ■... -
Page 69: Immunity
GigaVUE-HC1 Hardware Installation Guide Translation of Caution Statement for Korea Class A Equipment: This equipment is Industrial (Class A) electromagnetic wave suitability equipment and seller or user should take notice of it, and this equipment is to be used in the places except for home. -
Page 70: Environmental Specifications
783 TFTP, RFC 791 IP, RFC 793, TCP, RFC 826 ARP, RFC 768 UDP, RFC 792 ICMP, SNMP v1/v2c, RFC 2131 DHCP client, RFC 1492 TACACS+, and support for IPv4 and IPv6. Warranty Gigamon offers a range of premium support and extended services. For details regarding warranty, visit: https://www.gigamon.com/support-and-services/warranty... -
Page 71: Console Port Signaling And Cabling
GigaVUE-HC1 Hardware Installation Guide Console Port Signaling and Cabling This appendix provides the pin-outs for the RJ45-to-RJ45 rollover cable and RJ45-to-DB-9 adapter provided with the GigaVUE-HC1 node for connections from the node’s console port to a PC’s COM port. The following figure shows how to connect the RJ45-to-RJ45 rollover cable from the GigaVUE-HC1 node’s console port to a COM port on a PC using the RJ45-to-DB-9 adapter. - Page 72 GigaVUE-HC1 Hardware Installation Guide Console Port Signaling and Cabling Warranty...
-
Page 73: Nebs Level 3 Compliance
GigaVUE-HC1 Hardware Installation Guide NEBS Level 3 Compliance This appendix provides installation instructions for GigaVUE-HC1 Network Equipment- Building System (NEBS) Level 3 compliance. Installation Instructions GigaVUE-HC1 The following sections detail installation instructions for GigaVUE-HC1. Intrabuilding or Intra-connection WARNING: The intra-building ports: BNC Coaxial PPS ■... -
Page 74: Intrabuilding Ports (Rj45)
GigaVUE-HC1 Hardware Installation Guide Intrabuilding Ports (RJ45) WARNING: The intrabuilding ports (RJ45) shall be connected to shielded and grounded cables at both ends. Class A2 Voltage Accessibility The GigaVUE-HC1 shall be located in a restricted access location where only crafts personnel are allowed access. -
Page 75: Maintenance
GigaVUE-HC1 Hardware Installation Guide Unplated connection surfaces that are to be intentionally joined to form a bonding or grounding path shall be brought to a bright finish and then coated with an antioxidant before they are joined (electrical connections). g. Listing fasting hardware shall be compatible with materials being joined and shall preclude loosening deterioration, and electrochemical corrosion of the hardware and joined materials. -
Page 76: Additional Sources Of Information
■ Documentation This table lists all the guides provided for GigaVUE H Series software and hardware. The first row provides an All-Documents Zip file that contains all the guides in the set for the release. : In the online documentation, view... - Page 77 GigaVUE-HC1 Hardware Installation Guide GigaVUE H Series 5.16 Hardware and Software Guides Software Installation and Upgrade Guides GigaVUE-FM Installation, Migration, and Upgrade Guide GigaVUE-OS Upgrade Guide Administration GigaVUE Administration Guide covers both GigaVUE-OS and GigaVUE-FM Fabric Management GigaVUE Fabric Management Guide how to install, deploy, and operate GigaVUE-FM;...
-
Page 78: How To Download Software And Release Notes From My Gigamon
GigaVUE H Series 5.16 Hardware and Software Guides H Series and TA Series devices GigaVUE-OS Cabling Quick Reference Guide guidelines for the different types of cables used to connect Gigamon devices GigaVUE-OS Compatibility and Interoperability Matrix compatibility information and interoperability requirements for Gigamon devices GigaVUE-FM REST API Reference in GigaVUE-FM User's Guide... -
Page 79: Documentation Feedback
Product: "GigaVUE-FM" and Release: "5.6," enter "pdf" in the search box, and then click GO to view all PDF documentation for GigaVUE-FM 5.6.xx. : My Gigamon is available to registered customers only. Newer documentation PDFs, with the exception of release notes, are all available through the publicly available online documentation. -
Page 80: Contact Technical Support
You can also refer to https://www.gigamon.com/support-and-services/contact-support Technical Support hours and contact information. Email Technical Support at support@gigamon.com. Contact Sales Use the following information to Gigamon channel partner or Gigamon sales representatives. Telephone: +1.408.831.4025 Additional Sources of Information Contact Technical Support... -
Page 81: Premium Support
■ Download the latest product updates and documentation (Customers only) ■ The Gigamon Community is a great way to get answers fast, learn from experts and collaborate directly with other members around your areas of interest. Register today at community.gigamon.com Questions? Contact our Community team at community@gigamon.com. -
Page 82: Glossary
GigaVUE-HC1 Hardware Installation Guide Glossary decrypt list need to decrypt (formerly blacklist) decryptlist need to decrypt - CLI Command (formerly blacklist) drop list selective forwarding - drop (formerly blacklist) forward list selective forwarding - forward (formerly whitelist) leader leader in clustering node relationship (formerly master) member node follower in clustering node relationship (formerly slave or non-master) no-decrypt list... - Page 83 GigaVUE-HC1 Hardware Installation Guide nodecryptlist no need to decrypt- CLI Command (formerly whitelist) primary source root timing; transmits sync info to clocks in its network segment (formerly grandmaster) receiver follower in a bidirectional clock relationship (formerly slave) source leader in a bidirectional clock relationship (formerly master) Glossary...
Need help?
Do you have a question about the GigaVUE H Series and is the answer not in the manual?
Questions and answers