Table of Contents
Advertisement
Available languages
Available languages
Quick Links
SPLIT AIR CONDITIONER
INSTRUCTION MANUAL
CATALOG NUMBER
BSAH1215AC
BSAH1220AC
BSAH1820AC
BSAH2420AC
Thank you for choosing BLACK+DECKER!
PLEASE READ BEFORE RETURNING THIS PRODUCT FOR
ANY REASON.
If you have a question or experience a problem with your BLACK+DECKER
purchase, go to www.blackanddecker.com/instantanswers
If you can't find the answer or do not have access to the Internet, call
844-299-0879 from 10:30 a.m. to 6:30 p.m. EST Mon. - Fri. to speak with an
agent. Please have the catalog number available when you call.
SAVE THIS MANUAL FOR FUTURE REFERENCE.
Advertisement
Chapters
Table of Contents

Related Manuals for Black & Decker BSAH1215AC


Summary of Contents for Black & Decker BSAH1215AC
- Page 1 SPLIT AIR CONDITIONER INSTRUCTION MANUAL CATALOG NUMBER BSAH1215AC BSAH1220AC BSAH1820AC BSAH2420AC Thank you for choosing BLACK+DECKER! PLEASE READ BEFORE RETURNING THIS PRODUCT FOR ANY REASON. If you have a question or experience a problem with your BLACK+DECKER purchase, go to www.blackanddecker.com/instantanswers If you can’t find the answer or do not have access to the Internet, call...
-
Page 3: Table Of Contents
CONTENTS SAFETY INFORMATION ..........................4-8 SET UP & USE Operating Conditions ................................9-10 INSTALLATION Parts & Features ..................................11 Notices ......................................12 Indoor Unit Installation ..............................13-22 Outdoor Unit Installation ...............................23-27 Install the Refrigerant Pipe ............................28-35 REMOTE CONTROL MANUAL ......................36-43 TEST OPERATION ..............................44 CLEAN & CARE ..............................45-46 TROUBLESHOOTING &... -
Page 4: Safety Information
SAFETY INFORMATION DANGER WARNING CAUTION DANGER - Immediate hazards WARNING - Hazards or unsafe CAUTION - Hazards or unsafe which WILL result in severe practices which COULD result in practices which COULD result in personal injury or death severe personal injury or death minor personal injury IMPORTANT SAFETY INSTRUCTIONS WARNING... - Page 5 SAFETY INFORMATION Improper installation may cause water leakage, electrical shock, fire, or may void the warranty. • In North America, service or repair must be performed in accordance with the requirement of NEC and CEC (by authorized personnel or authority having jurisdiction only.) Contact an authorized service technician for repair or maintenance of the unit.
- Page 6 SAFETY INFORMATION CAUTION Please read the following before operation. Safety Rules and recommendations for the installer. • Do not put hands or any objects into the air inlets or outlets. This may cause personal injury or damage to the unit. •...
- Page 7 SAFETY INFORMATION • Cleaning and maintenance must be carried out by a trained and experienced individual or technician. Make sure to disconnect the appliance from the main’s electrical supply prior to cleaning or maintenance of the unit. • Never remain directly exposed to the flow of cold air for extended periods. Direct and prolonged exposure to cold air could be dangerous to your health.
- Page 8 SAFETY INFORMATION • Do not alter the characteristics of the appliance in any way. • Do not install the appliance in environments where the air could contain gas, oil or sulphur or near sources of heat. • This appliance is not intended for use by persons [including children] with reduced physical, sensory, or mental capabilities, or lack of experience and knowledge unless they have been given supervision or instruction concerning use of the appliance by a person responsible for their safety.
-
Page 9: Operating Conditions
SAFETY INFORMATION OPERATING CONDITIONS • Within the temperature range provided in following table, the air conditioner may stop running and other anomalies may arise. > 109.4˚F (Apply to T1) Outdoor Cooling > 125.6˚F (Apply to T3) Indoor < 64.4˚F > 75.2˚F Outdoor Heating <... - Page 10 SET UP & USE NOTE FOR TURNING OFF • When the air conditioner is turned off, the main controller will automatically decide whether to stop immediately or after running for dozens of seconds with lower frequency and lower air speed. NOTICES FOR USE Emergency Operation •...
-
Page 11: Parts & Features
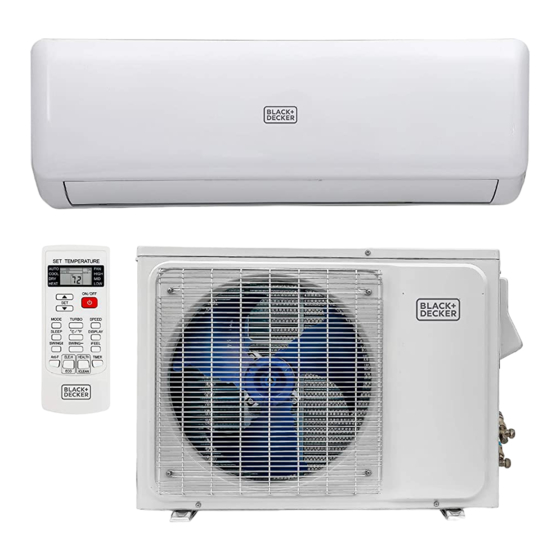
INSTALLATION INSTRUCTIONS PARTS & FEATURES INDOOR UNIT Air Inlet Grill Air Inlet Force Switch Panel Pipe Protection Air Filter Ring Air Louver Air Outlet Air Vent Remote Control OUTDOOR UNIT Air Outlet Refrigerant Pipe Grill 157.5 inches Drain Hose 78.7 inches Mounting Plate Air Outlet... -
Page 12: Notices
INSTALLATION INSTRUCTIONS NOTICES: • A split system air conditioner is a great option for keeping your home cool and comfortable in the summer months. These units are also quieter, easier to install, and may be more energy efficient than some central air conditioning. -
Page 13: Indoor Unit Installation
INSTALLATION INSTRUCTIONS INDOOR UNIT INSTALLATION Space to the ceiling 5.9 inches Space to the wall Space to the wall 7.9 inches 7.9 inches Space to the floor 78.7 inches 1. Select an unobstructed location on your interior wall to mount the indoor unit. •... - Page 14 INSTALLATION INSTRUCTIONS CAUTION • Choose a location with studs to ensure the wall is strong enough to hold the weight of the unit. • Install the unit at least 3.3 feet (1.0 m) away from antennas and power or connecting lines that are used for television, radio, home security systems, intercoms, or telephones.
- Page 15 INSTALLATION INSTRUCTIONS 2. Secure the mounting plate to the interior wall. • Hold the mounting plate against the wall where you want to install the indoor unit. Use a level to make sure it is both horizontally and vertically level. Use a pencil to mark the locations of the screw holes, remove the plate, then drill a hole into the wall where each screw will go.
- Page 16 INSTALLATION INSTRUCTIONS 3. Secure the indoor unit to the mounting plate. • To attach the air conditioner to the wall, simply align the female connections on the back of the unit with the male connections on the mounting plate and press firmly to secure the unit in place. Make sure the unit tilts backward 2-3 degrees so that water can flow out of the drain hose.
- Page 17 INSTALLATION INSTRUCTIONS 4. Lay a concrete pad on the ground. • Don’t place the outdoor unit directly on the ground, as it’s heavy and can shift around on dirt or rocks. Tip: Situate the concrete pad so that it’s high enough to keep the unit out of any water that may puddle on the ground due to rain or snow.
- Page 18 INSTALLATION INSTRUCTIONS 5. Drill a 3 in. (7.6 cm) hole through the wall so you can feed the refrigerant lines and condensate drain hose outside. • Make a mark in the center of the hole in the mounting plate. Use a keyhole saw or a drill with a hole-cutting attachment to create a circular 3 in.
- Page 19 INSTALLATION INSTRUCTIONS 6. Check the electrical connections on the indoor unit. Route of Pipeline • Depending on the position of the unit, the piping may be routed sideway from the left or the right (Fig. 1), or vertically from the back (Fig.
- Page 20 INSTALLATION INSTRUCTIONS ELECTRICAL DISCONNECT POWER FLOW AC MAINS OUTDOOR UNIT WEATHER PROOF FITTINGS LIQUID TIGHT NON-METALLIC CONDUIT INDOOR UNIT TO INDOOR UNIT VIEW OF ELECTRICAL CONNECTIONS AT UNIT OUTDOOR FROM DISCONNECT Page 20...
- Page 21 INSTALLATION INSTRUCTIONS Wiring Diagram • Connection is needed in accordance with the wiring diagram. NOTE: • This manual usually includes the wiring mode for the different kinds of A/C. We cannot exclude the possibility that some special type of wiring diagrams are not included. •...
- Page 22 INSTALLATION INSTRUCTIONS 7. Run the refrigerant lines and drain hose through the hole in the wall. • Then secure them to the designated spots on the indoor unit. • Place the drain hose on the bottom to ensure a free flow of water. •...
-
Page 23: Outdoor Unit Installation
INSTALLATION INSTRUCTIONS OUTDOOR UNIT INSTALLATION 1. Position the outdoor unit away from any heavily trafficked, dusty, or hot areas. • Find the hole you drilled through the mounting plate for the interior unit and position the exterior unit within 50 feet (15 m) so the piping and cable can easily be attached. - Page 24 INSTALLATION INSTRUCTIONS 2. Secure the outdoor unit on top of the concrete pad. • Lay a rubber cushion (Not included) on top of the pad to minimize vibration, then set the outdoor condenser unit on top of the pad. Secure the unit to the concrete with anchor bolts. Page 24...
- Page 25 INSTALLATION INSTRUCTIONS 3. Wiring electrical unit. WARNING - All electrical connections, wiring and installation should be performed by a licensed electrician. Otherwise, it may cause personal injury or damage. • Electrician shall read rating plate for proper circuit breaker and conductor size.
- Page 26 INSTALLATION INSTRUCTIONS Wiring Diagram To Power To Power To Power To Power To Power To Power NOTE: • This manual usually includes the wiring mode for the different kinds of A/C. We cannot exclude the possibility that some special type of wiring diagrams are not included.
- Page 27 INSTALLATION INSTRUCTIONS 4 . Connect the refrigerant lines and electrical power to the outdoor unit. • Use flare nuts to secure the refrigerant lines from the indoor unit to the outdoor unit as per manual. Make all electrical connections as well.
-
Page 28: Install The Refrigerant Pipe
INSTALLATION INSTRUCTIONS INSTALL THE REFRIGERANT PIPE (the unit with the quick connectors) Sound Deadening Pads Quick Connectors (Not included) NOTE: All the illustrations in this manual are for explanation purpose only. Your air conditioner may be slightly different. The actual shape shall prevail. - Page 29 INSTALLATION INSTRUCTIONS • After finishing connecting the couple of the quick connectors, pass drain hose and the refrigerant pipes through the wall hole. NOTE: The quick connector parts must be placed outside of room. Using wall hole sleeve, cap and neoprene to seal the wall hole.
- Page 30 INSTALLATION INSTRUCTIONS • Align the refrigerant pipes correctly so that they line up with the valves and are not stressed. Place the screw connector on the refrigerant pipes just on to the thread on the outdoor unit and tighten the first few threads by hand, Fig. 8. NOTE: The refrigerant pipes must be connected to the valves on the outdoor unit with as little stress as possible.
- Page 31 INSTALLATION INSTRUCTIONS IMPORTANT: Since the coupling works with tapping rings, it may leak if you undo and reconnect the pipes. This will also void the warranty. After completing steps 1-4, check that all the connections are sealed correctly using leak detection spray or soap suds.
- Page 32 INSTALLATION INSTRUCTIONS Wrap the Piping 1. Use the insulation sleeve to wrap the joint part the indoor unit and the refrigerant pipe, and then use the insulating material to pack and seal insulation pipe, to prevent generation of condensate water on the joint part.
- Page 33 INSTALLATION INSTRUCTIONS 5. Affix the piping to the wall with clamps (Not included) • To ensure the pipes and cables don’t move around or become disconnected, attach them to the exterior wall of your home using clamps (not included). Page 33...
- Page 34 INSTALLATION INSTRUCTIONS 6. Seal up the hole in the wall using expanding polyurethane foam. • Spray expanding polyurethane foam into the hole you drilled to feed the cable and piping through the wall. Make sure the hole is completely sealed to prevent hot air or insects from getting through. •...
- Page 35 INSTALLATION INSTRUCTIONS 7. Turn on the unit and enjoy the cool air! • All that’s left to do is to start the A/C, which you can do from the indoor unit. It should only take a minute or 2 for cool air to start blowing into your home.
-
Page 36: Remote Control Manual
REMOTE CONTROL INSTRUCTIONS CAUTION • Before first time use of the remote control, install the batteries and ensure that the “+” and “-” poles are correctly positioned. • Ensure the remote control is pointed to the signal receiving window, and that there is no obstruction in between and the distance is 8m at the maximum. - Page 37 REMOTE CONTROL INSTRUCTIONS HANDLING ALKALINE BATTERIES WARNING When handling alkaline, basic safety precautions should be followed, including the following: NEVER mix alkaline, standard (carbon-zinc), rechargeable (nickel-cadmium) batteries with this product. 2. Should fluid from the battery accidentally get into your eyes, there is a threat of loss of eyesight, do not rub them.
- Page 38 REMOTE CONTROL INSTRUCTIONS NOTE: The remote control displays all symbols during power-on and only those corresponding to current operation the rest of the time. Page 38...
- Page 39 REMOTE CONTROL INSTRUCTIONS 1. ON/OFF • Press this button to turn on/off the unit. • This will clear the existing timer and SLEEP settings. 2.°C/°F • Press this button to set the temperature display to Fahrenheit, which is displayed by default in Celsius. The “C” will not be displayed on the LCD.
- Page 40 REMOTE CONTROL INSTRUCTIONS 7. iCLEAN • Press this button with the unit OFF, the remote control will display “CL” and the unit will automatically clean dust off the evaporator and dry it, to increase the cooling and heating efficiency. • The iCLEAN function runs for approximately 30 minutes, during which if the unit is turned on with the remote control or this button is pressed again, the iCLEAN will be deactivated.
- Page 41 REMOTE CONTROL INSTRUCTIONS 13. FAN ON • The Fan On functions when the unit is turned off with the remote control in COOL, DRY, or AUTO mode. It will operate in HEAT mode (FAN mode for cool units only) with the internal fan running for ad- ditional time before stopping.
- Page 42 REMOTE CONTROL INSTRUCTIONS Battery Instructions 1. Slide to open the cover according to the direction indicated by the arrowhead. 2. Insert two brand new batteries (AAA, not included), and position the batteries to the right electric poles (+ & -). 3.
- Page 43 REMOTE CONTROL INSTRUCTIONS Fan operation mode 1. Press the “MODE” button select the fan operation mode. 2. By pressing the “SPEED” button, you can select the fan speed from LOW, MID, HIGH. 3. Press the “ON/OFF” button, the air-conditioner starts to operate. 4.
-
Page 44: Test Operation
TEST OPERATION Check after Installation Electrical Safety Check 1. If the supply voltage is as required. 2. If there is any faulty or misconnection in each of the power, signal and grounding wires. 3. If the grounding wire of the air conditioner is securely grounded. Installation Safety Check 1. -
Page 45: Clean & Care
CLEAN & CARE WARNING • Before the cleaning of the air conditioner, it must be shut down and the electricity must be cut off for more than 5 minutes, otherwise there might be the risk of electric shocks. • Do not wet the air conditioner, which can cause an electric shock. Make sure not to rinse the air conditioner with water under any circumstances. - Page 46 CLEAN & CARE Clean the Air Filter 1. Reinstall the dried filter in reverse order of removal, then cover and lock the panel. Check Before Use 1. Check whether all the air inlets and outlets of the units are unblocked. 2.
-
Page 47: Troubleshooting & Warranty
TROUBLESHOOTING & WARRANTY TROUBLE POSSIBLE CAUSE Air conditioner can not • Has the power been shut down? operate at all. • Is the wiring loose? • Is voltage too high or too low ? (measured by professionals) • Does it reach the set time for start up? •... - Page 48 TROUBLESHOOTING & WARRANTY BEFORE YOU CALL FOR SERVICE IF THE AIR CONDITIONER FAILS TO OPERATE: A) Check to make sure that the air conditioner is plugged in securely. If it is not, remove the plug from the outlet, wait 10 seconds and plug it in again securely. B) Check for a blown circuit fuse or a tripped main circuit breaker.
- Page 49 TROUBLESHOOTING & WARRANTY LIMITED WARRANTY Any repair, replacement, or warranty service, REPAIR OR REPLACEMENT AS PROVIDED UNDER THIS WARRANTY IS THE EXCLUSIVE REMEDY OF and all questions about this product should be THE CUSTOMER; BLACK+DECKER. SHALL NOT BE directed to BLACK+DECKER at 844-299-0879 LIABLE FOR ANY INCIDENTAL OR CONSEQUENTIAL from the USA or Puerto Rico.
- Page 50 Page 50...
- Page 51 FRANÇAIS CLIMATISEUR PARTAGÉ MANUEL D’INSTRUCTIONS NUMÉRO DE CATALOGUE BSAH1215AC BSAH1220AC BSAH1820AC BSAH2420AC Merci d’avoir choisi BLACK+DECKER! VEUILLEZ LIRE AVANT DE RETOURNER CE PRODUIT POUR TOUTE RAISON. Si vous avez une question ou rencontrez un problème avec votre achat BLACK+DECKER, allez sur www.blackanddecker.com/instantanswers Si vous ne trouvez pas la réponse ou n’avez pas accès à...
- Page 52 FRANÇAIS Page 52...
- Page 53 FRANÇAIS TABLE DES MATIÈRES INFORMATION SUR LA SÉCURITÉ ..................54-58 CONFIGURATION ET UTILISATION Conditions De Fonctionnement ..........................59-60 INSTALLATION Pièces Et Caractéristiques ..............................61 Avis ........................................62 Installation De l’Unité Intérieure ..........................63-72 Installation De l’Unité Extérieure ..........................73-77 Installer Le Tuyau De Réfrigérant ..........................78-85 MANUEL DE LA TÉLÉCOMMANDE ..................86-93 TEST DE FONCTIONNEMENT...
-
Page 54: Information Sur La Sécurité
FRANÇAIS INFORMATION SUR LA SÉCURITÉ DANGER ATTENTION AVERTISSEMENT AVERTISSEMENT - Dangers ATTENTION - Dangers ou DANGER - Dangers immédiats qui ou pratiques dangereuses qui pratiques dangereuses qui VONT entraîner des blessures POURRAIENT entraîner des POURRAIENT entraîner une graves ou la mort blessures graves ou la mort blessure corporelle mineure CONSIGNES DE SÉCURITÉ... - Page 55 FRANÇAIS INFORMATION SUR LA SÉCURITÉ • En Amérique du Nord, le service ou la réparation doit être effectué conformément aux exigences du NEC et du CEC (par du personnel autorisé ou par une autorité compétente uniquement.) Contactez un technicien de service agréé pour réparation ou entretien de l’unité. •...
- Page 56 FRANÇAIS INFORMATION SUR LA SÉCURITÉ ATTENTION Veuillez lire ce qui suit avant l’utilisation. Règles de sécurité et recommandations pour l’installateur. • Ne mettez pas les mains ou des objets dans les entrées ou sorties d’air. Ceci peut causer des blessures corporelles ou endommager l’appareil. •...
- Page 57 FRANÇAIS INFORMATION SUR LA SÉCURITÉ • Le nettoyage et l’entretien doivent être effectués parune personne ou un technicien formé et expérimenté. Assurez-vous de déconnecter l’appareil de l’alimentation électrique principale avant le nettoyage ou l’entretien de l’unité. • Ne restez jamais directement exposé au débit d’air froid pendant de longues périodes.
- Page 58 FRANÇAIS INFORMATION SUR LA SÉCURITÉ • Ne modifiez en aucune façon les caractéristiques de l’appareil. • N’installez pas l’appareil dans des environnements où l’air pourrait contenir du gaz, de l’huile ou du soufre ou à proximité de sources de chaleur. •...
-
Page 59: Conditions De Fonctionnement
FRANÇAIS INFORMATION SUR LA SÉCURITÉ CONDITIONS DE FONCTIONNEMENT • Dans la gamme de température indiquée dans le tableau suivant, le climatiseur peut s’arrêter de fonctionner et d’autres anomalies peuvent survenir. > 109.4˚F (Appliquer à T1) Extérieur Refroidissement > 125.6˚F (Appliquer au T3) Intérieur <... - Page 60 FRANÇAIS CONFIGURATION ET UTILISATION REMARQUE POUR ÉTEINDRE • Quand le climatiseur est éteint, le contrôleur principal décidera automatiquement de s’arrêter immédiatement ou après avoir fonctionné pendant des dizaines de secondes avec une fréquence et une vitesse de l’air plus faibles. AVIS D’UTILISATION Opération d’Urgence •...
-
Page 61: Pièces Et Caractéristiques
FRANÇAIS INSTRUCTIONS D’INSTALLATION PIÈCES ET CARACTÉRISTIQUES UNITÉ INTÉRIEURE Grille d’Entrée d’Air Interrupteur De Entrée d’Air Force Panneau Anneau De Protection De Filtre À Air Tuyau Volet d’Air Sortie d’Air Évent d’Air Télécommande UNITÉ EXTÉRIEURE Tuyau De Grille de Réfrigérant 157.5 Sortie d’Air pouces Tuyau De... -
Page 62: Avis
FRANÇAIS INSTRUCTIONS D’INSTALLATION AVIS: • Un climatiseur partagé est une excellente option pour garder votre maison frais et confortable pendant les mois d’été. Ces unités sont également plus silencieux, plus facile à installer et peut être plus écoé- nergétique que certains climatiseurs centraux. •... -
Page 63: Installation De L'unité Intérieure
FRANÇAIS INSTRUCTIONS D’INSTALLATION INSTALLATION DE L’UNITÉ INTÉRIEURE Espace au plafond 5.9 pouces Espace au mur Espace au mur 7.9 pouces 7.9 pouces Espace au plancher 78.7 pouces 1. Choisissez un emplacement dégagé sur votre mur intérieur pour monter l’unité intérieure. •... - Page 64 FRANÇAIS INSTRUCTIONS D’INSTALLATION ATTENTION • Choisissez un emplacement avec des poteaux pour vous assurer que le mur est suffisamment solide pour maintenir le poids de l’appareil. • Installez l’unité à au moins 3.3 pieds (1.0 m) des antennes et de l’alimentation ou des lignes de connexion utilisées pour la télévision, la radio, les systèmes de sécurité...
- Page 65 FRANÇAIS INSTRUCTIONS D’INSTALLATION 2. Fixez la plaque de montage au mur intérieur. • Tenez la plaque de montage contre le mur où vous voulez installer l’unité intérieure. Utilisez un niveau pour vous assurer qu’il est à la fois horizontalement et verticalement de niveau. Utilisez un crayon pour marquer les emplacements des trous de vis, retirez la plaque, puis percez un trou dans le mur où...
- Page 66 FRANÇAIS INSTRUCTIONS D’INSTALLATION 3. Fixez l’unité intérieure à la plaque de montage. • Pour fixer le climatiseur au mur, alignez simplement les connexions femelles à l’arrière de l’unité avec les connexions mâles sur la plaque de montage et appuyez fermement pour fixer l’unité en place. As- surez-vous que l’unité...
- Page 67 FRANÇAIS INSTRUCTIONS D’INSTALLATION 4. Posez une dalle de béton sur le sol. • Ne placez pas l’unité extérieure directement sur le sol, car elle est lourde et peut se déplacer sur la saleté ou les roches. Conseil: Placez la dalle de béton de façon à ce qu’elle soit suf- fisamment haute pour garder l’unité...
- Page 68 FRANÇAIS INSTRUCTIONS D’INSTALLATION 5. Percez un trou de 3 po. (7.6 cm) à travers le mur pour que vous puissiez alimenter les conduites de réfrigérant et le tuyau d’évacuation des condensats à l’extérieur. • Faites une marque au centre du trou de la plaque de montage. Uti- lisez une scie cloche ou une perceuse avec un accessoire de coupe- trou pour créer une ouverture circulaire de 3 po.
- Page 69 FRANÇAIS INSTRUCTIONS D’INSTALLATION 6. Vérifiez les connexions électriques sur l’unité intérieure. Acheminement de Tuyauterie • Selon la position de l’unité, la tuyauterie peut être acheminée latéralement à gauche ou à droite (Fig.1), ou verticalement à l’arrière (Fig. 2) (selon la longueur du tuyau de l’unité intérieure). L’unité...
- Page 70 FRANÇAIS INSTRUCTIONS D’INSTALLATION ELECTRICAL DÉCONNEXION DISCONNECT ÉLECTRIQUE ALIMENTATION POWER FLOW SECTEUR CA AC MAINS UNITÉ EXTÉRIEURE OUTDOOR UNIT RACCORDS WEATHER PROOF ÉTANCHES FITTINGS LIQUID TIGHT CONDUIT NON-MÉTALLIQUE NON-METALLIC IMPERMÉABLE CONDUIT INDOOR UNIT UNITÉ INTÉRIEURE VERS L’UNITÉ INTÉRIEURE TO INDOOR UNIT VUE DES CONNEXIONS VIEW OF ELECTRICAL ÉLECTRIQUES À...
- Page 71 FRANÇAIS INSTRUCTIONS D’INSTALLATION Schéma De Câblage • La connexion est nécessaire conformément au schéma de câblage. Vitesse constante Vitesse variable Vers l’unité extérieure Vers l’unité extérieure Vers l’unité extérieure Vers l’unité extérieure Connecteur S’il y a un connecteur, connectez-le directement. REMARQUE: •...
- Page 72 FRANÇAIS INSTRUCTIONS D’INSTALLATION 7. Faites passer les conduites de réfrigérant et le tuyau de vidange à travers le trou dans le mur. • Fixez-les ensuite aux emplacements désignés sur l'unité intérieure. • Placez le tuyau de vidange sur le fond pour assurer un débit d'eau libre.
-
Page 73: Installation De L'unité Extérieure
FRANÇAIS INSTRUCTIONS D’INSTALLATION INSTALLATION DE L’UNITÉ EXTÉRIEURE 1. Placez l’unité extérieure loin de toute zone très fréquentée, poussiéreuse ou chaude. • Trouvez le trou que vous avez percé dans la plaque de montage pour l’unité intérieure et placez l’unité extérieure à moins de 50 pieds (15 m) pour que la tuyauterie et le câble puissent être facilement fixés. - Page 74 FRANÇAIS INSTRUCTIONS D’INSTALLATION 2. Fixez l’unité extérieure sur le dessus de la dalle de béton. • Posez un coussin en caoutchouc (non inclus) sur le dessus de la dalle pour minimiser les vibrations, puis placez le condenseur extérieur sur le dessus de la dalle. Fixez l’unité au béton avec des boulons d’ancrage.
- Page 75 FRANÇAIS INSTRUCTIONS D’INSTALLATION 3. Câblage de l’unité électrique. AVERTISSEMENT - Toutes les connexions électriques, le câblage et l’installation doit être effectuée par un électricien agréé. Sinon, cela peut causer des blessures ou des dommages. • L’électricien doit lire la plaque signalétique pour un disjoncteur et une taille de conducteur appropriés.
- Page 76 FRANÇAIS INSTRUCTIONS D’INSTALLATION Schéma De Câblage Vitesse constante Vitesse variable Au pouvoir To Power Vers l’unité extérieure Au pouvoir To Power To Power Vers l’unité extérieure Au pouvoir Vers l’unité extérieure To Power To Power Au pouvoir To Power Vers l’unité extérieure Connecteur S’il y a un connecteur, connectez-le directement...
- Page 77 FRANÇAIS INSTRUCTIONS D’INSTALLATION 4. Connectez les lignes de réfrigérant et l'alimentation électrique à l’unité extérieure. • Utilisez des écrous évasés pour fixer les conduites de réfrigérant de l’unité intérieure à l’unité extérieure conformément au manuel. Faires toutes les connexions électriques aussi. Page 77...
-
Page 78: Installer Le Tuyau De Réfrigérant
FRANÇAIS INSTRUCTIONS D’INSTALLATION INSTALLER LE TUYAU DE RÉFRIGÉRANT (l’unité avec les connecteurs rapides) Tampons Insonorisants Connecteurs (Non inclus) Rapides REMARQUE: Toutes les illustrations de ce manuel sont à titre explicatif uniquement. Votre climatiseur peut être légèrement différent. La forme réelle prévaudra. Ils sont sujets à changement sans préavis pour amélioration future. - Page 79 FRANÇAIS INSTRUCTIONS D’INSTALLATION • Après avoir fini de connecter les connecteurs rapides, passez le tuyau de vidange et les tuyaux de réfrigérant à travers le trou mural. REMARQUE: Les pièces de connexion rapide doivent être placées à l’extérieur de la pièce. À l’aide d’un manchon de trou mural, utilisez un capuchon et du néoprène pour sceller le trou mural.
- Page 80 FRANÇAIS INSTRUCTIONS D’INSTALLATION • Alignez correctement les tuyaux de réfrigérant afin qu’ils s’alignent avec le vannes et ne sont pas stressés. Placez le connecteur à vis sur les tuyaux de réfrigérant juste sur le filetage de l’unité extérieure et serrez les premiers filetages à la main, Fig. 8. REMARQUE: Les tuyaux de réfrigérant doivent être connectés aux vannes sur l’unité...
- Page 81 FRANÇAIS INSTRUCTIONS D’INSTALLATION IMPORTANT: puisque le coupleur fonctionne avec des anneaux de taraudage, il peut fuir si vous déconnectez et reconnectez les tuyaux. Cela annulera également la garantie. Après avoir terminé les étapes 1 à 4, vérifiez que tous les connexions sont correctement scellées en utilisant un spray de détection de fuite ou de la mousse de savon.
- Page 82 FRANÇAIS INSTRUCTIONS D’INSTALLATION Enroulez la Tuyauterie 1. Utilisez le manchon isolant pour envelopper la partie commune de l’unité intérieure et le tuyau de réfrigérant, puis utilisez le matériau isolant pour emballer et sceller le tuyau d’isolation, pour éviter la génération d’eau de condensation sur la partie commune. 2.
- Page 83 FRANÇAIS INSTRUCTIONS D’INSTALLATION 5. Fixez la tuyauterie au mur avec des pinces (Non inclus) • Pour garantir que les tuyaux et les câbles ne bougent pas et ne devi- ennent pas déconnectés, fixez-les au mur extérieur de votre maison en utilisant des pinces (non incluses). Page 83...
- Page 84 FRANÇAIS INSTRUCTIONS D’INSTALLATION 6. Scellez le trou dans le mur à l’aide de mousse polyuréthane expansible. • Vaporisez de la mousse de polyuréthane expansive dans le trou que vous avez percé pour alimenter le câble et la tuyauterie à travers le mur.
- Page 85 FRANÇAIS INSTRUCTIONS D’INSTALLATION 7. Allumez l’appareil et profitez de l’air frais! • Il ne vous reste plus qu’à démarrer la climatisation, ce que vous pou- vez faire à partir de l‘unité intérieure. Cela ne devrait prendre qu’une minute ou 2 pour que l’air frais commence à souffler dans votre mai- son.
-
Page 86: Manuel De La Télécommande
FRANÇAIS INSTRUCTIONS DE LA TÉLÉCOMMANDE ATTENTION • Avant la première utilisation de la télécommande, installez les piles et assurez-vous que les pôles “+” et “-” sont correctement positionnés. • Assurez-vous que la télécommande est pointée vers la fenêtre de ré- ception du signal, et qu’il n’y a pas d’obstacle entre les deux et que la distance est de 8m au maximum. - Page 87 FRANÇAIS INSTRUCTIONS DE LA TÉLÉCOMMANDE MANIPULATION DES PILES ALCALINES AVERTISSEMENT Lors de la manipulation d’alcalins, des précautions de sécurité de base doivent être suivies, y compris les suivantes: NE JAMAIS mélanger de piles alcalin, standard (carbone-zinc), rechargeable (nickel- cadmium) avec ce produit. 2.
- Page 88 FRANÇAIS INSTRUCTIONS DE LA TÉLÉCOMMANDE REMARQUE: la télécommande affiche tous les symboles lors de la mise sous tension et seulement ceux correspondant au fonc- tionnement en cours le reste du temps. Page 88...
- Page 89 FRANÇAIS INSTRUCTIONS DE LA TÉLÉCOMMANDE 1. MARCHE / ARRÊT • Appuyez sur ce bouton pour allumer / éteindre l’appareil. • Cela effacera la minuterie et les paramètres VEILLE existants. 2.°C/°F • Appuyez sur ce bouton pour régler l’affichage de la température sur Fahrenheit, ce qui est affiché...
- Page 90 FRANÇAIS INSTRUCTIONS DE LA TÉLÉCOMMANDE 7. iCLEAN • Appuyez sur cette touche quand l’appareil est éteint, la télécommande affichera “CL” et l’unité nettoiera automatiquement la poussière de l’évaporateur et va le sécher, pour augmenter l’efficacité du refroid- issement et du chauffage. •...
- Page 91 FRANÇAIS INSTRUCTIONS DE LA TÉLÉCOMMANDE 13. VENT MARCHE • Le Vent Marche fonctionne quand l’appareil est éteint avec la télé- commande en mode FRAIS, SEC ou AUTO. Il fonctionnera en mode CHALEUR (Mode VENTILATEUR pour les unités froides uniquement) avec le ventilateur interne en marche pendant plus de temps avant de s’arrêter.
- Page 92 FRANÇAIS INSTRUCTIONS DE LA TÉLÉCOMMANDE Instructions Pour La Pile 1. Faites glisser pour ouvrir le couvercle dans le sens indiqué par la pointe de flèche. 2. Insérez deux piles neuves (AAA, non incluses) et positionnez les piles aux bons pôles électriques (+ & -). 3.
- Page 93 FRANÇAIS INSTRUCTIONS DE LA TÉLÉCOMMANDE Mode de fonctionnement du ventilateur 1. Appuyez sur le bouton “MODE” pour sélectionner le mode de fonc- tionnement du ventilateur. 2. En appuyant sur le bouton “VITESSE”, vous pouvez sélectionner la vitesse du ventilateur à partir de BAS, MOY, HAUT. 3.
-
Page 94: Test De Fonctionnement
FRANÇAIS TEST DE FONCTIONNEMENT Vérifier après l’Installation Contrôle De Sécurité Électrique 1. Si la tension d’alimentation est conforme aux besoins. 2. S’il y a un défaut ou une mauvaise connexion dans chacune des fils d’alimentation, de signal et de mise à la terre. 3. -
Page 95: Nettoyage Et Entretien
FRANÇAIS NETTOYAGE ET ENTRETIEN AVERTISSEMENT • Avant le nettoyage du climatiseur, il doit être arrêté et l’électricité doit être coupée pendant plus de 5 minutes, sinon il peut y avoir un risque d’électrocution. • Ne mouillez pas le climatiseur, car cela pourrait provoquer un choc électrique. - Page 96 FRANÇAIS NETTOYAGE ET ENTRETIEN Nettoyez le Filtre À Air 1. Réinstallez le filtre séché dans l’ordre inverse du retrait, puis couvrez et verrouillez le panneau. Vérifiez Avant Utilisation 1. Vérifiez si toutes les entrées et sorties d’air des unités sont débloquées.
-
Page 97: Dépannage Et Garantie
FRANÇAIS DÉPANNAGE ET GARANTIE TROUBLE CAUSE POSSIBLE Le climatiseur ne peut pas fonc- • L’alimentation a-t-elle été coupée? tionner du tout. • Le câblage est-il desserré? • La tension est-elle trop élevée ou trop basse? (mesuré par des professionnels) • A-t-il atteint l’heure définie pour le démarrage? •... - Page 98 FRANÇAIS DÉPANNAGE ET GARANTIE AVANT D’APPELER POUR LE SERVICE SI LE CLIMATISEUR NE FONCTIONNE PAS: A) Assurez-vous que le climatiseur est correctement branché. Si ce n’est pas le cas, enlevez la fiche de la prise, attendez 10 secondes et rebranchez-la fermement.
- Page 99 FRANÇAIS DÉPANNAGE ET GARANTIE GARANTIE LIMITÉE Toute réparation, remplacement ou service de garantie, et toutes les questions sur ce produit doivent être adressées à BLACK+DECKER au 844-299-0879 des États-Unis ou de Porto LA RÉPARATION OU LE REMPLACEMENT TELS QUE Rico. PRÉVUS DANS LA PRÉSENTE GARANTIE SONT LE RECOURS EXCLUSIF DU CLIENT;...
- Page 100 FRANÇAIS Page 100...
- Page 101 ESPAÑOL AIRE ACONDICIONADO SPLIT MANUAL DE INSTRUCCIONES NÚMERO DE CATÁLOGO BSAH1215AC BSAH1220AC BSAH1820AC BSAH2420AC ¡Gracias por elegir BLACK+DECKER! POR FAVOR, LEA ESTE MANUAL ANTES DE DEVOLVER ESTE PRODUCTO POR CUALQUIER MOTIVO. Si tiene alguna pregunta o tiene algún problema con su compra de Black+Decker, vaya a www.blackanddecker.com/instantanswers.
- Page 102 ESPAÑOL Página 102...
- Page 103 ESPAÑOL CONTENIDO INFORMACIÓN DE SEGURIDAD ................... 104-108 CONFIGURACIÓN Y USO Condiciones de funcionamiento..........................109-110 INSTALACIÓN Piezas y Características ................................ 111 Avisos ......................................112 Instalación de la unidad interior ..........................113-122 Instalación de la unidad exterior ...........................123-127 Instalación del tubo de refrigerante ........................128-135 MANUAL DEL CONTROL REMOTO ...................
-
Page 104: Información De Seguridad
ESPAÑOL INFORMACIÓN DE SEGURIDAD PELIGRO PRECAUCIÓN ADVERTENCIA ADVERTENCIA - Riesgos o PRECAUCIÓN - Riesgos o PELIGRO - Riesgos inmediatos prácticas prácticas peligrosas que prácticas prácticas peligrosas que que RESULTARÁN en PODRÍAN RESULTAR en lesiones PODRÍAN RESULTAR en lesiones personales o la muerte personales severas o la muerte lesiones personales menores INSTRUCCIONES IMPORTANTES DE SEGURIDAD... - Page 105 ESPAÑOL INFORMACIÓN DE SEGURIDAD • Una instalación incorrecta puede provocar fugas de agua, descargas eléctricas, incendios o anular la garantía. • En América del Norte, el servicio o la reparación deben realizarse de acuerdo con los requisitos del NEC y el CEC (únicamente por personal autorizado o autoridades que tengan jurisdicción).
- Page 106 ESPAÑOL INFORMACIÓN DE SEGURIDAD PRECAUCIÓN Lea lo siguiente antes de la puesta en marcha. Normas de seguridad y recomendaciones para el instalador. • No introduzca las manos ni ningún objeto en las entradas o salidas de aire. Esto puede causar lesiones personales o daños a la unidad. •...
- Page 107 ESPAÑOL INFORMACIÓN DE SEGURIDAD • La limpieza y el mantenimiento deben ser realizados por personal o un técnico calificado y con experiencia. Asegúrese de desconectar el aparato de la corriente eléctrica principal antes de la limpieza o el mantenimiento de la unidad. •...
- Page 108 ESPAÑOL INFORMACIÓN DE SEGURIDAD • No altere las características del aparato de ninguna manera. • No instale el aparato en ambientes donde el aire pueda contener gases, hidrocarburos o azufre, o cerca de fuentes de calor. • Este electrodoméstico no está diseñado para ser utilizado por personas con discapacidades físicas, sensoriales o mentales (incluidos niños) o con falta de experiencia y conocimiento, a menos que sean supervisados o instruidos acerca del uso del aparato por una persona responsable de su...
-
Page 109: Condiciones De Funcionamiento
ESPAÑOL INFORMACIÓN DE SEGURIDAD CONDICIONES DE FUNCIONAMIENTO • Teniendo en cuenta el rango de temperaturas de la tabla a continuación, sepa que el aire acondicionado puede dejar de funcionar o presentar otras anomalías en ciertas condiciones. > 109.4˚F o 43˚C (Aplicar a T1) Exterior Enfriar >... - Page 110 ESPAÑOL CONFIGURACIÓN Y USO NOTA PARA EL APAGADO • Cuando se apaga el aire acondicionado, el controlador principal decidirá automáticamente si se detiene inmediatamente o después de funcionar durante un par de decenas de segundos con menor frecuencia y menor velocidad del aire. AVISO SOBRE EL USO Funcionamiento de emergencia •...
- Page 111 ESPAÑOL INSTRUCCIONES DE INSTALACIÓN PARTES Y CARACTERÍSTICAS UNIDAD INTERIOR Rejilla de entrada Interruptor de de aire Entrada de aire inicio forzado Panel Anillo de Filtro protección de aire de la tubería Lamas Salida de aire Salida de aire Control remoto UNIDAD EXTERIOR Tubería de Rejilla de...
-
Page 112: Instalación
ESPAÑOL INSTRUCCIONES DE INSTALACIÓN AVISOS: • Un sistema de aire acondicionado split es una gran opción para mantener su hogar fresco y confortable en los meses de verano. Estas unidades también son más silenciosas, más fáciles de instalar y pueden ser más energéticamente eficientes que algunos sistemas de aire acondicionado central. -
Page 113: Instalación De La Unidad Interior
ESPAÑOL INSTRUCCIONES DE INSTALACIÓN INSTALACIÓN DE LA UNIDAD INTERIOR Espacio hasta el techo 5,9 pulgadas (15 cm) Espacio a la Espacio a la pared 7.9 pared 7.9 pulgadas (20 cm) pulgadas (20 cm) Espacio hasta el piso 78.7 pulgadas (200 cm) 1. - Page 114 ESPAÑOL INSTRUCCIONES DE INSTALACIÓN PRECAUCIÓN • Elija una ubicación con travesaños o vigas para asegurarse de que la pared sea lo suficientemente fuerte como para sostener el peso de la unidad. • Instale la unidad a por lo menos a 3,3 pies (1,0 m) de distancia de antenas y líneas de corriente o conexión que sean utilizadas para la televisión, la radio, los sistemas de seguridad del hogar, los interco- municadores o los teléfonos.
- Page 115 ESPAÑOL INSTRUCCIONES DE INSTALACIÓN 2. Asegure la placa de montaje a la pared interior. • Sostenga la placa de montaje contra la pared donde desee instalar la unidad interior. Use un nivel para asegurarse de que ésta se encuentre nivelada tanto de forma horizontal como vertical. Use un lápiz para marcar las ubicaciones de los orificios para los tornillos, retire la placa y luego perfore en la pared un orificio para cada tornillo.
- Page 116 ESPAÑOL INSTRUCCIONES DE INSTALACIÓN 3. Asegure la unidad interior a la placa de montaje. • Para fijar el aire acondicionado a la pared, simplemente alinee las con- exiones hembra en la parte posterior de la unidad con las conexiones macho en la placa de montaje y presione firmemente para asegurar la unidad en su lugar.
- Page 117 ESPAÑOL INSTRUCCIONES DE INSTALACIÓN 4. Coloque una plataforma de hormigón en el suelo. • No coloque la unidad exterior directamente en el suelo, ya que es pesada y podría moverse a estar sobre tierra o rocas. Consejo: Coloque la plataforma de hormigón de manera que sea lo suficientemente alta como para mantener la unidad fuera de del agua que pueda acumularse en el suelo debido a la lluvia o la nieve.
- Page 118 ESPAÑOL INSTRUCCIONES DE INSTALACIÓN 5. Perfore un agujero de 3 pulgadas (7,6 cm) de diámetro a través de la pared para que pueda pasar el tubo del refriger- ante y la manguera de drena hacia afuera. • Haga una marca del centro del agujero de la placa de montaje. Use una sierra de copa o un rotomartillo con un accesorio de corte de orificios para crear un orificio circular de 3 pulgadas (7,6 cm) a través de la pared.
- Page 119 ESPAÑOL INSTRUCCIONES DE INSTALACIÓN 6. Verifique las conexiones eléctricas en la unidad interior. Ruta de las tuberías • Dependiendo de la posición de la unidad, la tubería se puede dirigir hacia un lado desde la izquierda o la derecha (Fig. 1), o verticalmente desde la parte posterior (Fig.
- Page 120 ESPAÑOL INSTRUCCIONES DE INSTALACIÓN ELECTRICAL DESCONEXIÓN DISCONNECT ELÉCTRICA FLUJO DE LA COR- POWER FLOW RIENTE ALTERNA AC MAINS UNIDAD EXTERIOR OUTDOOR UNIT JUNTAS ESTANCAS WEATHER PROOF O A PRUEBA DE LOS FITTINGS ELEMENTOS LIQUID TIGHT CONDUCTO HERMÉTICO NO NON-METALLIC METÁLICO CONDUIT INDOOR UNIT UNIDAD INTERIOR...
- Page 121 ESPAÑOL INSTRUCCIONES DE INSTALACIÓN Diagrama de cableado • Es necesario hacer las conexiones eléctricas de acuerdo con el diagrama de cableado. Velocidad constante A la unidad exterior Velocidad variable Velocidad variable A la unidad exterior A la unidad exterior Conector Si hay un conector, conéctelo directamente.
- Page 122 ESPAÑOL INSTRUCCIONES DE INSTALACIÓN 7. Pase las líneas de refrigerante y la manguera de drenaje a través del agujero en la pared. • Luego fíjelos en los lugares designados en la unidad interior. • Coloque la manguera de drenaje en la parte inferior para garantizar un flujo libre del agua.
-
Page 123: Instalación De La Unidad Exterior
ESPAÑOL INSTRUCCIONES DE INSTALACIÓN INSTALACIÓN DE LA UNIDAD EXTERIOR 1. Coloque la unidad exterior lejos de zonas con mucho tráfico, polvo o calor. • Encuentre el orificio que perforó a través de la placa de montaje de la unidad interior y coloque la unidad exterior a menos de 50 pies (15 m) para que las tuberías y el cable se puedan conectar fácilmente. - Page 124 ESPAÑOL INSTRUCCIONES DE INSTALACIÓN 2. Asegure la unidad exterior sobre la plataforma de hormigón. • Coloque una alfombra de goma (no incluida) en la parte superior de la plancha de hormigón para minimizar las vibraciones; luego, coloque la unidad del condensador exterior sobre la almohadilla. Asegure la unidad al hormigón con pernos de anclaje.
- Page 125 ESPAÑOL INSTRUCCIONES DE INSTALACIÓN 3. Cableado de la unidad eléctrica. ADVERTENCIA - Todas las conexiones eléctricas, el cableado y la instalación deben ser realizadas por un electricista con licencia. De lo contrario, puede provocar lesiones personales o daños. • El electricista debe leer la placa de clasificación para informarse sobre el disyuntor y el tamaño del cable adecuado.
- Page 126 ESPAÑOL INSTRUCCIONES DE INSTALACIÓN Diagrama de cableado Velocidad constante Velocidad variable A la unidad exterior A la corriente To Power A la corriente To Power To Power eléctrica A la unidad exterior eléctrica A la corriente To Power To Power A la unidad exterior To Power A la corriente...
- Page 127 ESPAÑOL INSTRUCCIONES DE INSTALACIÓN 4. Conecte las líneas eléctricas y de refrigerante a la unidad exterior. • Use anclajes para asegurar las líneas de refrigerante desde la unidad interior a la unidad exterior de acuerdo al manual. También haga todas las conexiones eléctricas.
-
Page 128: Instalación Del Tubo De Refrigerante
ESPAÑOL INSTRUCCIONES DE INSTALACIÓN INSTALE LA TUBERÍA DE REFRIGERANTE (con los conectores rápidos) Almohadillas acústicas Conectores (no incluidas) rápidos NOTA: Todas las ilustraciones de este manual son solo para fines explicativos. Su aire acondicionado puede ser ligeramente diferente. La forma real prevalecerá. Están sujetos a cambios sin previo aviso para mejorarlos. - Page 129 ESPAÑOL INSTRUCCIONES DE INSTALACIÓN • Después de terminar de conectar el par de los conectores rápidos, pase la manguera de drenaje y los tubos de refrigerante a través del orificio de la pared. NOTA: Las partes del conector rápido deben colocarse fuera de la habitación.
- Page 130 ESPAÑOL INSTRUCCIONES DE INSTALACIÓN • osicione las tuberías de refrigerante correctamente para que queden alineadas con las válvulas y no estén sujetas a tensión. Coloque el conector con rosca en las tuberías de refrigerante justo en la rosca de la unidad exterior y ajuste a mano las primeras vueltas. Ver Fig. 8. NOTA: Los tubos de refrigerante deben ser conectados a las válvulas de la unidad exterior con el menor esfuerzo posible.
- Page 131 ESPAÑOL INSTRUCCIONES DE INSTALACIÓN IMPORTANTE: Dado que el acoplamiento funciona con anillos autorroscantes, puede que haya fugas si desconecta y vuelve a conectar las tuberías. Esto además anulará la garantía. Después de completar los pasos 1 a 4, verifique que todas las conexiones estén selladas correctamente utilizando espray de detección de fugas o agua con jabón.
- Page 132 ESPAÑOL INSTRUCCIONES DE INSTALACIÓN Envuelva la tubería 1. Use la funda de aislamiento para envolver la parte de la junta entre la unidad interior y el tubo de refrigerante; luego use el material aislante para empacar y aislar las tuberías para evitar la aparición de condensación en la junta.
- Page 133 ESPAÑOL INSTRUCCIONES DE INSTALACIÓN 5. Fije la tubería a la pared con abrazaderas (no incluidas) • Para asegurarse de que las tuberías y los cables no se muevan o se desconecten, conéctelos a la pared exterior de su casa utilizando abrazaderas (no incluidas).
- Page 134 ESPAÑOL INSTRUCCIONES DE INSTALACIÓN 6. Selle el agujero en la pared con poliuretano expandido. • Rocíe espuma de poliuretano expandido en el orificio que perforó para pasar el cable y las tuberías a través de la pared. Asegúrese de que el orificio esté completamente sellado para evitar que pasen el aire o los insectos.
- Page 135 ESPAÑOL INSTRUCCIONES DE INSTALACIÓN 7. ¡Encienda la unidad y disfrute del aire fresco! • Lo único que resta por hacer es encender el aire acondicionado, lo cual puede hacerse desde la unidad interior. Debería tomar solamente uno o dos minutos para que comience a soplar aire frío en su hogar. Página 135...
-
Page 136: Manual Del Control Remoto
ESPAÑOL INSTRUCCIONES DEL CONTROL REMOTO PRECAUCIÓN • Antes de usar el control remoto por primera vez, instale las baterías y asegúrese de que los polos “+” y “-” estén correctamente colocados. • Asegúrese de que el control remoto apunte a la ventana de recepción de la señal, y que no haya obstrucciones entre el mando y el receptor y que la distancia sea menor a 8 m. - Page 137 ESPAÑOL INSTRUCCIONES DEL CONTROL REMOTO MANIPULACIÓN DE PILAS ALCALINAS ADVERTENCIA Cuando se manipulen pilas alcalinas, se deben tomar precauciones de seguridad básicas, incluyendo las siguientes: NUNCA mezcle pilas alcalinas con estándares de carbono-zinc o recargables de níquel-cadmio en este producto. 2.
- Page 138 ESPAÑOL INSTRUCCIONES DEL CONTROL REMOTO NOTA: El control remoto muestra todos los símbolos durante el en- cendido y solo los correspondientes al funcionamiento actual el resto del tiempo. Página 138...
- Page 139 ESPAÑOL INSTRUCCIONES DEL CONTROL REMOTO 1. ENCENDIDO/APAGADO • Presione este botón para encender/apagar la unidad. • Esto borrará la configuración del temporizador existente y los ajustes de SLEEP (dormir). 2.°C/°F • Pulse este botón para configurar la visualización de la temperatura en Fahrenheit, que se muestra de forma predeterminada en grados Celsius.
- Page 140 ESPAÑOL INSTRUCCIONES DEL CONTROL REMOTO 7. iCLEAN • Presione este botón con la unidad APAGADA; el control remoto mostrará “CL” en la pantalla y la unidad limpiará automáticamente el polvo del evaporador y lo secará para aumentar la eficiencia de enfria- miento y calentamiento.
- Page 141 ESPAÑOL INSTRUCCIONES DEL CONTROL REMOTO 13. FAN ON • La función de ventilador encendido funciona cuando la unidad se apa- ga con el control remoto en los modos de enfriar, secar, o automático. Funcionará en el modo de calentar (en el modo VENTILADOR en las unidades sin calefacción) con el ventilador interno funcionando du- rante más tiempo antes de detenerse.
- Page 142 ESPAÑOL INSTRUCCIONES DEL CONTROL REMOTO Instrucciones de las pilas 1. Deslice la tapa para abrirla según la dirección indicada por la flecha. 2. Inserte dos pilas nuevas (AAA, no incluidas) y colóquelas con los po- los eléctricos de manera correca (+ y -). 3.
- Page 143 ESPAÑOL INSTRUCCIONES DEL CONTROL REMOTO Modo ventilador 1. Presione el botón “MODE” y seleccione el modo de funcionamiento como ventilador. 2. Con el botón “SPEED”, puede seleccionar la velocidad del ventilador entre BAJA, MEDIA, y ALTA. 3. Presione el botón “ON/OFF” para que el aire acondicionado co- mience a funcionar.
-
Page 144: Puesta En Marcha De Prueba
ESPAÑOL FUNCIONAMIENTO DE PRUEBA Compruebe luego de la instalación Verificación de seguridad eléctrica 1. Que la tensión de alimentación es la requerida. 2. Si hay algún defecto o conexión incorrecta en cada uno de los cables de alimentación, señal y conexión a tierra. 3. -
Page 145: Limpieza Y Cuidado
ESPAÑOL LIMPIEZA Y CUIDADO ADVERTENCIA • Debe apagar el aire acondicionado y la electricidad debe cortarse durante más de 5 minutos antes de limpiarlo, de lo contrario podría haber riesgo de descargas eléctricas. • No moje el aire acondicionado ya que esto puede provocar una descarga eléctrica. - Page 146 ESPAÑOL LIMPIEZA Y CUIDADO Limpieza del filtro de aire 1. Vuelva a instalar el filtro seco en el orden inverso al de la extracción, luego cubra y bloquee el panel. Comprobaciones antes del uso 1. Compruebe que todas las entradas y salidas de aire de las unidades están desbloqueadas.
-
Page 147: Resolución De Problemas Y Garantía
ESPAÑOL RESOLUCIÓN DE PROBLEMAS Y GARANTÍA PROBLEMA CAUSA POSIBLE El aire acondicionado no fun- • Se ha cortado la energía? ciona en absoluto. • Está flojo el cableado? • El voltaje es demasiado alto o demasiado bajo? (medido por un profesional) •... - Page 148 ESPAÑOL RESOLUCIÓN DE PROBLEMAS Y GARANTÍA ANTES DE LLAMAR AL SERVICIO TÉCNICO SI EL AIRE ACONDICIONADO NO FUNCIONA: A) Asegúrese de que el aparato está enchufado firmemente. Si no lo está, retire el enchufe de la toma de corriente, espere 10 segundos y vuelva a conectarlo firmemente.
- Page 149 ESPAÑOL SOLUCIÓN DE PROBLEMAS Y GARANTÍA GARANTÍA LIMITADA Cualquier reparación, recambio, o servicio LA REPARACIÓN O EL REMPLAZO COMO SE ESTABLECE EN ESTA GARANTÍA SON LA SOLUCIÓN de garantía, y todas las preguntas sobre este EXCLUSIVA DEL CLIENTE; BLACK+DECKER NO SERÁ producto deben ser dirigidas BLACK+DECKER RESPONSABLE POR NINGÚN DAÑO INCIDENTAL al 844-299-0879 desde EE.UU.
- Page 150 FRANÇAIS BLACK & DECKER, BLACK+DECKER, the BLACK & DECKER and BLACK+DECKER logos and product names and the orange and black color scheme are trademarks of The Black & Decker Corporation, used under license. All rights reserved. Product in this box may differ slightly from that pictured. Does not affect function.
Need help?
Do you have a question about the BSAH1215AC and is the answer not in the manual?
Questions and answers