Table of Contents
Advertisement
Quick Links
Instruction Sheet
FlexView 800 Series
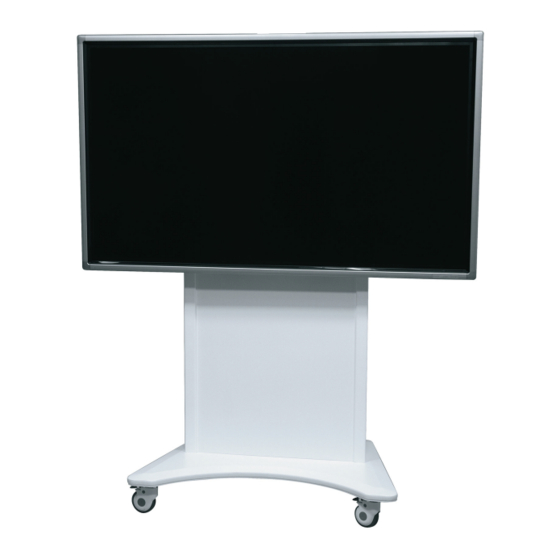
FVS Electric Lift Conferencing Cart
THANK YOU
Thank you for purchasing the FlexView™ 800 Series FVS electric lift conferencing cart. Please
read these instructions thoroughly before installing or assembling this product.
PRODUCT FEATURES
• Simple display mounting with electric display height adjustment.
• Lever Lock™ for easy mounting of Codecs and smaller components.
• Adjustable cable management included.
I-00669
Rev G
Advertisement
Table of Contents

Related Manuals for LEGRAND MIDDLE ATLANTIC FlexView 800 Series


Summary of Contents for LEGRAND MIDDLE ATLANTIC FlexView 800 Series
- Page 1 Instruction Sheet FlexView 800 Series FVS Electric Lift Conferencing Cart THANK YOU Thank you for purchasing the FlexView™ 800 Series FVS electric lift conferencing cart. Please read these instructions thoroughly before installing or assembling this product. PRODUCT FEATURES • Simple display mounting with electric display height adjustment. •...
-
Page 2: Table Of Contents
TABLE OF CONTENTS Grounding Instructions ------------------------------------------------------------------------------------------------------- Page 3 Important Safety Instructions --------------------------------------------------------------------------------------------- Page 4 - 6 Weight Ratings --------------------------------------------------------------------------------------------------------------- Page 7 Supplied Components and Hardware ---------------------------------------------------------------------------------- Page 7 - 8 Required Tools --------------------------------------------------------------------------------------------------------------- Page 8 Installing the Leveling Feet (Optional) ---------------------------------------------------------------------------------- Page 8 -9 Understanding Some Operational Items ------------------------------------------------------------------------------ Page 9 Selecting the Correct Interface Bracket Hardware for Your Display -------------------------------------------- Page 10 Installing the VESA 800 Display Adapter Brackets (Optional) --------------------------------------------------- Page 11... -
Page 3: Grounding Instructions
GROUNDING INSTRUCTIONS - INSTRUCTIONS DE MISE À LA TERRE This product must be grounded. If it should malfunction or breakdown, grounding provides a path of least resistance for electric current to reduce the risk of electric shock. This product is equipped with a cord having an equipment-grounding conductor and a grounding plug. - Page 4 IMPORTANT SAFETY INSTRUCTIONS - INSTRUCTIONS IMPORTANTES SUR LA SÉCURITÉ CAUTION! To avoid an unstable condition, place heavier WARNING/CAUTION! The exclamation point within an components at the bottom of the cabinet. When more than equilateral triangle is intended to alert the user to the one component is placed in the cabinet, begin at the presence of important operating and maintenance bottom of the cabinet and place equipment at the lowest...
-
Page 5: Important Safety Instructions
IMPORTANT SAFETY INSTRUCTIONS When using an electrical furnishing, basic precautions should always be followed, including the following: • For institutional use. • Read and follow all instructions before using. • WARNING – Death or serious injury may occur when children climb on audio and/or video equipment furniture. A remote control or toys placed on the furnishing may encourage a child to climb on the furnishing and as a result the furnishing may tip over on the child. - Page 6 INSTRUCTIONS IMPORTANTES SUR LA SÉCURITÉ Lorsque vous utilisez des mobiliers électriques, toujours respecter les précautions de base, notamment : • Usage institutionnel. • Lire et suivre toutes les instructions avant l'utilisation du matériel. • AVERTISSEMENT - Des blessures graves ou mortelles peuvent survenir si un enfant grimpe sur le meuble d'un équipement audio ou vidéo.
-
Page 7: Weight Ratings
Le poids total de l'équipement ne doit pas dépasser les quantités indiquées dans le tableau précédent. SUPPLIED COMPONENTS AND HARDWARE If any pieces are missing or damaged, please report it immediately to Technical Support at av.support@legrand.com or (866) 977-3901. 10” Lever Lock™ (2x) Plate 2”... -
Page 8: Required Tools
Pan Head Screw Pan Head Screw (4x) Washer NOTE: • To order more hardware, contact support at av.support@legrand.com or (866) 977-3901. • Additional hardware is included that may not be required for your installation. REQUIRED TOOLS • Protective Eyewear • Toothpick or WARNING: Use tools with caution and follow all •... -
Page 9: Understanding Some Operational Items
INSTALLING THE LEVELING FEET (CONTINUED) NOTE: Adjust torque on power driver to lightest setting and only increase as necessary. 4. Use power driver, socket, and (4x) nuts from the previous steps to install a leveling foot (A) to the bottom of your cart. (FIGURE C) Leveling Foot 5. -
Page 10: Selecting The Correct Interface Bracket Hardware For Your Display
SELECTING THE CORRECT INTERFACE BRACKET HARDWARE FOR YOUR DISPLAY NOTE: • If installing optional Camera Mount or Soundbar Mount, they must be installed prior to installing your display. Refer to instructions I-00875 for Camera Mount and I-00876 for Soundbar Mount. •... -
Page 11: Installing The Vesa 800 Display Adapter Brackets (Optional)
INSTALLING THE VESA 800 DISPLAY ADAPTER BRACKETS (OPTIONAL) NOTE: Only install the Flange VESA 800 display adapter Nuts NOTE: The VESA 800 display adapter bracket brackets if your display and (4x) 5/16-18 flange nuts are shown in requires VESA 800 spacing. VESA 800 black for clarity. -
Page 12: Attaching Your Display Onto The Horizontal Mounting Bracket
ATTACHING INTERFACE BRACKETS TO THE BACK OF YOUR DISPLAY (CONTINUED) WARNING: The hardware used must be assembled in the arranged order shown in this topic and minimum of 2 pan head screws, washers, and spacers (if required) must be used on each interface bracket. - Page 13 ATTACHING YOUR DISPLAY ONTO THE HORIZONTAL MOUNTING BRACKET (CONTINUED) WARNING: Do not release your display until certain the top hook of each interface bracket is securely seated on the upper rail of the horizontal mounting bracket. AVERTISSEMENT: Ne relâchez pas votre écran tant que le crochet supérieur de chaque support d'interface n'est pas fermement installé...
-
Page 14: Reversing The Door
ATTACHING YOUR DISPLAY ONTO THE HORIZONTAL MOUNTING BRACKET (CONTINUED) 9. With at least one other person bracing the bottom end of the cart, carefully lift the top end and gently place it upright onto the leveling feet. 10. Have someone slightly tip the cart while another person carefully makes any necessary final leveling feet adjustments. -
Page 15: Removing Lever Lock Plate And Channels
REMOVING LEVER LOCK PLATE AND CHANNELS NOTE: Your FlexView Conferencing Cart comes with a 10” Lever Lock plate and (2x) 2” channels pre-installed inside. This topic explains how to remove them. 1. Temporarily remove any devices, cables, and cable management from the inside of your cart. 2. -
Page 16: Understanding Cable Management And Equipment Mounting
UNDERSTANDING CABLE MANAGEMENT AND EQUIPMENT MOUNTING 1. Raise display to highest position before securing cables. For more information, see “Understanding Some Operational Items” on page 9. 2. Create a service loop to assure adequate cable length when display is fully extended. (FIGURE T) 3. -
Page 17: Warranty
Factory Distribution United States: New Jersey, California, and Illinois | Canada: Ontario | The Netherlands: Weert At Legrand AV Inc. we are always listening. Your comments are welcome. Legrand AV is an ISO 9001 and ISO 14001 Registered Company. Accessory and...
Need help?
Do you have a question about the MIDDLE ATLANTIC FlexView 800 Series and is the answer not in the manual?
Questions and answers