
Related Manuals for LeeBoy Rosco NB25 BROOM


Summary of Contents for LeeBoy Rosco NB25 BROOM
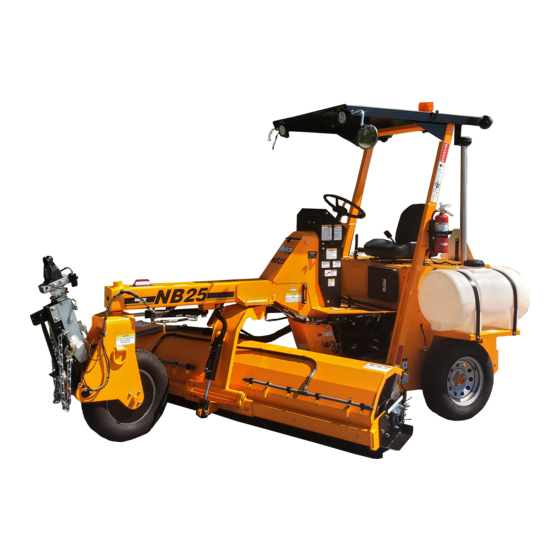
- Page 1 Safety and Operation Manual NB25 BROOM Manual No. 1026160-SOP Manual No. 1026160-SOP REV A REV A This manual applies to Serial Number 334287 and above.
- Page 3 The LeeBoy family of companies is committed to total quality management with a strong focus on meeting customer needs. LeeBoy is also proud to be an accredited ANAB manufacturer, which is a certification process comprised of quality standards established by the American National Standards Institute (ANSI) and the American Society for Quality (ASQ).
- Page 4 2022 LeeBoy 2022 LeeBoy LeeBoy reserves all copyright and other rights in this manual and its content. No part of this manual may be reproduced or used in any way without the written permission of LeeBoy, except as necessary to operate LeeBoy equipment.
-
Page 5: Table Of Contents
Hydrostatic Drive System ..... . 3-3 Brush Control ......3-4 Rosco NB25 Broom... - Page 6 Poly/Steel Wafer ......4-17 Cab Option ......4-17 Rosco NB25 Broom...
- Page 7 Check Hydraulic Oil Level ..... . 5-18 Change Hydraulic Oil and Filter ....5-19 Rosco NB25 Broom...
- Page 8 Hydraulic Motor Installation Start-Up Procedure ... 5-29 Troubleshooting Chart ......5-30 viii Rosco NB25 Broom...
-
Page 9: Safety
Safety Decal Locations ..... . . 1-11 Safety Decals Care ......1-13 Rosco NB25 Broom... -
Page 10: Safety
Safety NOTES Rosco NB25 Broom... - Page 11 IMPORTANT FOR THE SAFETY OF YOU AND YOUR COWORKERS. READ AND UNDERSTAND you MUST read and understand this manual before operating the Rosco NB25 Broom and follow its THOROUGHLY. HEED THE WARNINGS AND instructions when operating the machine. FOLLOW THE INSTRUCTIONS.
-
Page 12: Safety Precautions
• Safety signs and labels are additional reminders for safe operating and maintenance techniques. • Failure to observe these directions could result in electrocution or death. • Contact your authorized Rosco/LeeBoy dealer for additional training. • Make sure you are aware of all laws and regulations Electrocution Hazard that are in effect for the location in which the broom is operated. - Page 13 When operating machinery there is a risk for Never modify the machine without the written consent fire. Always ensure appropriate safety of Rosco/LeeBoy . Any modification can affect safe equipment is available. operation and may cause personal injury or even death.
- Page 14 • Never check for a hydraulic fluid or fuel leak with your hands. Always use a piece of wood or cardboard. Have your authorized LeeBoy dealer or distributor repair the damaged parts. Rosco NB25 Broom...
-
Page 15: Machine Precautions
Hydraulic Systems Precautions Hydraulic Systems Precautions Only use replacement parts approved by Rosco/ • Ensure all components are in good working condition. LeeBoy. Other replacement parts may affect warranty Replace any worn, cut, abraded, flattened or crimped coverage. hoses and metal lines. -
Page 16: Refueling Precautions
Apply parking brake and turn off the machine. Keep the machine securely parked until the failure is corrected or the machine can be safely transported. Rosco NB25 Broom... -
Page 17: Storage Precautions
• Make sure the unit is stored on a surface that is firm, level, and free of debris. • Store the machine inside a building or cover securely with a weatherproof tarpaulin. Rosco NB25 Broom... -
Page 18: Tire Precautions
• NEVER operate a vehicle on a single tire of a dual assembly. The carrying capacity of the single tire and rim is dangerously exceeded and operating a vehicle in this manner can result in damage to the rim and tire. 1-10 Rosco NB25 Broom... -
Page 19: Safety Decals
For additional help, by Rosco/LeeBoy. refer to the parts listing in Section 7 and contact your authorized Rosco/LeeBoy dealer to order a replacement kit. Safety Decal Locations Safety Decal Locations... - Page 20 Part #1024123-04 Part #983125-10 Part #1024123-07 (Both Sides) Part #1021704-03 Part #1005474 Part #1008622 Part #1023749 Part #39141-24 Part #1024123-06 Part #1010219 (Both Sides) (Both Sides) Tow DOWN Part #39141-19 Part #1024123-02 Tow UP Part #1024123-20 1-12 Rosco NB25 Broom...
-
Page 21: Safety Decals Care
5. Slowly remove remaining backing and carefully smooth into place. • Obtain replacement safety decals or signs from your authorized dealer. 6. Small air pockets can be pierced with a pin and smoothed using a piece of decal backing. Rosco NB25 Broom 1-13... - Page 22 Safety NOTES 1-14 Rosco NB25 Broom...
- Page 23 Hydraulic Fittings ......2-8 Determining Proper Torque ..... 2-9 Rosco NB25 Broom...
- Page 24 Information and Specifications NOTES Rosco NB25 Broom...
-
Page 25: Contact Information
LeeBoy directly. Sales Representative: Dealership Name: Dealership Address: Dealership Phone: Record of Ownership Please complete the following information for use if you need to contact Rosco/LeeBoy for service, parts or literature. Machine Model Number: Product Serial Number: Date of Purchase: Nameplate The nameplate contains the model and serial numbers used to identify the machine and its components for parts or service information. -
Page 26: Specification Charts
Information and Specifications SPECIFICATION CHARTS The specifications provided in this section include the Replace original equipment only with machine weights, dimensions, performance, and torque components approved by Rosco/LeeBoy. values for both metric and standard inch fasteners. 8’ 9” 8’ 5” 7’ 7”... - Page 27 Standard: Kubota V1505-E4B (Canopy) Manufacturer and Model Optional: Deutz D2.2 (Cab) Kubota: 4-Cylinder Liquid Cooled Diesel Engine Type Deutz: 3-Cylinder Liquid Cooled Diesel Combustion System; Intake System Direct Injection; Air Cooled Power Rating HP (kW) 25 HP @ 2300 RPMs Rosco NB25 Broom...
- Page 28 Additional cab options include front windshield washer. Poly/Steel Wafers (In lieu of poly wafers.) Forward/Reverse Brush Rotation Brush rotates in either direction. Fire Extinguisher Mount included. Hydraulic Oil Cooler (Canopy) (Standard with Cab Option) Work Lights Front and Rear, Canopy or Cab Rosco NB25 Broom...
-
Page 29: Torque Specifications
1121 1520 1139 1817 1363 2464 1848 12 UNF 1241 1683 1261 2012 1509 2728 2046 1-1/2 6 UNC 1950 1462 2644 1982 3162 2371 4287 3215 12 UNF 2194 1645 2975 2230 3557 2668 4823 3617 Rosco NB25 Broom... -
Page 30: Metric Fasteners
Place one wrench on the connector body and tighten the swivel nut with the second to the torque shown in the following table: NOTE: The torque values shown are based upon 1 1/4 lubricated connections. 1 3/8 Rosco NB25 Broom... -
Page 31: Determining Proper Torque
TS = Torque setting indicated on wrench Equations Equations • Torque setting if the crowfoot is placed in line with respect to the wrench: TS = TD * L / LA TS = TD * L / (L+E) Rosco NB25 Broom... - Page 32 2. The flats method is most accurate for the first assembly cycle. For multiple disassembly and assembly cycles, torque values are more reliable. 3. Tightening two (2) flats or more may damage seal faces. Rosco NB25 Broom 2-10...
- Page 33 2. Torque values apply to bolts that are plated or coated in light engine oil. 3. Before assembly, lubricate O-Ring with light oil (SAE 10W or 20W). Rosco NB25 Broom 2-11...
- Page 34 2. When using a male tapered pipe thread with a female straight or parallel pipe thread, maximum values are 50% of those listed in the table above. 3. If thread sealant is used, maximum values shown should be decreased by 25%. Rosco NB25 Broom 2-12...
-
Page 35: Component Location
Heater (Cab Option) ......3-8 Air Conditioning (Cab Option) ......3-8 Rosco NB25 Broom... - Page 36 Component Location NOTES Rosco NB25 Broom...
-
Page 37: Components Overview
Engine Engine forward and reverse with dynamic braking. The Rosco NB25 Broom comes standard with a Kubota A hydraulic gear pump connected to the hydrostatic D1505 four-cylinder diesel engine a diesel engine or system pump provides hydraulic flow to the manifold. -
Page 38: Brush Control
The Rosco NB25 offers a dust suppression system that features a 35-gallon water tank on each side. A series of corrosion-resistant nozzles mounted on a spray bar across the broom frame sprays water on dust and debris being swept away. Rosco NB25 Broom... -
Page 39: Machine Overview
Broom / Brush Angles 50 degrees right or left. 24 OD brush core with poly bristles. Dust Suppression Spray The spray bar across the brush cover contains a series of nozzles that spray water to control dust. Rosco NB25 Broom... -
Page 40: Control Panel
• Turn knob right to increase throttle speed. Throttle Control Knob • Turn knob left to decrease throttle speed. KUBOTA ENGINE ONLY NOTE: If equipped with the Deutz engine option, set throttle speed in the MVP-350 digital controller (See Section 4). Rosco NB25 Broom... - Page 41 • Push switch DOWN to lower the tow lift cylinder. If equipped with the optional Wheel Up Tow package, use this switch to 22 * Wheel Up Tow/Work select Tow when towing the broom (UP) or Work during normal sweeping operation (DOWN). Optional items. Rosco NB25 Broom...
-
Page 42: Heater (Cab Option)
Turns the air conditioning on and off, and controls fan speed. Fan Speed • Turn knob right to turn on and increase fan speed. • Turn knob left to turn off and decrease fan speed. Rosco NB25 Broom... - Page 43 Quick-Change Brush Core ......4-12 Transporting the Broom ......4-13 Rosco NB25 Broom...
- Page 44 Fire Extinguisher ......4-18 Magnetic Cup Holder ......4-18 Rosco NB25 Broom...
-
Page 45: General Information
Operation GENERAL INFORMATION RECEIVING THE MACHINE The Rosco NB25 Broom is a hydrostatic, self-propelled Although the machine has been checked thoroughly by compact street sweeper for cleaning a variety of the manufacturer, road hazards or other factors during surfaces. Whether sweeping gravel, construction site transport may result in damage. -
Page 46: Start-Up Procedure
Verify there are no people, obstacles To start the Rosco NB25 Broom: or other equipment in the machine’s path before Ensure the park brake is engaged before starting starting the engine. -
Page 47: Cold Weather Starting
• Apply the foot pedal brake. It is important that the operator become familiar with driving the three-wheeled Rosco NB25 Broom before • Turn the ignition key to the ON position and wait three operating it on the job site. Know and understand the to five seconds until the Wait to Start light goes out. -
Page 48: Forward Reverse Pedal
• You can lock the throttle speed by turning the lower Speed should be dictated by your experience and knob to the right; unlock by turning the knob left. sweeping conditions. Rosco NB25 Broom... -
Page 49: Status And Warning Lights
It is important to investigate the issue if this light illuminates. What may be a minor problem can become a major problem when this warning is ignored. Figure 4-5. MVP-350 Digital Controller Unit Wait to Start Rosco NB25 Broom... -
Page 50: Navigation
• Use the foot pedals to move forward or in reverse as indicates amount of fuel remaining in tank (shown above described on Page 4-6. the symbol). Engine Hours: This is a status light that illuminates when engine hours are being displayed by the system. Rosco NB25 Broom... -
Page 51: Starting To Sweep
STARTING TO SWEEP cylinder lock when towing or if the machine is left parked for extended periods of time. The Rosco NB25 Broom features excellent broom control and functionality for a variety of commercial applications. Most operator controls are conveniently located on the main control panel, with a few controls located to the operator’s right side. -
Page 52: Brush Pivot
Most problems of rapid wear, bristle breakage and loss are due to using excessive own pressure. Brush Rotation Park Brake Lever Brush Down Pressure Figure 4-11. Brush Rotation Lever and Brush Down Pressure Valve 4-10 Rosco NB25 Broom... -
Page 53: Dust Suppression System
3. Follow the sweeping procedures and guidelines outlined in the next section. NOTE: Be sure to inspect and clean the water nozzles after each use to prevent clogging and ensure the spray pattern is not adversely affected. Rosco NB25 Broom 4-11... -
Page 54: Sweeping Guidelines
NOTE: Brush carriage may need to be raised slightly to install a new core if the old brush core was worn. 9. Once the idle hub is fully engaged, reinsert the swing arm pin and cotter pins, ensuring each is secure. 4-12 Rosco NB25 Broom... -
Page 55: Transporting The Broom
Park the transport vehicle on a level surface and set the park brake. 2. Install chocks or blocks against the truck (or trailer) wheels. Rosco NB25 Broom 4-13... -
Page 56: Options
ALWAYS attach the safety chains to the towing vehicle and ensure the hitch connection is secure BEFORE towing. Hitch Warning Coupler Steering Light Valve Switch Lock/Unlock Brake Brush Lift Valve Cylinder Lock Figure 4-16. Towing Controls 4-14 Rosco NB25 Broom... -
Page 57: Towing Instructions
Figure 4-19. Brush Lift Cylinder Lock Position Using the ball hitch or pintle eye, pull the tow hitch coupler back to the center, then lower onto the kickstand (it will fall down into place). Tow Position Figure 4-17. Steering Valve Rosco NB25 Broom 4-15... - Page 58 Twist the chains to shorten their length and keep them from dragging. Insert the hooks from the bottom to ensure that they will stay attached. 4-16 Rosco NB25 Broom...
-
Page 59: Poly/Steel Wafer
NOTE: Recheck electrical and break-away cable needed. The wire tips can reach down into cracks and connections before towing! crevices, and are better suited for cutting through ice and snow. Contact your authorized Rosco LeeBoy dealer for purchase. Cab Option Cab Option The cab option is equipped with front windshield wiper, heater and air conditioner. -
Page 60: Brush Rotation
Operation Fire Extinguisher Fire Extinguisher For additional safety, contact your authorized LeeBoy dealer to purchase the fire extinguisher option. (Figure 4-25) This fire extinguisher has its own mount and is installed on the broom frame for easy access. Figure 4-27. Hydraulic Oil Cooler System... - Page 61 Cold Weather Starting ......5-15 Dielectric Grease ......5-16 Rosco NB25 Broom...
- Page 62 Hydraulic Motor Installation Start-Up Procedure ... 5-29 Troubleshooting Chart ......5-30 Rosco NB25 Broom...
-
Page 63: Maintenance Schedule
Engine Operator’s Manual accompanying your machine for more detailed engine service information. Before performing any maintenance procedures on the Rosco NB25 Broom, review the safety information in When performing any routine maintenance, always Section 1. include the previous routine maintenance hours in the higher hourly schedule. -
Page 64: Routine Maintenance
Engine Operator’s Manual. 9. Check hydraulic oil level and filters. (Page 5-18) 10. Check hydraulic fluid at master cylinder in cab on the floor. (Page 5-22) 11. Perform any other engine preventive maintenance described in the Engine Operator’s Manual. Rosco NB25 Broom... -
Page 65: Every 500 Hours Or Semi-Annual Routine Maintenance
Use the following procedure for lubricating these components: Locate and clean the single grease fitting at each of the lubrication points. 2. Apply one shot of grease to each fitting with a manual (hand) grease gun. 3. Wipe away any excess grease. Rosco NB25 Broom... -
Page 66: Lubrication Points
Figure 5-1. Lubrication Points Schedule ITEM TYPE OF LUBRICANT INTERVAL Steering Pivot Multi-Purpose Grease Daily Brush Core Shaft Bearings Multi-Purpose Grease Daily Brush Lift Pivot Multi-Purpose Grease Daily Tow Hitch Pivot (If equipped Multi-Purpose Grease Daily with tow package option.) Rosco NB25 Broom... -
Page 67: Daily Lubrication
Maintenance Daily Lubrication Daily Lubrication Brush Core Shaft Bearings Brush Lift Pivot Steering Pivot Rosco NB25 Broom... -
Page 68: Engine Maintenance
3 - Oil Filter 9 - Hydraulic Gear Pump 4 - Engine Oil Filler Cap 10 - Engine Fan (with Safety Shield) 5 - Engine Oil Dipstick 11 - Radiator Cap 6 - Exhaust System 12 - Air Filter Rosco NB25 Broom... -
Page 69: Change Engine Oil And Filter
8 - Oil Filter 3 - Piston Pump 9 - Engine Oil Filler Cap 4 - Hydraulic Gear Pump 10 - Engine Oil Dipstick 5 - Exhaust System 11 - Engine Oil Drain Screw 6 - Air Filter Rosco NB25 Broom... -
Page 70: Air Filter
13. Fill the engine with 14.2 quarts (13.4 liters) of oil. use the cover to push filters into place to prevent damage. 14. Reinsert the dipstick. 8. Inspect and torque all clamps, bolts and connections to the air intake system and make any repairs if needed. 5-10 Rosco NB25 Broom... -
Page 71: Engine Drive Belt
.39 to .47 inches. Belt • If replacing the belt, remove worn belt and replace with new fan belt. Tension 5. Retighten the alternator bolts and reinstall safety Bolt shield. Safety Shield Figure 5-5. Engine Belt Rosco NB25 Broom 5-11... -
Page 72: Fuel System
DO NOT start the engine until the leakage problem is corrected. NEVER loosen a fuel injector line as contents are under high pressure. DO NOT try to bleed air by loosening injector lines. 5-12 Rosco NB25 Broom... -
Page 73: Water Separator
Make certain the vent caps are tight to prevent solution from entering the cells. After cleaning, pour clean water over the battery and surrounding area to wash the solution away. Check vent cap breather openings to make sure they are open. Rosco NB25 Broom 5-13... -
Page 74: Check Battery Electrolyte Level
2. Place the positive (red) multimeter lead on the positive (+) battery terminal; and the negative (black) multimeter lead on the grounded negative (-) battery terminal. 3. Start the engine. 4. Check the battery charge level. The multimeter should read at least 13.5 volts. 5-14 Rosco NB25 Broom... -
Page 75: Alternator
(-) to negative (-) and positive (+) to 2. Connect one end of the second jumper cable to the positive (+). negative (-) terminal of the booster battery and the other end to the frame of the machine with the dead battery. Rosco NB25 Broom 5-15... -
Page 76: Dielectric Grease
Figure 5-12. Incorrect Application of Dielectric Grease Figure 5-11. Correct Application of Dielectric Grease 5-16 Rosco NB25 Broom... -
Page 77: Fuse Box Panel
If you replace a fuse, but it continues to blow, contact your authorized Rosco/ LeeBoy dealer. Standard Canopy Standard Canopy Optional Cab Optional Cab Figure 5-13. Fuse Panel and Fuse Sizes Figure 5-14. Fuse Panel and Fuse Sizes Rosco NB25 Broom 5-17... -
Page 78: Hydraulic System
See your authorized service life of the components in the hydraulic LeeBoy/Rosco dealer if these components need system. servicing. You should inspect the machine for hydraulic leaks... -
Page 79: Change Hydraulic Oil And Filter
13. Replace the hydraulic oil cap onto the tank filler neck and tighten securely. 14. Start the engine and operate hydraulic controls several times to check functions. 15. Check the hydraulic system for any leaks. Figure 5-16. Hydraulic Oil Tank Valve Rosco NB25 Broom 5-19... -
Page 80: Change Hydraulic Oil Cap Strainer
Hydraulic Pump and Motor Hydraulic Pump and Motor The hydraulic pump and motor generally require no regularly scheduled maintenance. Frequent inspection for leaks will indicate the need for service of these components. 5-20 Rosco NB25 Broom... -
Page 81: Inspect Cooling System
• Check for any internal blockage in the radiator hose. If reinstallment (or replace if damaged). scale forms on the hose, clean with scala inhibitor (or equivalent). 6. Install new hoses and reconnect with hose clamps. Rosco NB25 Broom 5-21... -
Page 82: Chassis Maintenance
Adjust brakes. Spots during inflation. tire skidding. 3. After proper inflation (the recommended pressure is 36 ± 2 PSI), release chuck or stand-off gauge. 4. Torque wheel lug nuts to 90 - 95 ft lb. 5-22 Rosco NB25 Broom... -
Page 83: Change Tires
13. Torque to 90 - 95 ft lbs. Cylinder 14. Remove supports and lower jack. Figure 5-21. Master Cylinder Brake Fluid Fill If the master cylinder fluid is fre- quently low, check the hydraulic system for leaks. Rosco NB25 Broom 5-23... -
Page 84: Tow Hitch Brake (Option)
(Figure 5-24) can occur to this important component. See your 2. Then turn on the water system using the switch on authorized LeeBoy/Rosco dealer for assistance. the main control panel. (Pages 3-6 to 3-7) Serious injury or even death can result 3. -
Page 85: Spray Bar And Nozzles
4. If the nozzle is still clogged or not spraying properly, When installing batteries, always contact your authorized Rosco/LeeBoy dealer for install the positive cable first followed by the replacement nozzle(s). negative cable. Reversed polarity can damage the electrical system. -
Page 86: Weldment
Electrical current can ignite fire or cause an explosion, therefore it is critical to turn off power to the machine. It is also important to grind off the paint to ensure proper ground on the area being welded. 5-26 Rosco NB25 Broom... -
Page 87: Winterizing For Storage
Purge the gas system the hydraulic tank refilled. Failure to perform this and seal connection(s). maintenance procedure if needed could result in premature failure of the pumps or motors. Rosco NB25 Broom 5-27... -
Page 88: Periodic Maintenance In Storage
• Reinstall the battery to start the engine and allow the engine to warm until all machine functions are at operating temperature at least twice per month. • Continue to perform routine maintenance procedures as required using the Periodic Maintenance Table on Page 5-3. 5-28 Rosco NB25 Broom... -
Page 89: Troubleshooting
15 - 30 minutes at no-load and half- defined for the capscrew grade and size. speed to bleed air from the hydraulic system. It is CRITICAL to use the correct mounting hardware. Rosco NB25 Broom 5-29... -
Page 90: Troubleshooting Chart
Troubleshooting Chart Troubleshooting Chart The troubleshooting chart below identifies the most If the problem persists, contact your authorized LeeBoy common symptoms of mechanical problems. Fault dealer for assistance or repair. codes are also shown on the PV101 Digital Display unit on the Operator Control Panel. - Page 91 Alternator malfunctioning. Replace alternator. Circuit breaker tripped. Reset circuit breaker. Faulty gauge or sender. Replace gauge or sender. Instrument gauges don’t Alternator not charging. Repair wiring or replace alternator. work. Faulty wiring. Replace wiring or connector. Rosco NB25 Broom 5-31...
- Page 92 Engine oil pressure is low. Replace fuel injector, fuel transfer pump and Oil diluted with fuel. injection pump. Oil diluted with coolant. See your authorized Rosco/LeeBoy dealer. Incorrect oil specifications. Change oil. Oil pressure sender or gauge Replace oil pressure sender or gauge.
- Page 94 ST Engineering LeeBoy, Inc., dba LeeBoy 500 Lincoln County Parkway Ext. Lincolnton, North Carolina 28092 Phone: (704) 966-3300 - Fax Sales: (704) 483-5802 Scan QR Code to download and view this manual. www.LeeBoy.com Printed in the U.S.A.
Need help?
Do you have a question about the Rosco NB25 BROOM and is the answer not in the manual?
Questions and answers