Table of Contents
Advertisement
Quick Links
Advertisement
Table of Contents

Related Manuals for Nexus 21 L-75i+


Summary of Contents for Nexus 21 L-75i+
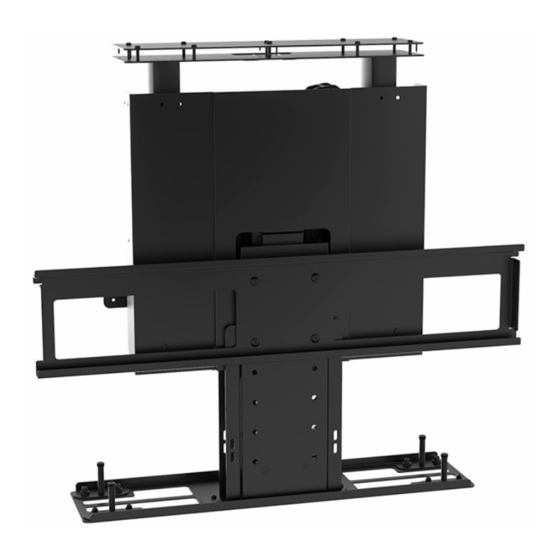
- Page 1 Installation Manual for L-75i+...
-
Page 2: Table Of Contents
Table of Contents Satefy Information Parts & Hardware List Warranty & Return Policies Pre-Installation Upper Assembly Lower Assembly & Cable Management TV Mounting Lid Installation Integration Information Version: 1.0.2 Date: 11-18-21... -
Page 3: Satefy Information
Nexus 21 products. Nexus 21 bears no responsibility for incidental or consequential damages. This includes, but is not limited to, any labor charges for the servicing of Nexus 21 products performed by anyone other than Nexus 21. Nexus 21 intends to make this and all documentation as accurate as possible. -
Page 4: Parts & Hardware List
Parts List Install Hook Above Enclosure Plate Top Beam Support (2) Upper Column Rear Support (2) Bayonet Sleeve Upper Track Bracket Lower Assembly Center Track Bracket Lower Track Bracket (2) Lid Support Bracket Lid Plate Upper & Lower Cable Control Box (3) 4.5m Motor Cables Tracks... - Page 5 Hardware List Backup Switch Front Cover (2) Screen Locks Screen Back Plate (2) Vertical Mounting Bars Power Cord Control Kit (See pg. XX) Hardware Pack (See Contents below) Hardware Pack Contents: 6 x 12mm FHMS (4) 6 x 16mm FHMS (16) 6 x 30mm FHMS (10) 6 x 10mm BHMS (12) 5 x 10mm BHMS (12)
-
Page 6: Warranty & Return Policies
Disclaimer: Nexus 21 warrants all motorized products to be free from defects in material and workmanship for the term of the warranty. The warranty includes all parts, motorized components, electronics and metal parts. If a Nexus 21 product proves to be defective in material or workmanship during the expressed warranty period, Nexus 21 will replace the product free of charge. If the exact original purchase product is not available (due to upgraded designs or discontinuation of a model), the defective product will be replaced with a similar product of equal or greater value. - Page 7 Nexus 21 ships each product encased in custom die-cut foam which is purpose engineered for vibration dampening to reduce any risks of shipping damage. It is mandated that all product returns be shipped back to Nexus 21 in its original packaging.
-
Page 8: Pre-Installation
Pre-Installation... - Page 9 1a. Place the Above Enclosure Plate inside, flush, and centered against the rear panel of your enclosure with the edge labeled “Front” facing you. 1b. Mark and drill pilot holes for the holes shown in the image.
- Page 10 2. Drill the piloted holes out with ¼” Drill Bit; Be sure to center the drill on the piloted holes. If the holes are slightly misaligned, redrill them with a 5/16” bit. 3. Place the Above Enclosure Plate on the top of the enclosure and align it with the holes you just drilled; Ensure the “Front” label is facing up.
- Page 11 4. Return to the inside of your enclosure, align the Install Hook with the two holes in the center, then fasten it to your enclosure using (2) 6 x 30 FHMS. 5. Fasten the Above Enclosure Plate to the to of the Enclosure using (6) #8 x ¾” FHWS.
-
Page 12: Upper Assembly
Upper Assembly... - Page 13 6. Fasten each Bayonet Sleeve to the Rear Support using (4) 6 x 10 BHMS. Note: Use the Notch circled in the image above to ensure proper orientation of the Rear Support and Bayonet Sleeves. 7. Fasten the Top Beam Support to the top of the Column Assemblies using (8) 6 x 16 FHMS.
- Page 14 8. Slide and tap the tongue on the Bayonet Sleeves up into the metal sleeves on Column Assemblies A & B. 9. Align the slot on the Top Beam Support with the Install Hook inside your enclosure, then push it up and back to hang it.
- Page 15 10. Fasten the Top Beam Support to the Above Enclosure Plate using (8) 6 x 30 FHMS. 11. Fasten the Rear Support to the rear panel of your enclosure using (8) #10 x ¾” THWS.
- Page 16 12. Place the Upper Cable Track Bracket within the notch on the Rear Support then fasten it to your enclosure using (2) #8 x ¾” FHWS. 13. Feed (3) 4.5m Motor Cables and any AV Cables through the shorter of the two Cable Tracks, leaving Slack on both ends of the track.
- Page 17 14. Fasten the Cable Track to the threaded holes closest to the Rear Support on the Upper Cable Track Bracket using (2) 5 x 10 BHMS.
-
Page 18: Lower Assembly & Cable Management
Lower Assembly & Cable Management... - Page 19 Support Plate 15a. Lift the Lower Assembly up above the Support Plates, then slide it back, allowing it to rest on the top of the Support Plates; Maintain your grip. 15b. Fasten the Lower Assembly to the Support Plates using (8) 6 x 16 FHMS.
- Page 20 DO NOT PUSH CONNECTIONS INTO THE COLUMN LEAVE CONNECTIONS EXPOSED 16. Connect the (3) Motor Cables coming out of the Upper Cable Track to each of the Lift Columns. 17. Mount the Control Box inside your enclosure on the right side of your lift using (2) #10 x 1-3/4” FHWS.
- Page 21 Upper Left Column Lower Column IR or RF Receiver Backup Switch Extend Retract Power Cord Upper Right Column 18. Connect your Control Box according to the diagram shown above. 19. Press and hold the “Retract” button on your Backup Switch for 5 seconds to ‘Initialize’ your system. Note: You should see or hear the system move up and down very slightly, if you don’t, repeat this step.
- Page 22 20. Press the “Extend” button on your remote or Backup Switch to fully extend the system. If you need to stop it at any time, press the “Retract” button to do so. 21. Attach the Center & Lower Track Brackets to the back of the Lower Assembly using (4) 5 x 10 BHMS. Note: Use the image above as a reference for correct orientation.
- Page 23 22. Attach the Upper Cable Track to the Center Track Bracket on the left using (2) 5 x 10 BHMS. 24. Disconnect the Motor Cable from the Lower Column then feed it and any AV Cables through the Lower Cable Track.
- Page 24 25. Attach the Lower Cable Track to the Center Cable Track Bracket on the right using (2) 5 x 10 BHMS. 26. Attach the bottom of the Lower Cable Track to the Motor Cover using (2) 5 x 10 BHMS.
- Page 25 DO NOT PUSH CONNECTIONS INTO THE COLUMN LEAVE CONNECTIONS EXPOSED 2” Increments 27. Reconnect the Motor Cable to the Lower Column and route the cables as shown the image above. 28. Fasten the Screen Back Plate to the Lower Assembly using (4) 3/8” – 16 x ¾” BHMS then fully retract your system using the Backup Switch or Remote. Note: The Screen Back Plate position can be adjusted up or down in 2”...
-
Page 26: Tv Mounting
TV Mounting... - Page 27 30. Fasten the Lid Supports to the left and right sides of the Screen Support using (6) 6 x 10 BHMS; For taller cabinets, (4) screws can be used instead of (6). Note: The Lid Supports can be adjusted down, up to 10”, to change the position of your Lid Plate. 31.
- Page 28 Bottom of Enclosure Make this Flush 32. Adjust the Lid Supports up or down until the bottom of the Lid Plate is Flush with the bottom of your enclosure or ‘Lid Catch’. Note: This step will allow you to precisely mark the location of the Spring-Loaded Lid hardware later on in the manual. 33.
- Page 29 Screen Locks 34. Hang your TV on the Screen Back Plate, center it, then fasten the Screen Locks to the bottom set of hooks to lock it in place. Note: If you are unsatisfied with the position of the TV, remove it, then adjust the Vertical bars up to lower the TV or down to raise the TV on your lift. Important Note: Ensure the gap between the bottom of your TV and the Lid Plate is as small as possible.
-
Page 30: Lid Installation
Lid Installation... - Page 31 Lid Mount Disc Dowel Center Tape (Not Provided) Dowel Center Tip 35. Place a Dowel Center into the center hole on each of the Lid Mount Discs then place them into the Floating Nests on the underside of the Lid Plate and tape them into place.
- Page 32 1/2” x 45 Bevel Extend Retract 37. Press the “Extend” button to lower your lift system. 38. Drill a ½” deep hole in each of the (4) marked locations on your Lid using a ½” Drill bit. Note: The Bevel is optional but if used, it will ensure your lid retracts perfectly every time.
- Page 33 Stabilization Mount Lid Mounting Disc 5/16” - 18 x 3/8” Bolt 39. Remove the Tape, Dowel Centers, and Lid Mount Discs from the Lid Plate. 40. Place a quick setting Epoxy into each hole on your Lid, then place the Small Shoulder Bolts into each hole; An alternate adhesive can be used if Epoxy is not available.
- Page 34 42. Fasten the Lid Mount Discs to your Lid using (16) #6 x ½” FHWS, ensuring the Stabilization Mounts remain upright.
- Page 35 43. Slip the (4) 2.5 Lg Springs over each of the (4) Large Shoulder Bolts. 44. Align the Stabilization Mounts with the Floating Nests and fasten your Lid to the Lid Plate using the Shoulder Bolts.
- Page 36 Floating Nests 45. Slighty Loosen the Nut’s on the Floating Nests, do not remove them. 46. Ensure everything is out of the way to operate your lift, then press the “Retract” button on your remote to retract it and test your lid placement. If needed, press the “Extend”...
- Page 37 1/8” Gap All Around Floating Nests 47. Adjust the position of your lid so that it’s centered within your opening, then extend it again. 48. Tighten the Nut’s on the Floating Nests, being careful not to shift the position of the lid as you tighten them.
- Page 38 49. Fasten the Front Cover to the Lower Assembly using (2) 6 x 10 BHMS Screws.
- Page 39 Your installation is now complete.
-
Page 40: Integration Information
Integration & Control Information This section of the manual contains information on IR, Contact Closure, and RF Controls. For IP Control integration information, please consult the manual that came with your IP Control Module. - Page 41 IR Control User Guide A. Connect the IR Receiver Connect the IR Receiver to port A1 or A2 on the Control Box. B. Setting a Height Limit (Optional) Use the IR Remote to run your system to the desired extended position, then plug the Height Limit Insert into the Control Box.
- Page 42 Technical Support IR Control FAQ Phone: 480-306-5462 E-mail: support@nexus21.com Do you have IR Hex Codes for this lift? EXTEND: 0000 006D 0000 000C 000C 0115 000C 0115 000C 0115 000C 00B7 000C 0115 000C 00B7 000C 00B7 000C 00B7 000C 0115 000C 0115 000C 0115 000C 0255 STOP: 0000 006D 0000 000C 000E 0115 000E 00B5 000E 0115 000E 00B5 000E 0115 000E 00B5 000E 00B5 000E 00B5 000E 0115 000E 0115 000E 0115 000E 0240 RETRACT: 0000 006D 0000 000C 000E 0115 000E 0115 000E 0115 000E 00B5 000E 0115 000E 00B5 000E 00B5...
- Page 43 Height Limit Insert into the RF Receiver. Note: This will set the maximum extension for your system, to reset this, remove the Height Limit Insert and repeat these steps. Copyright 2020 ©, Nexus 21 Technology in Motion...
- Page 44 We offer 3 types of integration, IR, IP, or Contact Closure. As a courtesy we offer a free control swap to and from any of these control Contact Closure, contact your account manager or our technical support department for more information. types. To process a Control Swap contact your account manager or our support department at support@nexus21.com. Copyright 2020 ©, Nexus 21 Technology in Motion...
- Page 45 The relays CANNOT latch. They must function similar to a light switch that always reverts back to neutral position. Connect the RJ-45 plug of the Contact Closure Cable to the Nexus 21 Lift Control Box using port A1. (Ports A1 and A2 can be used interchangeably.) A.
- Page 46 Contact Closure FAQ Technical Support Phone: 480-306-5462 E-mail: support@nexus21.com What if I only have one relay? To ensure proper function, two relays must be used and both relays must be Normally Open. Latching the relay closed will cause the lift to receive continuous commands resulting in undesired operation or damage to the Control Box. Do you support RS232 or 12v Triggers? We typically get this question due to the request for feedback from the lift.
- Page 47 Intentionally Left Blank...
Need help?
Do you have a question about the L-75i+ and is the answer not in the manual?
Questions and answers