Table of Contents
Advertisement
Available languages
Available languages
Quick Links
Advertisement
Table of Contents

Subscribe to Our Youtube Channel
Related Manuals for INNOLIVING INN-616


Summary of Contents for INNOLIVING INN-616
- Page 1 GROOMING SET RIFINITORE BARBA/CAPELLI/CORPO INN-616 MANUALE D’USO USER MANUAL...
- Page 2 RIFINITORE BARBA/CAPELLI/CORPO ISTRUZIONI PER L’USO Grazie per aver acquistato INN-616. PRIMA DELL’USO LEGGERE ATTENTAMENTE IL SEGUENTE MANUALE DI ISTRUZIONI E CONSERVARLO PER FUTURE CONSULTAZIONI.. Leggere attentamente e interamente le istruzioni prima di utilizzare l’apparecchio e conservare il presente libretto per future consultazioni.
- Page 3 diretta del sole. Tenere il prodotto e i suoi accessori lontano da fonti di calore. • Spegnere sempre il tagliacapelli o il rifinitore dopo l’utilizzo. Si consiglia di non prolungare l’utilizzo oltre i 30 minuti consecutivi per evitarne il surriscaldamento. Dopo ogni utilizzo, lasciare a riposo per alcuni minuti per permetterne il raffreddamento.
-
Page 4: Descrizione Prodotto
lavandino o altri recipienti contenenti acqua. • Per motivi igienici non condividere il set con altre persone. • In caso di infezioni o problemi cutanei nell’area su cui si intende utilizzare il set, occorre utilizzare il set con estrema cautela e dopo aver consultato il medico curante. - Page 5 ACCESSORI PETTINE SPAZZOLINA Dopo aver rimosso le lame per la pulizia o la sostituzione, al momento di riposizionarle, controllare che siano ben riallineate. Per farlo, occorre semplicemente far coincidere i denti della lama superiore e della lama inferiore, punta per punta. L’estremità dei denti della lama superiore dovrebbe essere a circa 1,2 mm da quelli della lama inferiore;...
- Page 6 NOTA BENE Per mantenere il dispositivo in condizioni ottime, aggiungere delle gocce di olio periodicamente. Non utilizzare olii per capelli, brillantina, olio con cherosene o altri solventi. I solventi possono evaporare e lasciare uno strato di grasso che potrebbe rallentare il normale funzionamento delle lame.
-
Page 7: Inserimento Batteria
le lame senza problemi. Questa operazione andrebbe fatta ad ogni utilizzo. Successivamente pulire la quantità di olio in eccesso. Durante l’utilizzo, stendere il cavo per evitare che si avvolga su sé stesso. 2. Se il taglio viene fatto ad un’altra persona, farla sedere in modo che la sua testa si trovi all’altezza degli occhi di chi taglia, permettendo una visuale agevolata durante il taglio e un controllo del dispositivo. - Page 8 La numerazione del pettine è riportata sulla parte centrale del pettine stesso. Per inserire il pettine, posizionarlo con i dentini rivolti verso l’alto e farlo scorrere lungo le lame. Per rimuovere il pettine, spingere verso l’alto e rimuoverlo dalle lame. Per un taglio uniforme far scorrere il pettine e le lame del taglia capelli tra i capelli, senza forzare e senza passare troppo velocemente.
- Page 9 PASSAGGIO 3 – PARTI LATERALI DELLA TESTA Utilizzare il pettine per taglio più corto da 3 mm o 6 mm, adatto per le basette e per le parti vicino alle orecchie. Poi passare a un pettine per un taglio più lungo, 9 mm o 12 mm, e continuare a tagliare fino alla parte alta della testa.
-
Page 10: Pulizia E Manutenzione
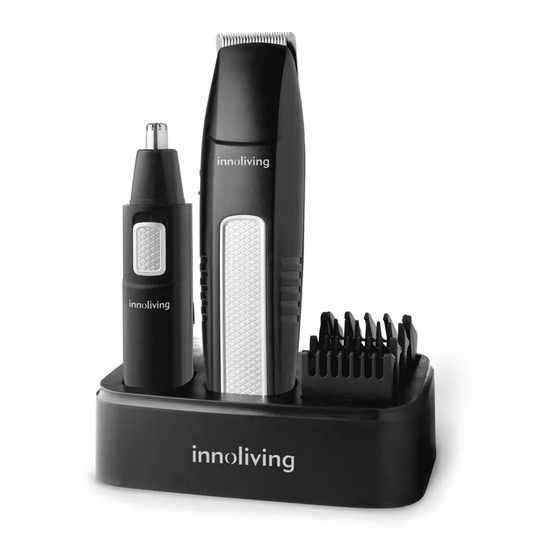
alcune parti, ottenendo un taglio netto e pulito come con il rasoio. Fig.7 LOOK CORTI E SFUMATI 1. Cominciare con il pettine da 12 mm, tagliando dalla parte posteriore fino alla parte centrale. Mantenere il pettine guida premuto parallelamente sulla testa e muovere lentamente tra i capelli, come mostrato nella figura 8. - Page 11 parte delle lame verso il basso quando pulite la testina. Aspettare che l’accessorio sia asciutto prima di rimettere in funzione l’apparecchio. RIFINITORE PER NASO E ORECCHIE PULSANTE SPAZZOLINA PER ON/OFF PULIZIA TESTINA PER NASO/ORECCHIE UTILIZZO Questo prodotto è pensato per rimuovere peli superflui da naso ed orecchie Rimuovere il tappo trasparente e impostare il pulsante su “ON”...
- Page 12 PULIZIA E MANUTENZIONE 1. Pulire il rifinitore dopo ogni utilizzo 2. Assicurarsi che il pulsante sia posizionato su OFF 3. Utilizzare la spazzolina per rimuovere residui di peli dalla testina. 4. Non pulire mai il corpo del rifinitore direttamente con acqua. 5.
- Page 13 BEARD/HAIR/BODY TRIMMER INSTRUCTIONS Thank you for purchasing Innoliving grooming set INN-616 BEFORE USE READ CAREFULLY THIS MANUAL AND KEEP IT SAFE FOR FUTURE REFERENCES. Read the instructions carefully and completely before using the appliance and keep this user manual safe for future references.
- Page 14 overheating. After every use, let the devices cool down some minutes. • Use the item with the supplied accessories. • Do not use on animals. • This set can be used by children aged 8 and above or by people with reduced physical, sensor or mental capabilities, or lack of experience or knowledge, unless they are supervised or trained on how to use the product safely and they understand the related hazards.
-
Page 15: On/Off Switch
• Remove the batteries from device, in case of prolonged no-use. HAIR CLIPPER COMPONENTS UPPER BLADE LOWER BLADE ON/OFF SWITCH ACCESSORIES COMB BRUSH... - Page 16 After removing the blades for cleaning or replacement, check that they are properly realigned during their replacement. To do this, simply match the teeth of the upper and lower blades, tip by tip. The end of the teeth of the upper blade should be about 1.2 mm from those of the lower blade;...
- Page 17 The comb will also allow continuous use of the hair clipper, since it has various types of cuts possible with a single accessory. In addition to this it is also useful if a lock of hair gets stuck because it is not necessary to remove the blades but only the comb.
-
Page 18: Battery Insertion
BATTERY INSERTION 1. Gently slide the battery compartment cover and remove it from the device body. 2. Insert 2 AA batteries paying attention on polarities. Replace the battery compartment cover TIPS Cut the hair calmly and with a steady hand. Make short passes and gradually work on the entire head. - Page 19 Pic.1 3. Grip the hair clipper comfortably and press lightly on the head, with the teeth of the comb facing up. Gradually and slowly move the hair clipper upwards and outwards to obtain a slight faded effect. 4. As you cut, gradually lift the top of the clipper. Continue to cut the back above the ears.
- Page 20 STEP 4 - TOP OF THE HEAD 1. Using the 9 mm or 12 mm comb, start cutting from the center of the hair to the forehead, on the opposite side of the hair growth (picture 4). In some cases, it may be useful to cut in the opposite direction, or cut from the forehead towards the center of the head.
-
Page 21: Cleaning And Maintenance
Pic.8 2. Use the same procedure from the lowest part of the head to the highest, as in the image. Then pass the hair clipper in the opposite direction to the growth of the hair, from the forehead to the central part and equalize the cut at the level of the lateral part. - Page 22 NOSE AND EAR TRIMMER ON/OFF CLEANING BRUSH SWITCH NOSE/EAR ATTACHMENT USAGE This product is designed to remove unwanted nose and ear hair Remove the transparent cap and set the button to “ON” Carefully place the head inside the nostrils to remove the hair. Do not forcefully insert the trimmer inside the ear or nose cavities to avoid damage.
-
Page 23: Rating Label
CLEANING AND MAINTENANCE 1. Clean the trimmer after each use 2. Make sure the button is in the OFF position 3. Use the brush to remove residual hair from the head. 4. Never clean the trimmer body directly with water. 5. - Page 24 Innoliving Spa Via Merloni, 2/B 60131 Ancona Italy Tel 071.2133550 www.innoliving.it...
Need help?
Do you have a question about the INN-616 and is the answer not in the manual?
Questions and answers