
Related Manuals for Inalto ICI302K.1


Summary of Contents for Inalto ICI302K.1
- Page 1 U S E R M A N U A L I N A L T O . H O U S E 30cm Induction Cooktop MODEL CODE/S I C I 3 0 2 K .1 F O R A L L A U S T R A L I A N H O M E S V 1 .
- Page 2 Again, thank you for choosing an InAlto appliance and we look forward to being of service to you. Scan to Register your InAlto Appliance or go to: →...
-
Page 3: Table Of Contents
24 Warranty Information Customer Care InAlto recommends the use of original spare parts. When contacting our customer service team on 1300 11 4357, please ensure that you have the following information at hand (which can be found on your appliances’ rating plate). -
Page 4: Safety Instructions
Safety Instructions IMPORTANT INFORMATION INSTALLATION The following statements you will see in this booklet Electrical Shock Hazard have these meanings: • Disconnect the appliance from the mains electricity supply before carrying out any work WARNING! or maintenance on it. • Connection to a good earth wiring system is Indicating information concerning your personal essential and mandatory. - Page 5 • Metallic objects such as knives, forks, spoons and Hot Surface Hazard lids should not be placed on the cooktop surface • During use, accessible parts of this appliance will since they can get hot. become hot enough to cause burns. •...
- Page 6 Safety Instructions (Continued) CAUTION: Important safety instructions (cont.) Read the following carefully to avoid an • Do not use pans with jagged edges or drag pans electric shock or fire. across the induction glass surface as this can scratch the glass. It is important to use your cooktop safely.
-
Page 7: Your Inalto Cooktop
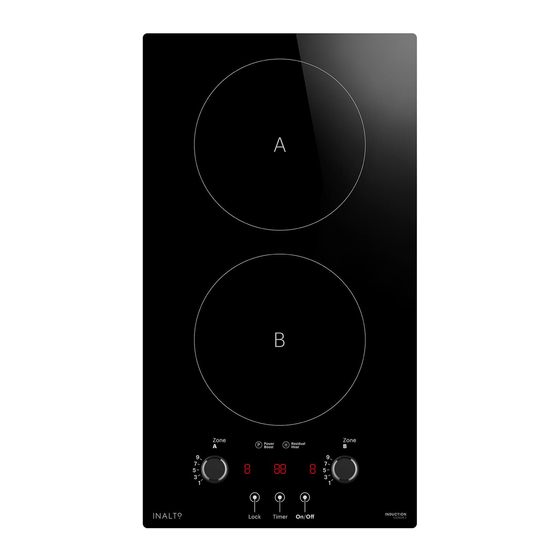
Your InAlto Cooktop PRODUCT LEGEND Zone A: Max. 1800/2000 W zone 2. Zone B: Max. 1800/2000 W zone 3. Ceramic glass plate 4. Lock control 5. Timer control 6. ON/OFF power control 7. Zone A: Power & Time control knob 8. -
Page 8: Before First Use
Before First Use WARNING! BEFORE FIRST USE Never install a cooktop that has been damaged. Please contact our Customer Care team for • Before using this appliance read this manual, taking further assistance. special note of the “Safety Instructions” section. CLEANING IMPORTANT! You should clean the induction... -
Page 9: Using Your Cooktop
Using Your Cooktop WARNING! INDUCTION COOKING Some pots and pans on the market are not suitable for induction cooking because they have Induction cooking is a safe, advanced, efficient, only a part of the bottom in ferromagnetic material and economical cooking technology. It works by with parts in another material. -
Page 10: Operation Instructions
Operation Instructions IMPORTANT! TO START COOKING The residual heat indicator will disappear if the mains supply to the product is cut. IMPORTANT! Do not use cookware with jagged edges WARNING! or a curved base. It is still possible to burn yourself on a Touch the ON/OFF power button for a while. - Page 11 HEAT SETTINGS The settings below are guidelines only. The exact setting will depend on several factors, including your cookware and the amount you are cooking. Experiment with the induction cooktop to find the settings that best suit you. Power level setting Recommended Use Delicate warming of small amounts of food Melting chocolate, butter or food that burns quickly...
-
Page 12: Installation Instructions
Installation Instructions WARNING INSTALLATION This user manual must be read! Cut out the work surface according to the sizes shown in The laws, ordinances, directives and standards in the drawing. force in the country of use are to be followed (safety regulations, proper recycling in accordance with the For the purpose of installation and use, a minimum of regulations, etc.) - Page 13 L(mm) W(mm) H(mm) D(mm) A(mm) B(mm) X(mm) F(mm) 875+4 495+4 50 mini 3 mini Under any circumstances, make sure the ceramic cooker hob is well ventilated and the air inlet and outlet are not blocked. Ensure the ceramic cooker hob is in good work state. As shown below CLEARANCES Note: The safety distance between the hotplate and the cupboard above the hotplate should be Under any circumstances, make sure the induction cooktop is well ventilated and the air inlet and outlet are not...
- Page 14 Installation Instructions (Continued) BEFORE INSTALLING THE COOKTOP, ENSURE ADJUSTING THE FIXING BRACKETS • The work surface is square and level, and The unit should be placed on a stable, smooth surface no structural members interfere with space (use the packaging or a towel). Do not apply force onto requirements.
- Page 15 CAUTIONS WIRING DIAGRAM The induction cooktop must be installed by qualified personnel or technicians. We have professionals at your service. Please never conduct the operation by yourself. 2. The induction cooktop shall not be installed directly above a dishwasher, fridge, freezer, washing machine or clothes dryer, as the humidity may damage the cooktop electronics.
- Page 16 THIS PAGE IS INTENTIONALLY LEF T BL ANK 16 16...
-
Page 17: Cleaning & Maintenance
Cleaning & Maintenance By ensuring proper cleaning and maintenance of your InAlto cooktop, you can ensure that it will have a long and fault free operation. GENERAL CLEANING INSTRUCTIONS WARNING Do not start cleaning the cooktop until it has completely cooled. -
Page 18: Troubleshooting
Troubleshooting Some minor faults can be fixed by referring to the instructions given below. There is also a self-help section online at www.support.residentiagroup.com.au. Problem Possible Cause Solution The induction cooktop cannot be No power • Make sure the induction cooktop turned on. - Page 19 The induction cooktop is equipped with a self diagnostic function. With this test the technician is able to check the function of several components without disassembling or dismounting the cooktop from the working surface. ERROR CODES If an abnormality comes up, the induction cooktop will automatically enter the protective state and display the corresponding error codes: FAILURE CODE POSSIBLE CAUSES...
- Page 20 Troubleshooting (Continued) FAILURE POSSIBLE CAUSES SOLUTION The LED does not • No power supplied. • Check to see if plug is secured come on when unit is • The accessorial power board tightly in outlet and that outlet is plugged in. and the display board connected working.
-
Page 21: Technical Specifications
Technical Specifications MODEL ICI302K.1 RATED VOLTAGE 220-240V~ 50Hz or 60Hz INSTALLED ELECTRIC POWER 3500W PRODUCT SIZE (W × D × H mm) 288 × 520 × 59.5mm BUILT IN CUTOUT DIMENSIONS (A × B mm) 268 × 500mm... -
Page 22: Your Receipt
Attach your receipt to this page... -
Page 23: Purchase Details
Purchase Details For future reference, please record the following information in the form below. The product details can be found on the rating plate, and purchase details which can be found on your sales invoice. STORE DETAIL S STORE NAME ADDRESS TELEPHONE PURCHASE DATE... -
Page 24: Warranty Information
Warranty Information AUSTRALIAN WARRANTY TERMS & CONDITIONS (h) ‘you’ means the purchaser of the Appliance not COOKING APPLIANCES having purchased the Appliance for re-sale, and ‘your’ has a corresponding meaning. This document sets out the terms and conditions This warranty only applies to Appliances of the product warranties for Residentia Group purchased and used in Australia and is in Appliances. - Page 25 (a) the Appliance is damaged by: replaced if the Appliance fails to be of acceptable accident quality and the failure does not amount to a major (ii) misuse or abuse, including failure to properly failure. The benefits to you given by this warranty maintain or service are in addition to your other rights and remedies (iii)
- Page 26 THIS PAGE IS INTENTIONALLY LEF T BL ANK...
- Page 27 Simply visit the below website, or ask your retailer 24 months on the microwave magnetron; Waste for help: www.inalto.house/nz/registration disposers have a 12 month warranty. The provision of service under this warranty is...
- Page 28 D E S I G N E D I N M E L B O U R N E F O R A L L A U S T R A L I A N H O M E S —...
Need help?
Do you have a question about the ICI302K.1 and is the answer not in the manual?
Questions and answers