Parrot ANAFI USA User Manual
Hide thumbs
Also See for ANAFI USA:
- User manual (130 pages) ,
- Quick start manual (3 pages) ,
- User manual (89 pages)
Table of Contents
Advertisement
Quick Links
Advertisement
Table of Contents

Related Manuals for Parrot ANAFI USA


Summary of Contents for Parrot ANAFI USA
-
Page 3: W E Are Parrot . Welcome To The Team
The indispensable prerequisites, on the next pages, will not occupy more than 5 minutes of your time: ANAFI USA requires the FreeFlight 6 app to fly, and to make sure your drone and controller are fully up to date with the latest features. -
Page 4: Prerequisites
You want ANAFI USA up in the air as soon as possible, so do we. 1. Wake your ANAFI USA’s smart battery up. Charge the battery using one of the enclosed USB-A to USB-C cable and the enclosed charger. The battery’s LEDs start flashing: it is awake. - Page 5 Tap “CONTINUE” to access the update of AN AFI US A. 8. ANAFI USA update: tap the green “CONTINUE” box to proceed. FreeFlight 6 displays an animation and a progress circle on a screen labelled “Preparing your drone”. When the update is finished, the screen displays “Your drone is ready”...
-
Page 6: Table Of Contents
ARROT KYCONTROLLER Top panel ............................16 LED status indicator codes ......................17 Skycontroller USA Maintenance Mode .................... 17 Pairing ANAFI USA to a Parrot Skycontroller USA ................. 18 ..........................19 FLIGHT CHECKLIST Equipment ............................. 19 Regulations ........................... 19 Flight conditions ..........................19 ............................. - Page 7 Direct media retrieval (drone to computer) ..................40 FreeFlight 6 Gallery ........................41 MicroSD card formatting ........................ 41 MicroSD card encryption ........................ 42 ........................43 RTSP VIDEO STREAM SHARING 6........................45 NTRODUCING LIGHT User Guide v6.7.7GOV – © Parrot, April 29, 2022...
- Page 8 Presentation of the video mode HUD ..................... 46 Presentation of the photo mode HUD .................... 48 ............................49 REFERENCES Controls ............................49 Presets............................49 Thermal ............................50 Special ............................51 Interface ............................51 Safety ............................52 Camera ............................53 Network ............................54 ....................
- Page 9 Touch & Fly: Waypoint ........................95 Touch & Fly: POI ..........................95 ....................97 1: G TIFF PPENDIX CONVERSION AND IMPORT ......................100 2: T PPENDIX ROUBLESHOOTING GUIDE ......................104 3: O PPENDIX PERATIONAL CHECKLIST User Guide v6.7.7GOV – © Parrot, April 29, 2022...
-
Page 10: Foreword
Also bear in mind you should never alter the center of gravity of the drone. About GPS ANAFI USA does not need a satellite – GPS, Glonass, Galileo – synchronization (or fix) to take off. It can therefore be piloted indoor and through cluttered areas, stabilized by its onboard sensors. -
Page 11: About Auto-Rth (Return Home)
By design, when synchronized to GPS, Glonass and Galileo satellites and when short on power, ANAFI USA will always attempt to come back to its most recent take-off point, at a minimal height over this take-off point, which is configurable through FreeFlight 6 (between 20 meters and 100 meters) and is set by default at 30 meters. -
Page 12: Disclaimer
Using carries no particular health requirement. HOWEVER: 1. ANAFI USA IS NOT A TOY and should not be used or handled by a person under the age of 18 years. 2. BEFORE USING ANAFI US A: (A) CAREFULLY READ the user manual and all information and documentation available on www.parrot.com, which is susceptible to be updated at any time and... -
Page 13: Technical Specifications
Video resolution: 4k/FHD/HD • Video format: MP4 (H264) • Photo resolution: Wide: 21 MP (84° FOV); Rectilinear: up to 16 MP (up to 75.5° FOV) • Photo formats: JPEG, DNG (Digital NeGative RAW) User Guide v6.7.7GOV – © Parrot, April 29, 2022... -
Page 14: Package Contents
ACKAGE CONTENTS Your ANAFI US A package contains: 1 ANAFI USA drone 3 smart batteries (2 + 1 preinstalled on ANAFI US A) 1 Parrot Skycontroller USA 1 multi-port fast USB charger 1 Skycontroller USA charger 1 additional set of propeller blades... -
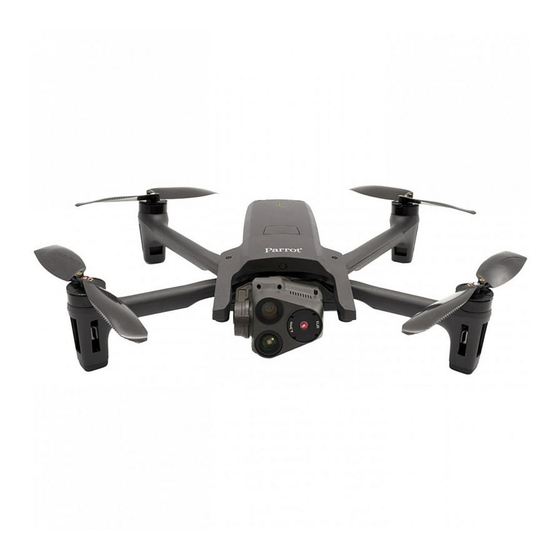
Page 15: Presentation Of Anafi Usa
RESENTATION OF Ready to store or carry Foldable arms and propellers Ready to fly Smart battery Battery extraction button Charge level LED indicators 180° tilt camera gimbal USB-C charging port Power button User Guide v6.7.7GOV – © Parrot, April 29, 2022... -
Page 16: Presentation Of Parrot Skycontroller Usa
RESENTATION OF ARROT KYCONTROLLER External antennas connectors Status LED Take-off/ Landing Joysticks Visible: +/-EV Visible>IR>Hot spot>Cold spot>Visible Screenshot IR: Hot spot/Cold spot Video stream/Map view toggle Top panel Shutter (photo) Optics reset or start / stop recording (back to no tilt and 1x zoom) Zoom trigger Gimbal tilt trigger... -
Page 17: Led Status Indicator Codes
LED status indicator codes When the Parrot Skycontroller USA is powered on, its LED status indicator gives you an instant visual indication: Steady green: Skycontroller USA Maintenance Mode; Flashing green: Skycontroller USA update in progress; connecting to AN AFI USA;... -
Page 18: Pairing Anafi Usa To A Parrot Skycontroller Usa
3. Power the Parrot Skycontroller USA on. 4. Plug the drone and the controller together with an USB-A (controller) to USB-C (drone) cable. 5. The LED of the Parrot Skycontroller USA flashes briefly in green: it is acknowledging ANAFI USA. -
Page 19: Pre - Flight Checklist
Do not fly AN AFI US A over urban areas or over restricted airspaces such as airports, train stations, power plants, national reserves, and so on. Check the weather: do not fly ANAFI USA in the fog or in a wind exceeding 15 meters per second or 50 km/h. -
Page 20: Getting Started
5. Launch FreeFlight 6, which connects ANAFI USA to Parrot Skycontroller USA. 6. Check for controller and drone software updates. 7. Calibrate your ANAFI US A, your Parrot Skycontroller USA, or both, if required, following the instructions on the screen. -
Page 21: Taking Off
Press the button on your Parrot Skycontroller USA, or activate the green “TAKE- OFF” box, on the screen. ANAFI USA takes off and stabilizes at 1 m (3 ft) from the ground, waiting for commands from the pilot. Hand launch Be especially careful when you hand launch ANAFI USA. -
Page 22: Deployment From A Moving Vehicle
“ section of this guide). Power ANAFI USA on and position the drone in the palm of the operator’s hand. On the screen, the green “TAKE OFF” box has been replaced by a blue “HAND LAUNCH” box. Stabilize as much as possible the speed and direction of the vehicle (up to 30 km/h,... -
Page 23: Standard Take-Off From A Moving Vehicle
When the propellers’ speed has stabilized: 1. Briefly and briskly lift ANAFI USA upward and toward a direction free of all obstacles with your open hand; 2. immediately push the left joystick of the Skycontroller USA (elevation) upward (default control mode) to give altitude to the drone;... -
Page 24: Flying
Reverse Turn right Move to the right Turn left Move to the left ANAFI USA You can modify ’s controls through the PREFERENCES menu of FreeFlight 6. Refer “PREFERENCES / Controls” to the section of this guide for additional information. -
Page 25: Optimal Speeds
Among these settings, two precise values enable you to optimize either ANAFI USA’s flight time, or the distance it can cover on a single battery. - Page 26 Wi-Fi link is perfect Wi-Fi link is good...
- Page 27 A Flight Plan has been set up in a controlled environment to illustrate all Wi-Fi statuses for the purpose of this user guide: never fly your drone out of your direct line of sight unless special authorization has been granted. User Guide v6.7.7GOV – © Parrot, April 29, 2022...
-
Page 28: Returning Home
Smart RTH mode. If you feel confident you can bring ANAFI USA back to its take-off point or if you wish to land it at a different location, you can cancel the Smart RTH directly from the alert pop-up. -
Page 29: Coordinates And Advanced Rth Settings
OORDINATES AND ADVANCED SETTINGS ANAFI USA features a fly-by-coordinates function which allows you to instantly display, reuse and share any coordinates in the surroundings of your drone – or indeed the GPS position of your drone itself. This is especially useful to precisely locate any point of interest or person ANAFI USA has detected. - Page 30 Reticle (crosshair) at the center of the screen, coordinates top left By default, “Reticle” (crosshair at the center of the screen) coordinates are displayed on the top left of the screen. Move the map around and zoom in to pinpoint any spot, then tap the coordinates box to activate coordinates options.
-
Page 31: About Advanced Rth Settings
By activating advanced RTH features, if you select return to Pilot or Custom position, the drone might not be able to reach its destination in case of low battery. Parrot will not be held responsible in case the drone lands in a different location. -
Page 32: Pilot Rth
RTH button, when in “Pilot” advanced RTH mode. Custom RTH By default, when you have set up ANAFI USA for a flight, provided it has a GPS synch, when you activate the “Custom” advanced RTH option, the current position of the drone appears in the “Custom point”... - Page 33 Custom RTH point set Access Safety Preferences again and note the Custom point coordinates have been updated. You are set! User Guide v6.7.7GOV – © Parrot, April 29, 2022...
-
Page 34: Landing
Precise Landing Hand landing Be especially careful when you hand land ANAFI USA. This procedure is safe provided you are not distracted or startled by an outside event with a live drone approaching your hand: concentrate on what you are doing, but always stay aware of your surroundings. -
Page 35: Recovery From A Moving Vehicle
Recovery from a moving vehicle Be cautious when you recover ANAFI USA from a moving vehicle: it is a technical gesture, which demands full focus. Parrot recommends mobilizing two operators for this procedure: one operator pilots the drone, the second operator recovers ANAFI USA. -
Page 36: Replacing Propeller Blades
B. blades: unscrew damaged B blades (left front & right back) counterclockwise and back & right front) clockwise and screw new screw new ones clockwise. ones counterclockwise. Double check your blades respect the following diagram before setting up ANAFI USA for its next flight. -
Page 37: Smart L I P O Battery
The smart battery can be charged whether it is installed on ANAFI USA, or not. When handling ANAFI USA, you should never apply pressure and generally avoid touching the drone’s gimbal –... -
Page 38: Battery Software Update
PD power banks recharge on ANAFI USA’s smart battery, rather than the other way around. When ANAFI USA’s smart LiPo battery is plugged to a power source and charging, its 4 LEDs indicate in real time its level of charge: LED 1 flashing: battery is between 0 and 25% charged;... -
Page 39: Battery Care And Safety
65%. If you leave your ANAFI USA battery for 12 days, you will find out its power button does not activate the charge level LED indicators. The battery needs to be charged to exit the wintering mode and start operating as described in the earlier paragraphs: this behavior preserves the battery over time. -
Page 40: Micro Sd Card And Media Management
Slide the metal lock with a finger toward the back of ANAFI USA to open it – you will feel a slight click. Lift the front part of the lock to open the slot. Position the microSD card into its keyed slot: make sure the metal contacts of the card are facing down and set on the contacts of the drone. -
Page 41: Freeflight 6 Gallery
FreeFlight 6 Gallery Finally, you can manage your media and download them directly from ANAFI USA to your Parrot Skycontroller USA with the Gallery of FreeFlight 6. -
Page 42: Microsd Card Encryption
Skycontroller USA with which the encryption has been carried out. Consequently, if a drone has been destroyed, its MicroSD card can only be decrypted through: the Skycontroller USA which holds the MicroSD card’s Encryption profile; another ANAFI USA drone paired to that Skycontroller USA. -
Page 43: Rtsp Video Stream Sharing
From the “Preferences” interface of VLC, select the “Input / Codecs” tab. Set the first item, “Hardware-accelerated decoding” to “Disable”, as in the screenshot below. Save your selection to close the “Preferences” interface. User Guide v6.7.7GOV – © Parrot, April 29, 2022... - Page 44 From the “Media” menu of VLC, select “Open network stream”. Enter “rtsp://192.168.53.1/live” in the Network URL field, as in the following screenshot. Enable the loop mode from VLC interface as in the screen capture below. Click “Play” to launch the stream in the main window of VLC.
-
Page 45: Introducing Free Flight
The HUD (head-up display) interface of FreeFlight 6 is the ultimate companion to ANAFI USA. It enables you to access all the outstanding features of ANAFI USA, from the screen of your Parrot Skycontroller USA, at the touch of your thumbs. -
Page 46: Presentation Of The Video Mode Hud
Map center toggle (to drone) Cineshots box Video mode box ANAFI USA and FreeFlight 6 are packed with features which are accessible from the HUD. “PREFERENCES Before we present the ” menu of FreeFlight 6, here is an overview of your drone’s current piloting, Cineshots, Dronies, and video modes. - Page 47 Note that both GPS icons are green, on both screen captures. This means that the Parrot Skycontroller USA and ANAFI USA are both synchronized to enough GPS, Glonass and Galileo satellites to optimize the stability of the drone, especially at higher altitudes.
-
Page 48: Presentation Of The Photo Mode Hud
Cineshots box Photo mode box ANAFI USA’s photo modes include a Single shot mode, a Burst mode, a Bracketing mode, a Timer mode, a Timelapse mode, a GPS Lapse mode and a five-format Panorama mode. Note that both GPS icons are green, on both screen captures. This means that the Skycontroller USA and ANAFI USA are both synchronized to enough GPS, Glonass and Galileo satellites to optimize the stability of the drone, especially at higher altitudes. -
Page 49: Preferences
Access FreeFlight 6 preferences through the icon on the extreme right of the top bar of the homepage, or that of the HUD. Preferences enable you to fine-tune ANAFI USA to your hand – to customize it, to fit your piloting and filming styles. -
Page 50: Thermal
About horizon and Banked turn: refer to in-app information for details about these features. Note that “Global reactivity”, “Inclination”, “Vertical speed” and “Rotation speed” values are the ones which carry the biggest impact on ANAFI USA’s acceleration and general flying behavior. Corresponding sliders turn to orange instead of green to warn users the settings they have selected require extreme care, superior piloting skills, or both, when flying ANAFI USA. -
Page 51: Special
Photo: Single, Panorama, Timelapse, GPS Lapse Video: Standard 1080p only (24, 25 or 30 fps) Piloting modes: Manual flight, Cameraman, Flight Plan, Touch & Fly Style (image): Natural only (with adjustment) User Guide v6.7.7GOV – © Parrot, April 29, 2022... -
Page 52: Safety
Tap “RESET ALL INTERFACE PREFERENCES” on the bottom of the page to reset preferences. Safety Through Safety preferences, you can set a safe and clear flying area for ANAFI USA. Set ANAFI USA’s maximum flight altitude with the “Max altitude” slider. -
Page 53: Camera
Tap “RESET ALL CAMERA PREFERENCES AND SETTINGS” on the bottom of the page to reset preferences. User Guide v6.7.7GOV – © Parrot, April 29, 2022... -
Page 54: Network
Network Network preferences let you change your ANAFI U SA’s Wi-Fi network name, password, and band. - Broadcast DRI OFF / ON - Network’s name Tap the field to change your AN AFI USA’s network name - Password Tap the field to change your network’s password - Wi-Fi band AUTO / MANUAL About Direct Remote Identification (DRI): the DRI system makes your drone locally broadcast... -
Page 55: Installing And Activating External Antennas
NSTALLING AND ACTIVATING EXTERNAL ANTENNAS The Parrot Skycontroller USA is equipped with two external female TNC antenna connectors, which enable you to connect it to external antennas. Compatible passive antennas must respect the following specifications: Connectors: male TNC Frequencies: 2400 to 2480 MHz, 5150 to 5250 MHz and 5750 to 5850 MHz Gain: >5 dBi... -
Page 56: Videos And Photos
By default, AN AFI US A and FreeFlight 6 are set to start recording a video as soon as ANAFI USA takes off. This literally means all you have to do, to start filming, is to fly ANAFI USA into the sky! -
Page 57: Taking Photos
The timer resets. Taking photos To access the photo camera of ANAFI USA, tap the photo/video toggle in the middle of the bottom bar of the HUD, to circle the photo camera (left icon) in white. Five photo modes are available on ANAFI USA: Single shot, Burst, Bracketing, Timer and Panorama (5 formats). - Page 58 Selecting the “Panorama” mode opens three options: Vertical, Horizontal and 360. When one of these options has been selected, the soft shutter button of the HUD displays the corresponding icon inside a grey (ANAFI USA landed) or white (ANAFI USA flying) circle.
- Page 59 The timer of the soft shutter button resets. The number to the left of the soft shutter button of the HUD is increased by 1. User Guide v6.7.7GOV – © Parrot, April 29, 2022...
-
Page 60: Creating Panoramas
In “GPS Lapse” mode, the screen flashes white then freezes briefly in black and white to confirm a picture has been taken. Control and move ANAFI USA: when the drone reaches any point on a 5 to 200-meter radius sphere around the initial photo, depending on your option choice, the drone takes another photo, and so on until you press the shutter button again to stop the GPS Lapse. - Page 61 Bear in mind ANAFI USA will not enable you to proceed with a panorama if the drone is short on power (capturing a 360 Panorama takes ANAFI USA up to 90 seconds).
- Page 62 Tap the green box of the Panorama you want to generate to start downloading the corresponding series of pictures to your Parrot Skycontroller USA. When the download is complete, FreeFlight 6 displays a page from where you can delete the downloaded photos: tap “Yes”...
- Page 63 For each 360 capture, you will be able to generate three different preset panoramas (Sphere, Little Planet and Tunnel) and a potentially infinite number of custom panoramas, through the 360 editor. User Guide v6.7.7GOV – © Parrot, April 29, 2022...
- Page 64 Do not worry about stitching issues on your 360 editor screen, when you create a custom panorama: the direct rendering is a preview only. For each custom panorama you decide to create, FreeFlight 6 completely reprocesses the data to minimize stitching issues and discrepancies.
-
Page 65: Gimbal Tilt And Zoom Controls
IMBAL TILT AND ZOOM CONTROLS Two of ANAFI USA’s main assets are its gimbal tilt control capabilities (180°, nadir to zenith), and its 32x zoom. This section presents these features and the way to activate them. Gimbal tilt control ANAFI USA’s gimbal tilt control is activated through the left trigger of Skycontroller USA. It is available in all video and photo modes, and in all manual piloting modes. - Page 66 x5.3 Zoom x32 Zoom...
-
Page 67: Camera Calibration: Correct Horizon (Exceptional Procedure)
Camera Calibration: Correct horizon (exceptional procedure) Your ANAFI USA’s camera has been factory-calibrated with unparalleled precision. Unlike the calibration of ANAFI USA or that of the Parrot Skycontroller USA, which must be carried out periodically, the camera calibration must not be carried out unless it appears necessary –... - Page 68 Access “Camera calibration” from the ANAFI USA box of the homepage or the HUD of FreeFlight 6, or from the “PREFERENCES-Camera” menu. Select the “Correct horizon” option from the following screen. AN AFI USA: gimbal/camera calibration The following screen appears.
-
Page 69: Camera Calibration: Gimbal Calibration
Camera Calibration: Gimbal calibration Use this option to perform a gimbal calibration, similar to that which occurs after ANAFI USA is powered on. Be aware that FreeFlight 6 can require you to carry out this procedure (as it can require you to perform a drone magnetometer calibration) before allowing you to fly ANAFI USA. - Page 70 Tap “-“ or “+” on each axis to align visible and thermal views. AN AFI USA: Camera alignment, after Tap “<” on the top left of the screen to exit the interface and confirm your settings.
-
Page 71: Pro - Imaging Settings
IMAGING SETTINGS ANAFI USA is set to deliver high quality and balanced 4K videos and 21MP photos, out of the box. Some image enthusiasts and all professional directors, videographers and photographers, however, will find their way through pro-imaging settings. This section is designed to help you exploit manual settings and develop your filming and photography styles. -
Page 72: Iso Value (Iso)
By default, in Auto mode, ANAFI USA constantly adapts its ISO and shutter speed values to the scene it is filming. Setting an ISO value for a whole shot or series of shot, however, is very useful to professional filming. -
Page 73: Hdr
HDR (high dynamic range) is another great way to enhance a video or a photo. The HDR option is available for Standard video mode 4K, 2.7K and 1080p formats (regardless of framerate values) and JPEG photos. User Guide v6.7.7GOV – © Parrot, April 29, 2022... -
Page 74: Natural Style
INTENSE Style Another alternative Style to Natural looking images (default value) can be selected for ANAFI USA both in the video mode, and in the photo mode. It is called “Intense”. It makes images more saturated and contrasted. Activate the “INTENSE” Style from the “Style” box of the Video/Photo settings menu. -
Page 75: Pastel Style
Another alternative Style to Natural looking images (default value) can be selected for ANAFI USA both in the video mode, and in the photo mode. It is called “Pastel”. It makes images less saturated, but it brings out their warmest tones. -
Page 76: Lock Ae
A yellow “Lock AE” box appears under the “Next available action” box, at the center of the top bar of the HUD. Move ANAFI USA around or tilt its gimbal to change the frame: the exposure settings remain as they were when you activated the function. -
Page 77: Lock Ae Touch
Exposure is locked on the top of the trees: shutter speed is set at 1/240 s Exposure is locked on a building on the horizon: shutter speed is set at 1/500 s User Guide v6.7.7GOV – © Parrot, April 29, 2022... -
Page 78: Thermal Imaging
About Thermal Imaging Thermal imaging – or infrared (IR) thermography – is the process of acquiring, measuring and analyzing thermal information from non-contact devices, such as ANAFI USA’s FLIR Boson camera. Thermal imaging devices transform invisible IR radiations, or heat transfers, into colored images the human eye can interpret and analyze. -
Page 79: Relative Thermal Mode
Its main specificity is that the scale it displays, on the left of the HUD, matches by default the temperature range of the scene ANAFI USA is filming, on a 0 to 100 graduated scale. Relative Thermal mode... -
Page 80: Spot Thermal Mode
Spot Thermal mode The Spot Thermal mode of AN AFI US A is especially useful to isolate cold or hot spots. Use the inverted arrows button (under the scale, on the left of the screen) to toggle from hot to cold (or from cold to hot) and slide your finger along the scale to adapt the threshold of the scale to your scene and highlight only coldest or hottest spots. -
Page 81: Thermal Analyzer Mode
Parrot Skycontroller USA. This function gives you full control over the on-screen rendering of any thermography video or photo you have taken with ANAFI USA. From the analyzer, you can: access Thermal Preferences directly from the preview’s Preferences icon, top right;... - Page 82 Same image, (hot) Spot mode...
-
Page 83: Cineshots ( Visible Spectrum Only )
Cineshot unfolds. Reveal The Reveal Cineshot is a classic motion picture opening shot: when it is activated, ANAFI USA tilts its camera toward the ground and starts moving forward in a straight horizontal line. Slowly, over 30 or 60 meters, the camera gimbal tilts up, revealing the scenery in front of ANAFI USA. -
Page 84: Spiral
When it is activated, ANAFI USA tilts its camera to the ground and starts moving up, in a straight vertical line. Slowly, as it climbs to 30 or 60 meters, ANAFI USA carries out a full 360° rotation around its axis, then its camera tilts up progressively, panning over the scenery along a 180°... -
Page 85: Piloting Modes
Manual flight The Manual flight mode is ANAFI USA’s default mode. It enables you to pilot the drone and fully control its camera tilt and zoom. When you release the commands in Manual flight mode, ANAFI USA stays in position, hovering. -
Page 86: Follow Me
“STOP” box of your HUD) in case a danger or any sort of unexpected obstacle arises. Follow Me The Follow Me mode was designed to enable ANAFI USA pilots to have their drone follow them in action. Fly ANAFI US A at least 5 meters (15ft) high and 10 meters (30ft) in front of you, facing you –... - Page 87 If you stay immobile, ANAFI USA stops and stays focused on you. To have ANAFI USA stop tracking you, tap the red “STOP” box at the center of the top bar of the HUD.
-
Page 88: Smartdronies
ANAFI USA, and always be ready to stop the following (tap the “STOP” box of your HUD) in case a danger or any sort of unexpected obstacle arises. -
Page 89: Map - Based Flying Modes
Tap Flight Plan from the “PILOTING MODE” box menu. The map of your surroundings opens full screen. If you are not connected to ANAFI USA, the minimized live view is black, as on the screen captures that follow. Find your next dream flying spot on the map. - Page 90 ANAFI US A’s camera. Initial waypoint (WP) Tap the white arrow and hold it to move it around. In this example, we want ANAFI USA to frame the lighthouse as it starts the flight. Initial waypoint, with the camera framing the lighthouse...
- Page 91 Use the slider on the right of the screen to set the altitude of the waypoint. In this example, ANAFI USA will climb from 3 to 30 meters between the initial waypoint and the second waypoint.
- Page 92 POI. Open waypoints Tap waypoints to link them to the POI. In this example, we want ANAFI USA to film the tip of the peninsula as it flies around it: we have selected the three waypoints to the left of the peninsula.
- Page 93 All you have to do now is to close FreeFlight 6, to get to your flying spot, to prepare ANAFI USA and your Parrot Skycontroller USA for the flight. Tap the “PILOTING MODE” box on the HUD to call the options. Select “Flight Plan”: the last plan you have set up appears.
- Page 94 Tap the green arrow on the right of the left bottom bar of the Flight Plan interface to begin the Flight Plan: ANAFI USA takes off, flies to the first waypoint and starts the Flight Plan. At the end of the Flight Plan, depending on your settings and depending on your version of FreeFlight 6, ANAFI USA lands at, or hovers over, the last waypoint you have set.
-
Page 95: Touch & Fly: Waypoint
Tap a point on the map to select a destination for ANAFI USA: this point is marked as a white circle with a green border. For each new Waypoint Touch & Fly session, FreeFlight 6 asks you to confirm the first destination of AN AFI US A as on the following screen capture. - Page 96 Tap “STOP” from the red box at the center of the top bar of your screen to halt ANAFI USA, or to reset a POI. From the “Smartdronies” box, next to the “Type” box of the lower bar of the HUD, you can also activate Smartdronies (Orbit, Parabola, Dolly Zoom, Boomerang) of your POI.
-
Page 97: Appendix 1: Geo Tiff Conversion And Import
The free software QGIS provides an easy way to convert GeoTIFF maps into FreeFlight 6- compatible PNG tiles. Follow this procedure to convert your files. 1. Launch QGIS: this is the software’s main interface. 2. Import your GeoTIFF file in the software’s main interface. User Guide v6.7.7GOV – © Parrot, April 29, 2022... - Page 98 3. Check your GeoTIFF file has been imported on the screen of your PC. 4. From the “Processing” menu, select the “Toolbox” to open it.
- Page 99 Skycontroller USA Maintenance Mode section of this guide for additional information. 10. At the next launch of FreeFlight 6, the new map appears as an overlay of the default (Google) map. User Guide v6.7.7GOV – © Parrot, April 29, 2022...
-
Page 100: Appendix 2: Troubleshooting Guide
ROUBLESHOOTING PROCEDURES ANAFI USA drone hard reset Hard resetting ANAFI USA reverts ANAFI USA’s most recent firmware to its original state. Parrot recommends the drone hard reset as a first intent procedure for several issues, notably gimbal calibration troubles. - Page 101 3. Plug the drone and the controller together with an USB-A (controller) to USB-C (drone) cable. 4. The LED of the Parrot Skycontroller USA flashes briefly in green: it is acknowledging ANAFI USA. 5. Wait for synchronization between Parrot Skycontroller USA and ANAFI US A: check that the left trigger of the Parrot Skycontroller USA activates the drone’s gimbal to...
- Page 102 Reset the smart battery (refer to the relevant procedure in the earlier section of this document). What do I do if my ANAFI USA is connected to the Parrot Skycontroller USA, but won’t take off when I hit the take-off button? The drone or controller boxes of the homepage of FreeFlight 6 either signal you that: you must update your Parrot Skycontroller USA, your ANAFI USA, or both;...
- Page 103 – refer to point 8 below. 8. Note that if the crash has damaged a component of ANAFI USA which is essential to a safe flight (such as its vertical camera or its ultra-sonar), your drone will not be able to take off and a FreeFlight 6 alert will tell you to contact your Parrot Support Partner.
-
Page 104: Appendix 3: Operational Checklist
3: O PPENDIX PERATIONAL CHECKLIST This foolproof checklist has been developed with military ANAFI series drone pilots. If it is useful to them, it is useful to every ANAFI USA pilot. Update & calibration Device UPDATED FreeFlight 6 UPDATED Skycontroller USA... - Page 105 Depending on conditions / 10 secs or 10 meters Check Stick Mode Inverted / Special mode Flight mode MANUAL Check flight commands Check gimbal Video feed Video latency Drone status Check User Guide v6.7.7GOV – © Parrot, April 29, 2022...
- Page 106 Drone status Check Take-off/Land command Land After landing Check engines off Drone status Check ANAFI USA Battery Skycontroller USA Check drone / gimbal / propellers Lens cap ANAFI USA Battery Disengaged, stored away Micro SD card Stored away ANAFI USA arms...
Need help?
Do you have a question about the ANAFI USA and is the answer not in the manual?
Questions and answers