Table of Contents
Advertisement
Quick Links
Advertisement
Table of Contents

Related Manuals for Parrot ANAFI FPV


Summary of Contents for Parrot ANAFI FPV
- Page 2 P A G E I S B L A N K O N P U R P O S E...
-
Page 3: W E Are Parrot . Welcome To The Family
Read entirely at least once: it answers most questions that most users encounter when they discover ANAFI. Keep it for reference and stay alert for updates: they will be advertised on all Parrot websites and social media. The Table of contents, on page 7, is active. Click a title to access the corresponding section. -
Page 4: Prerequisites
ANAFI. 2. Download FreeFlight 6 on your iOS or Android smartphone: ANAFI requires FreeFlight 6 to fly. The app will enable you to update your Parrot Skycontroller 3 and ANAFI when you power them on for the first time. - Page 5 ANAFI If the prompt does not appear on your screen when you connect your device to your Parrot Skycontroller 3, launch FreeFlight 6 manually, as any other app. iOS FreeFlight 6 homepage 3. Tap the green “FLY” box on the homepage of FreeFlight 6 to launch the initial updates.
- Page 6 ANAFI 5. ANAFI update: tap the green “CONTINUE” box to proceed. FreeFlight 6 displays an animation and a progress circle on a screen labelled “Preparing your drone”. When the update is finished, the screen displays “Your drone is ready” and a “CONTINUE” box.
-
Page 7: Table Of Contents
Ready to store or carry ........................18 Ready to pilot ............................ 18 Camera and gimbal controls ......................19 LED status indicator color codes ...................... 19 PRESENTATION OF THE PARROT COCKPITGLASSES 3 ..................20 ............................ 22 FLIGHT CHECKLIST Equipment ............................22 Regulations ............................ - Page 8 ANAFI ..............................25 LYING ............................26 ETURNING HOME Precise Home Setting ........................26 RTH ..............................27 MART ..............................27 ANDING ............................. 28 MART ATTERY Battery removal ..........................28 Battery installation ........................... 29 Battery charging ..........................29 Battery care and safety ........................30 ............................
- Page 9 ANAFI Camera Calibration: Gimbal calibration ................... 56 ..........................57 IMAGING SETTINGS Exposure value (EV) .......................... 57 Shutter speed (s) ..........................57 ISO value (ISO) ..........................58 White balance (WB) .......................... 58 HDR ..............................60 NATURAL Style ..........................60 P-LOG Style ............................60 INTENSE Style ............................
-
Page 10: Foreword
Parrot asks you to switch off your smartphone’s Wi-Fi connection when flying ANAFI with both the Parrot Skycontroller 3 and your phone: with this configuration, the drone and the controller communicate through ANAFI’s Wi-Fi network and activating your phone’s Wi-Fi can only result in interferences. -
Page 11: About Devices
Parrot strongly recommends that you use your My.Parrot account (or create one if ANAFI is your first Parrot drone) to let Parrot store your ANAFI flight data. Sharing your data, even anonymously, benefits the community, as it enables us to improve our products. It also directly benefits all identifiable users in case they need to contact Parrot support teams. -
Page 12: Disclaimer
PERSONAL INJURY, OR BOTH, which could result in serious harm or death. 3. Be aware that videos and photos that are promoted and advertised by Parrot Drones SAS and its affiliates have been made by and with experienced professionals and drone pilots. -
Page 13: Technical Specifications
ANAFI ECHNICAL SPECIFICATIONS DRONE IMAGING SYSTEM - Size folded: 244x67x65mm - Sensor: 1/2.4’’ CMOS - Size unfolded: 175x240x65mm - LD-ASPH (low dispersion aspherical) lens: - Weight: 320g Aperture: f/2.4 ▪ - Max transmission range: 4km with Skycontroller 3 35mm format equ. focal length: 23mm ▪... -
Page 14: Package Contents
USB-A to USB-C charging cable a 16GB microSD card, preinstalled in ANAFI a microSD to SD card adapter a Parrot Skycontroller 3 8 spare propeller blades a mounting tool a Flight Safety Guide a Super Quick Start Guide (SQSG) -
Page 15: Anafi Work
USB charger a 16GB microSD card, preinstalled in ANAFI a microSD to SD card adapter a Parrot Skycontroller 3 a pair of Parrot Cockpitglasses 3 8 spare propeller blades a mounting tool a Flight Safety Guide a Super Quick Start Guide (SQSG) a Wi-Fi settings card User Guide v2.6 –... -
Page 16: Anafi Extended
3 USB-A to USB-C charging cables a 16GB microSD card, preinstalled in ANAFI a microSD to SD card adapter a Parrot Skycontroller 3 8 spare propeller blades a mounting tool a Flight Safety Guide a Super Quick Start Guide (SQSG) -
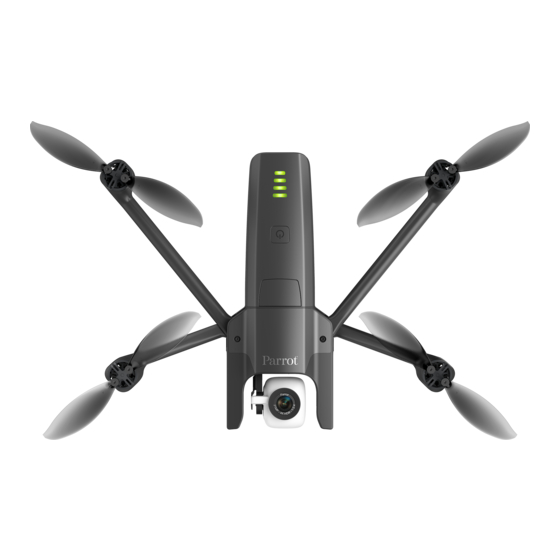
Page 17: Presentation Of Anafi
ANAFI ANAFI RESENTATION OF Ready to store or carry Foldable arms and propellers Ready to fly Smart battery Battery extraction button Charge level LED indicators 180° tilt 4K camera gimbal USB-C charging port Power button User Guide v2.6 – published on August 30, 2019... -
Page 18: Presentation Of Parrot Skycontroller 3
ANAFI RESENTATION OF ARROT KYCONTROLLER Ready to store or carry Left control stick Right control stick Power-on foldable arm and device holder Ready to pilot LED status indicator Wi-Fi antenna RTH (return home) button Take-off/landing button... -
Page 19: Camera And Gimbal Controls
USB-C charging port (red: charging; green: charged) USB-A device port LED status indicator color codes When the Parrot Skycontroller 3 is powered on, its LED status indicator gives you an instant visual indication: flashing green: Skycontroller 3 update in progress;... -
Page 20: Presentation Of The Parrot Cockpitglasses 3
Unfold the Parrot Cockpitglasses 3 into their "Ready to Fly" position. Open the removable flap on the front of the Parrot Cockpitglasses 3. Place your terminal at the centre point of the height and length of the Parrot Cockpitglasses 3... - Page 21 2. Adjust the shoulder strap of the Parrot Cockpitglasses 3 before putting them on to ensure safe flying. 3. Make sure the lenses are at your eye level by adjusting the position of the Parrot Cockpitglasses 3 on your nose.
-
Page 22: Pre - Flight Checklist
Equipment Make sure you have downloaded the latest version of FreeFlight 6 and that both your Parrot Skycontroller 3 and your ANAFI have been updated with the latest versions of firmware. For the ultimate ANAFI experience, make sure you have the right USB-A cable to connect your Parrot Skycontroller 3 and your device. -
Page 23: Getting Started
4. To start the drone, place it on a flat horizontal surface and press the power button. 5. a) If you use Parrot Skycontroller 3, unfold the central part of the controller to power it on, wait for the steady dark blue light, then plug your device to the controller using a USB cable. -
Page 24: Taking Off
Press the button on your Parrot Skycontroller 3, or tap the green “TAKE-OFF” box, on the screen of your device. ANAFI takes off and stabilizes at 1m (3ft) from the ground, waiting for commands from the pilot. -
Page 25: Flying
ANAFI LYING Left control stick (default mode) Right control stick (default mode) Rise Forward Descend Reverse Turn right Move to the right Turn left Move to the left User Guide v2.6 – published on August 30, 2019... -
Page 26: Returning Home
(refer to the "Controls - Arcade Mode" section of this guide). ETURNING HOME To bring ANAFI back to its take-off position, press the button on your Parrot Skycontroller 3, or tap the icon on the screen of your device. ANAFI rises to 30 meters over its take-off point – or to the altitude you have set, through FreeFlight 6, between 20 and 100 meters –... -
Page 27: Smart Rth
ANAFI Android “Precise Home Set” pop-up MART ANAFI features a Smart RTH capability: considering its altitude and its distance from its take- off point, the drone computes in real time the power it needs to return home. When short on battery power, FreeFlight 6 alerts you that it will enter automatic RTH mode. If you feel confident you can bring ANAFI back to its take-off point or if you wish to land it at a different location, you can cancel the auto-RTH directly from the alert pop-up. -
Page 28: Smart L I P O Battery
ANAFI Precise Landing, Android MART ATTERY ANAFI’s smart LiPo battery is preinstalled on the drone and should always be reinstalled in the same way, with the LEDs and power button facing up, to avoid irrecoverable electric damage to the battery, to the drone, or to both. The smart battery can be charged whether it is installed on ANAFI, or not. -
Page 29: Battery Installation
Place your middle finger on the Parrot logo of ANAFI and your thumb on the back of the smart battery. Squeeze your fingers together until you feel and hear the battery clicking into the body of the drone. -
Page 30: Battery Care And Safety
The battery needs to be charged to exit the wintering mode and start operating as described in the earlier paragraphs: this behavior preserves the battery over time. Parrot recommends you always run a full charge of your smart battery before flying ANAFI. -
Page 31: Media Retrieval
ANAFI Like all other LiPo batteries, ANAFI’s smart battery must be handled, transported and stored with care: never leave a battery unattended while charging; never expose a battery to extreme temperatures, neither hot, nor cold; never charge a battery which is still warm from use (wait for at least 20 minutes); never use or recharge a damaged or swollen battery;... -
Page 32: Installing The Microsd Card
The enclosed 16GB microSD card enables you to record just over 20 minutes of 4K video. For this reason, Parrot recommends you backup your photos and videos, and you empty your 16GB microSD card after each flight, to ensure you always have available memory space to capture new still or moving images. -
Page 33: Introducing Free Flight
ANAFI As you can see from the screen capture below, the FreeFlight 6 Gallery displays the microSD card media, by default. Tap any green media download box to transfer the corresponding media to your device. Access the media you have downloaded to your device by tapping the “Local” box, at the top of the interface. - Page 34 ANAFI iOS FreeFlight 6 homepage Android FreeFlight 6 homepage...
-
Page 35: Presentation Of The Ios Hud (Video Mode View)
ANAFI Presentation of the iOS HUD (video mode view) ANAFI horizontal distance from pilot Next available action ANAFI height relative to take-off point Controller box (charge and GPS synch) ANAFI ANAFI ground speed box (charge and GPS synch) Back to homepage Preferences Speed (Film or Soft shutter... - Page 36 GPS and Glonass satellites to optimize the stability of the drone, especially at higher altitudes. Parrot therefore recommends you always check both your FreeFlight 6 HUD’s GPS icons are green (and not red), before you make your ANAFI take off.
-
Page 37: Presentation Of The Android Hud (Photo Mode View)
ANAFI are both synchronized to enough GPS and Glonass satellites to optimize the stability of the drone, especially at higher altitudes. Parrot therefore recommends you always check both your FreeFlight 6 HUD’s GPS icons are green (and not red), before you make your ANAFI take off. -
Page 38: Presentation Of The Hud Fpv
- or via the FPV tile on the home page Homepage - HUD FPV NB: FreeFlight 6 mode must be started before inserting the terminal into the Parrot Cockpitglasses 3. HUD FPV is accessible if the Parrot Skycontroller 3 is connected to the terminal via a USB cable. - Page 39 - access the settings by pressing the top button. - access SeeThrough mode by pressing the bottom button. The settings can only be accessed if the Parrot Skycontroller 3 is connected to the terminal via a USB cable. The settings can be navigated through the Parrot Skycontroller 3 and your drone will remain in hover mode u ntil the user has exited the Settings menu.
-
Page 40: Seethrough Mode
Measurement system AUTO / IMPERIAL / METRIC The EV Trigger, if selected, allows the user to control the EV directly from the Parrot Skycontroller 3. The zoom trigger (see the "PARROT SKYCONTROLLER 3 PRESENTATION - Camera and Platform Control" paragraph) then becomes the EV trigger. The user can manually modify the EV (between the values of -3.0 and +3.0, in increments of 0.3), which... -
Page 41: Piloting
ANAFI Piloting Flying preferences allow you to adapt the flight behaviour of ANAFI. For each item, drag the cursor to select a value - or touch your preferred option to select it. For each item, move the slider to select a value – or tap your selection with regards to Banked turn. -
Page 42: Network
ANAFI Camera calibration Tap “CALIBRATE” to access camera & gimbal calibration Autorecord from take-off NO/ YES (video only) Lossless zoom only NO / YES (selecting “YES” blocks zoom in JPEG RECT) Display overexposure NO / YES Anti-flickering OFF / AUTO / 50Hz / 60 Hz About camera calibration: only resort to the “correct horizon”... -
Page 43: Videos And Photos
Although you can film and take pictures using your device as ANAFI’s only controller, we recommend you always use the Parrot Skycontroller 3 and your device, for the best controlled, most precise, and safest filming and photos-shooting flights. - Page 44 Standard video format menu When you are happy with your settings and your framing, press the hard shutter button on the right of Parrot Skycontroller 3 (or tap the soft shutter button of the HUD) to start filming. The soft shutter button of the HUD animates and displays a cycle between red square, and...
-
Page 45: Taking Photos
ANAFI Press the hard shutter button of the controller (or tap the soft shutter button of the HUD) again to end the recording. The soft shutter button of the HUD comes back to steady, red and round. The timer resets. Taking photos To access the photo camera of ANAFI, tap the photo/video toggle in the middle of the bottom bar of the HUD, to circle the photo camera (left icon) in white. - Page 46 ANAFI Selecting the "Timelapse" option opens six options: 5 seconds, 10 seconds, 15 seconds, 30 seconds, 60 seconds and 120 seconds (or opens six options in thermal mode: 10 seconds, 15 seconds, 30 seconds, 60 seconds, 120 seconds and 240 seconds).
- Page 47 Android photo formats: DNG+JPEG When you are happy with your settings and your framing, press the hard shutter button on the right of the Parrot Skycontroller 3 (or tap the soft shutter button of the HUD) to take a photo.
-
Page 48: Creating Panoramas
Bear in mind ANAFI locks the exposure (refer to the “AE Lock ” section of this guide for additional information on exposure locking) of the frame with which you start your panorama. For this reason, Parrot recommends you always frame the main subject of the intended panorama before pressing the shutter button. - Page 49 When you are happy with your framing, press the hard shutter button on the right of the Parrot Skycontroller 3 (or tap the soft shutter button of the HUD) to begin the Panorama capture. ANAFI starts taking pictures and the bottom of the HUD displays a progress bar which fills with green as the capture unfolds.
- Page 50 ANAFI iOS microSD gallery: downloading media to device Tap the green box of the Panorama you want to generate to start downloading the corresponding series of pictures to your device. When the download is complete, FreeFlight 6 displays a page from where you can delete the downloaded photos: tap “Yes”...
-
Page 51: Gimbal Tilt And Zoom Controls
This section presents these features and the way to activate them. Gimbal tilt control ANAFI’s gimbal tilt control is activated through the left trigger of Parrot Skycontroller 3. It is available in all video and photo modes, and in all manual piloting modes. - Page 52 ANAFI Pressing the optics reset button on the left of Parrot Skycontroller 3 instantly resets the zoom factor of the lens to x1 (this action also resets the gimbal tilt to a horizontal position). The HUD of FreeFlight 6 presents precise, decimal-by-decimal zoom information at all times, in the middle of the left side of the screen, as shown on the following screen captures –...
- Page 53 ANAFI iOS 4K x3 zoom As already mentioned, ANAFI presents no lossless zoom capabilities for pictures: the zoom is deactivated by design in WIDE formats (JPEG and DNG+JPEG), and it has an impact on the resolution of the pictures in JPEG RECT format. By contrast, ANAFI offers impressive lossless zoom capabilities for 4K UHD (x1.4), 2.7K (x1.9) and 1080p (X2.8) videos.
-
Page 54: Camera Calibration: Correct Horizon (Exceptional Procedure)
Camera Calibration: Correct horizon (exceptional procedure) Your ANAFI’s camera has been factory-calibrated with unparalleled precision. Unlike the calibration of ANAFI or that of the Parrot Skycontroller 3, which must be carried out periodically, the camera calibration must not be carried out unless it appears necessary –... - Page 55 A N A F I ready for camera calibration When ANAFI is correctly positioned, perpendicular to its straight horizon reference, power it on, along with the Parrot Skycontroller 3 and your device, as you would for any flight. Access “Camera calibration” from the ANAFI box of the homepage or the HUD of FreeFlight 6, or from the “PREFERENCES-Camera”...
-
Page 56: Camera Calibration: Gimbal Calibration
ANAFI Gimbal/camera calibration: before (Android) Tap “–“ or “+” until the artificial horizon of ANAFI matches the horizon reference facing the drone. Do not worry about vertical lines: as you can see from the screenshots, they do not appear straight or parallel on the calibration screen. Gimbal/camera calibration: after (Android) When you have straightened the tilt of the camera, tap the “<”... -
Page 57: Pro - Imaging Settings
ANAFI IMAGING SETTINGS ANAFI is set to deliver high quality and balanced 4K videos and 21MP photos, out of the box. Some image enthusiasts and all professional directors, videographers and photographers, however, will find their way through pro-imaging settings. This section is designed to help you exploit manual settings and develop your filming and photography styles. -
Page 58: Iso Value (Iso)
ANAFI As ANAFI’s f/2.4 aperture lens lets a lot of light in, even compared to most professional SLR lenses, your drone can achieve very fast “s” values (down to 1/10000s) and capture very fast action. It can also be used for slow shots, up to 1 second for the photo mode. Note that ANAFI can shoot pictures and videos when it is not flying. - Page 59 ANAFI Select the WB option that is best suited for your shooting conditions, your subject, or both. The display of the HUD reflects your settings and helps you make the best choice. Android Auto WB Android Incandescent WB Android Fluo 1 WB Android Fluo 2 WB Android Sunny WB Android Cloudy WB...
-
Page 60: Hdr
“next available action” box, at the center of the top bar of the HUD. Press the hard shutter button on your Parrot Skycontroller 3 (or the soft shutter button of the HUD) to start filming in HDR or to take a HDR photo. -
Page 61: Pastel Style
ANAFI Activate the “INTENSE” Style from the “Style” box of the Video/Photo settings menu. PASTEL Style Another alternative Style to Natural looking images (default value) can be selected for ANAFI both in the video mode, and in the photo mode. It is called “Pastel”. It makes images less saturated, but it brings out their warmest tones. -
Page 62: Lock Ae
ANAFI Tap the RESET button, on the right of the screen, to bring all values to 0 (zero). Tap the “<” icon, on the left of the screen, to confirm your settings and exit the ADJUSTMENT menu. Lock AE Another great feature of FreeFlight 6 is the possibility to lock the general exposure of a view, to fine-tune the framing of a shot and keep the desired exposure. - Page 63 ANAFI Refer to the following screen captures for additional details on the logic of this great feature. Exposure is locked on the top of the trees (Android): shutter speed is set at 1/240 s Exposure is locked on a building on the horizon (Android): shutter speed is set at 1/500 s User Guide v2.6 –...
-
Page 64: Cineshots
ANAFI INESHOTS ANAFI features a series of automated shots, which enable you to capture scenes professionally. iOS Cineshots Menu Make sure you have selected the video settings you require, check that you are filming and tap “CINESHOTS” in the bottom bar of the HUD to access Cineshots. Tap a Cineshot to select it. -
Page 65: Epic
ANAFI, and always be ready to reclaim control of your drone: any action on any stick of Parrot Skycontroller 3 immediately terminates the current Cineshot. User Guide v2.6 – published on August 30, 2019... -
Page 66: Piloting Modes
Therefore, if you push the right joystick of the Parrot Skycontroller 3 to the left, ANAFI circles around your target clockwise. If you push the right joystick of the Parrot Skycontroller 3 to the right, ANAFI circles around your target counterclockwise. -
Page 67: Follow Me (In-App Purchase)
Tap “FLY” to access the Follow Me mode. Select one of the three Follow Me options (refer to in-app explanations for details): Track Lock Dynamic (Parrot recommends you only use this option in completely open and unobstructed areas) User Guide v2.6 – published on August 30, 2019... - Page 68 If you push the right joystick of the Parrot Skycontroller 3 to the left, ANAFI circles around you clockwise. If you push the right joystick of the Parrot Skycontroller 3 to the right, ANAFI circles around you counterclockwise.
-
Page 69: Smartdronies
Tap the Dolly Zoom Dronie to open its three options: try them all and enjoy the magic! Prerequisites for accessing FPV Mode: use with Parrot Cockpitglasses 3 and it is essential to be connected to the Parrot Skycontroller 3 via a USB cable. -
Page 70: Touch & Fly: Waypoint
Control the height of the POI (the blue figure inside the square diamond) through the slider on the right: this effectively controls the tilt of the gimbal, while you use the Parrot Skycontroller 3 to fly around your target. ANAFI remains focused on the POI. -
Page 71: Flight Plan (In-App Purchase)
ANAFI Tap “STOP” from the red box at the center of the top bar of your screen to halt ANAFI, or to reset a POI. From the “Dronies” box, next to the “Type” box of the lower bar of the HUD, you can also shoot Dronies (Orbit, Parabola, Dolly Zoom, Boomerang) of your POI. - Page 72 ANAFI First, select your initial waypoint: ideally, very close to your intended take-off point. Tap the screen to set it. The green circle represents the waypoint, the white figure the altitude of the drone, and the white arrow the direction of ANAFI’s camera.
- Page 73 ANAFI Tap the map to set the second waypoint: the distance between the two waypoints appears on the screen. Use the slider on the right of the screen to set the altitude of the waypoint. In this example, ANAFI will climb from 3 to 30 meters between the initial waypoint and the second waypoint.
- Page 74 ANAFI Tap “Point of interest” to add the POI. It appears as a blue square diamond. The figure in the center represents the height of the POI, which you can modify using the slider on the right of the screen. All waypoints turn white as they can now be selected to be linked to the POI.
- Page 75 All you have to do now is to close FreeFlight 6, to get to your flying spot, to prepare ANAFI, your Parrot Skycontroller 3 and your device for the flight. Tap the “PILOTING MODE” box on the HUD to call the options. Select “Flight Plan”: the last plan you have set up appears.
- Page 76 This is a different way to fly; the user can switch between Classic mode and Arcade mode in the HUD flight text box. The prerequisites for using Arcade mode are: - to be connected to the Parrot Skycontroller 3 via a USB cable, and - to have taken off.
- Page 77 - All flying settings - Thermal mode Joysticks The joysticks are used differently from the Classic mode in that your drone will advance, using the joysticks of the Parrot Skycontroller 3, in the direction shown by the camera in immersed mode. Elevation Zoom...
- Page 78 • When the incline of the camera is directed upwards, the circle moves upwards, • When the drone moves forward, the circle becomes larger, • When the drone moves backwards, the circle becomes smaller. If you have feedback or comments about the v2.3 of this user guide, please reach out to: technical.writer@parrot.com...
Need help?
Do you have a question about the ANAFI FPV and is the answer not in the manual?
Questions and answers