
Related Manuals for KeepGuard KW571


Summary of Contents for KeepGuard KW571
- Page 1 Highly Recommended by Outdoor Explorers Wildlife Scouting Cam Instruction Book Applicable models:KW571...
-
Page 2: Notes Before Use
Notes Before Use Congratulations on the purchase of your Trail Cam! The Trail Cam is one of the best scouting cameras available and is designed for long duration performance in the harshest outdoor environment. It is equipped with built-in infrared LEDs for incredible night vision images and can be triggered by movement 24 hours a day. - Page 3 Notes Before Use 4. The color changing of the Indicator ① When camera is updating, indicator light flashes green. ② The indicator light flashes red when it is turned on or ready for operation. ③ When battery is lower, the indicator light turns blue. ④...
- Page 4 Notes Before Use 8. Please take out the battery for long time unused, so as to avoid leakage of the battery. 9. Camera can not be directly immersed in water, can not be placed in the environment of strong acid and alkali. 10.
-
Page 5: Quick Starts
Quick Starts 1. Move the latches and open the front cover 2. Load 8 lithium AA(non rechargeable) or alkaline AA batteries 3. Insert the SD card and format 4. Switch to the SETUP Mode 5. Press MENU key 6. Press UP key to select Photo or Video Mode 7. -
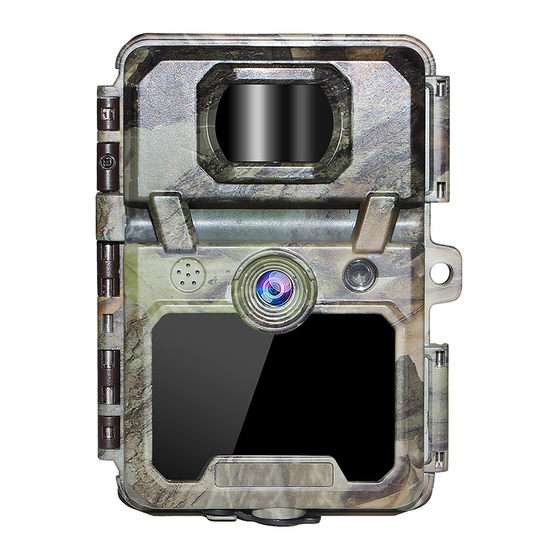
Page 6: Camera Overview
Camera Overview [Dispiay Screen] [ PIR] [LDR] [LED Indicator] [LENS] [Loock Catch] [IR LED] [ON-OFF Key] [Operation part] [Battery Case]... -
Page 7: Standard Accessories
Standard Accessories 1×Belt 1×USB 1×Manual 1×Gift Box... -
Page 8: Power Supply
Power Supply After opening the latch on the right side of the camera, you will see that it has 8 battery slots. For maximum battery life, we recommend using 8 lithium AA(non-rechargeable)or alkaline AA batteries. Please be sure to insert each battery with correct polarity (negative or“flat”end against the long spring of each battery slot). - Page 9 MOUNTING We recommend mounting cam on a sturdy tree with a diameter of about 6 in. (15cm). To get the optimal picture quality, the tree should be about 16-17 ft(5 meters) away from the place to be monitored, with the camera placed at a height of 5-6.5 ft. (1.5~2 m). Also, keep in mind that you will get the best results at night when the subject is within the ideal flash range, no farther than 60' (19m) and no closer than 10'(3m) from the camera.
-
Page 10: Sensing Angle And Distance Test
Sensing Angle and Distance Test To test whether cam can effectively monitor the area you choose, this test is recommended to check the sensing angle and monitoring distance of cam. To perform the test: 1. Switch cam to SETUP mode. 2. -
Page 11: Operational Modes
Operational Modes The cam has three basic operational modes: 「OFF」, 「ON」 and 「SETUP」 ●「OFF 」Mode When cam in OFF mode, you can do the following: • replacing the SD card or batteries • connecting cam with other device by USB port It will occur a little of power consumption under OFF mode. - Page 12 Operational Modes ●「SETUP」Mode In the SETUP mode you can check and change the settings of the cam with the help of built- in LCD. Moving the power switch to the SETUP position will turn on the LCD display and you will see an information screen as below.
- Page 13 Settings Set Clock Press OK and use UP/DOWN keys ( to change the setting ) and LEFT/RIGHT keys ( to move to the next field ) to set the hour ( 24-hr format only, “00”=midnight,“12”=noon) Clock and minute, then move to the next row to set the year, month and date accordingly.
- Page 14 Settings Capture Number Selects how many photos are taken in sequence per trigger in Camera mode. This setting affects photos taken in Field Capture Number Scan mode as well. Exit MENU Image Quality Selects image resolution (in pixels per frame).Higher Super Fine resolution produces better quality, but creates larger files Fine...
- Page 15 Settings Video Size 640*480 Selects video resolution (in pixels per frame). Higher resolution produces better quality videos, but creates larger Video Size 1280*720 files that will occupy more space of the SD card. 1920*1080 Exit MENU Video Length Sets length per captured video clip. Settings begin with 10 second default when parameter is first selected.
- Page 16 Settings Interval Selects the length of time that the camera will “wait”until it responds to any additional triggers from the PIR after an animal is first detected and remains within the sensor‘s Interval range. During this mode user sets“ignore triggers”interval, the camera will not capture photos/videos.
- Page 17 Settings Time Scan (Time Lapse) recording mode on/off. When activated, Time Scan forces the camera to take photos or videos even Timed Scan when it is not triggered by an nearby live animal,useful for constant monitoring of an area that might be far away from the camera.
- Page 18 Settings Password Press “On”and enter into password set, 4 numbers Password shows “****”,you can reset pasword by yourself. Exit MENU lmage Recycle When SD card is full, the last pics will be removed. lmage Recycle Exit MENU Time Stamp Time Stamp Exit MENU...
- Page 19 Settings Video Sound Video Sound Exit MENU Format Deletes (erases) all files stored on a card to prepare it for reuse. Always format a card that has been previously used in other devices. Caution! Make sure you have downloaded and backed Format Execute up all files you want to preserve first! Press OK to execute, press...
- Page 20 Settings Version Here it shows the updated Firmware version being currently used in this camera. Make sure you download and use the 571NC2Dx19XXX Version most updated firmware. Exit MENU...
-
Page 21: Specification
Specification Model Number KW571 Max Pixels 30MP Lens lens: f=7.36mm F/NO:2.8 FOV=55°,HOV=42° IR-Flash Range 48*940nm LEDS Display Screen 2.4 inch HD Color Display Image Size 30MP;16MP;3MP Video Size 1920*1080; 1280*720 ; 640*480 PIR Sensitivity PIR with 4 sensitivity levels:High/ Normal/ Low/Auto Response Time Picture trigger: <... -
Page 22: Warranty And Services
Warranty and Services Any questions, please contact us, We will reply to you within 48 hours. Our E-mail: Model Serial No. Date of Purchase Warranty State During warranty, hardware failure occurring, which caused by product itself, we will provide free maintenance service for the customer. Warranty period is 12 months from the day you purchase it.
Need help?
Do you have a question about the KW571 and is the answer not in the manual?
Questions and answers