Table of Contents
Advertisement
Highly Recommended by Outdoor Explorers - KeepGuard Wildlife Scouting Cam
This KeepGuard cam is the best-selling scouting camera which is designed for activity and is resistant against water and snow. It is
equipped with built-in infrared LEDs, so that it can be triggered by any movement in a location, then take high quality pictures or
video clips. Please refer to the notes below and instructions in this manual to ensure that you are completely satisfied with this
product.
Applicable models:KG695
Contents
KEEPTIME
KG Cams Instruction Book
2
3
4
5
6
7
7
8
9~16
17
18
19
1
Advertisement
Table of Contents

Related Manuals for KeepGuard KG695


Summary of Contents for KeepGuard KG695
-
Page 1: Table Of Contents
KG Cams Instruction Book This KeepGuard cam is the best-selling scouting camera which is designed for activity and is resistant against water and snow. It is equipped with built-in infrared LEDs, so that it can be triggered by any movement in a location, then take high quality pictures or video clips. -
Page 2: Quick Start
Quick Start Move the latches and open the front cover Load 8 lithium AA or alkaline AA batteries Insert the SD card Switch to the SETUP Mode Press MENU key Press UP key to select Camera or Video Mode Put it good position Switch to the ON Mode and it have started working KEEPTIME... -
Page 3: Notes Before Use
Notes Before Use 1. When setting camera parameters, please put camera in Setup mode. 2. Do not set the camera directly from ON to Setup. 3. To replace the battery, SD card,firstly turn camera to OFF model. 4. Color of Indicator 1) When camera is updating, indicator light flashes green. -
Page 4: View Drawings
View Drawings KEEPTIME... -
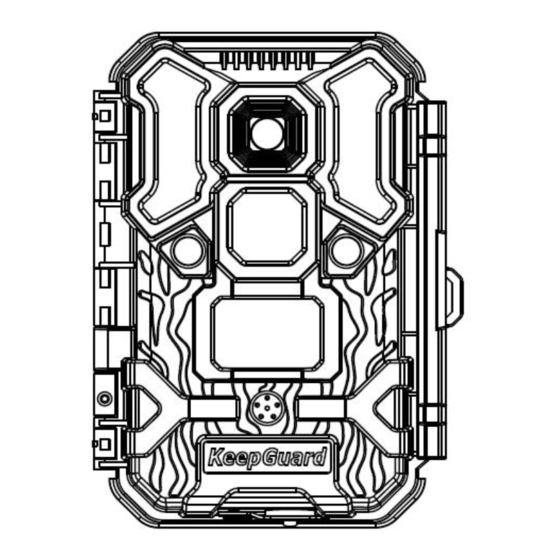
Page 5: Camera Overview
Camera Overview KEEPTIME... -
Page 6: Standard Accessories
Standard Accessories 1×Belt 1×USB 1×Case 1×Manual Other Accessories(not included) 1× Security Case 1×Solar Panel Micro-Lens / Wide-angel Lens 1×Cradle Head KEEPTIME... -
Page 7: Power Supply
Power Supply After opening the latch on the right side of the camera, you will see that it has 8 battery slots. For maximum battery life, we recommend using 8 lithium AA or alkaline AA batteries. Please be sure to insert each battery with correct polarity (negative or“flat”end against the long spring of each battery slot). -
Page 8: Operational Modes
Operational Modes The cam has three basic operational modes: 「OFF」, 「ON」 and 「SETUP」 ●「OFF 」Mode When cam in OFF mode, you can do the following: • replacing the SD card or batteries • connecting cam with other device by USB port It will occur a little of power consumption under OFF mode. -
Page 9: Settings 9~16
Settings Set Clock Press OK and use UP/DOWN keys ( to change the setting ) and LEFT/RIGHT keys ( to move to the next field ) to set the Clock hour ( 24-hr format only, “00”=midnight,“12”=noon) and minute, and then (on the lower row ),the year,month and date. - Page 10 Settings Capture Number Selects how many photos are taken in sequence per trigger in Camera mode. This setting affects photos taken in Field Capture Number Scan mode as well. Exit MENU Video Size 640*360 Selects video resolution (in pixels per frame). Higher resolution produces better quality videos, but creates larger Video Size 1280*720...
- Page 11 Settings Camera Name Allows the user to set a custom name for the camera. Useful for ID purposes when multiple cameras are setup, since each Camera Name Input camera will imprint its name on all photos (but not videos) it captures.
- Page 12 Settings Time Period Set Press OK and use UP/DOWN keys ( to change the setting ) and LEFT/RIGHT keys ( to move to the next field ) to set time. Once all settings are made, press OK to save. Time Period Set Note: two time blocks can not appear overlap section, or you will not set it successfully.
- Page 13 Settings Format SD Card Deletes (erases) all files stored on a card to prepare it for reuse. Always format a card that has been previously used in other devices. Caution! Make sure you have downloaded and Format SD Card Execute backed up any files you want to preserve first! Press OK to execute, press MENU (or select NO then press OK) to exit without formatting.
-
Page 14: Mounting And Positioning
MOUNTING and POSITIONING Mounting We recommend mounting cam on a sturdy tree with a diameter of about 6 in. (15cm). To get the optimal picture quality, the tree should be about 16-17 ft(5 meters) away from the place to be monitored, with the camera placed at a height of 5-6.5 ft. -
Page 15: Specification
Specification Model Number KG695 Day Sensor:4320*3252;Night Sensor: 2592*1944 Effective Pixels Lens Night Sensor lens (at night): f=7.36mm F/NO:2.8 FOV=55°,HOV=42°; Day Sensor lens(at day) : f=4.55mm F/NO:4.5 FOV=50°,HOV=40.5° IR-Flash Range High Power LED: 6*850nm(30m) 6*940nm LEDS(25m) Display Screen 2.4 inch HD Color Display Image Size 30M(6400x4800);14M(4320*3240);5M (2592*1944);... -
Page 16: Warranty Card
Warranty Card Warranty Warranty State Model During warranty, hardware failure occurring, which Serial No caused by product itself, we will provide free Date of Purchase maintenance service for the customer. Free warranty is for the first year. If there is a need for repair, you Your Name should offer this warranty card, please take care of this card.
Need help?
Do you have a question about the KG695 and is the answer not in the manual?
Questions and answers