Table of Contents
Advertisement
Quick Links
Installation, Operation and
Maintenance Manual
Lync WQ-AS
Complete Water Quality Solutions
Disclaimer
The information contained in this manual is subject to change without notice
from Lync, a division of Watts Water Technologies, Inc. Lync makes no
warranty of any kind with respect to this material, including, but not limited to,
implied warranties of merchantability and fitness for a particular application.
Lync is not liable for errors appearing in this manual, nor for incidental or
consequential damages occurring in connection with the furnishing,
performance, or use of these materials.
L- OMM-007_A
5/6/2022
•
Lync • 425 W Everman Pkway, St. 101 • Fort Worth, TX 76134
Technical Support • (800) 433-5654 (ext. 3) • Mon-Fri, 8 am - 5 pm CST
Engineered Solutions
USA: T: (817) 335-9531
© 2021 LYNC
Advertisement
Table of Contents

Related Manuals for Watts Lync WQ-AS


Summary of Contents for Watts Lync WQ-AS
- Page 1 Disclaimer The information contained in this manual is subject to change without notice from Lync, a division of Watts Water Technologies, Inc. Lync makes no warranty of any kind with respect to this material, including, but not limited to, implied warranties of merchantability and fitness for a particular application.
-
Page 2: Table Of Contents
Table of Contents TABLE OF CONTENTS Introduction ............................4 1.1. System Overview ........................4 1.2. Specifications..........................6 Lync WQ-AS Components ......................... 9 2.1. WQ-AS Skid Components ......................9 Installation and Operation ........................ 10 3.1. Pre-Installation Considerations....................10 3.2. Installation Location ......................... 10 3.3. - Page 3 Lync WQ-AS Table of Contents 6.2. Routine Cartridge Replacement ....................40 6.3. Lync UV Maintenance ......................40 6.4. Disinfection Procedure ......................41 Technical Support • (800) 433-5654 • Mon-Fri, 8 am - 5 pm EST L- OMM-007_A • 5/6/2022 of 42...
-
Page 4: Introduction
System Overview 1.1. Lync WQ-AS is a complete, fully engineered multi-barrier, packaged system that optimizes your system’s water quality by integrating scale prevention, sediment filtration and UV disinfection. Lync WQ-AS is factory pre-assembled to minimize installation time and labor. Standard components of this system are: •... - Page 5 Lync WQ-AS SECTION 1: INTRODUCTION NOTES: Lync UV complies with part 15 of the FCC Rules. Operation is subject to the following two conditions: (1) This device may not cause harmful interference, and (2) this device must accept any interference received, including interference that may cause undesired operation.
-
Page 6: Specifications
316L SS Controller mounting On chamber bracket Input voltage 120 to 240VAC, 50/60 Hz Max nominal input power for each UV system (Watts) Technical Support • (800) 433-5654 • Mon-Fri, 8 am - 5 pm EST L- OMM-007_A • 5/6/2022... - Page 7 Lync WQ-AS SECTION 1: INTRODUCTION Max nominal electrical power for each lamp (Watts) Quartz glass low pressure lamp / ozone free / true Lamp technology pre-heat starting / glow-cap indicator Wireless lamp key Standard Lamp dimming / Flow switch Standard...
- Page 8 Lync WQ-AS SECTION 1: INTRODUCTION • The addition of soaps, chemicals, or cleaners, before or after AquaSolve treatment, may reverse its anti-scale treatment effects and/or create water with a heavy residue or spotting potential. Any adverse conditions caused by the addition of soaps, chemicals, or cleaners are the sole responsibility of the end user.
-
Page 9: Lync Wq-As Components
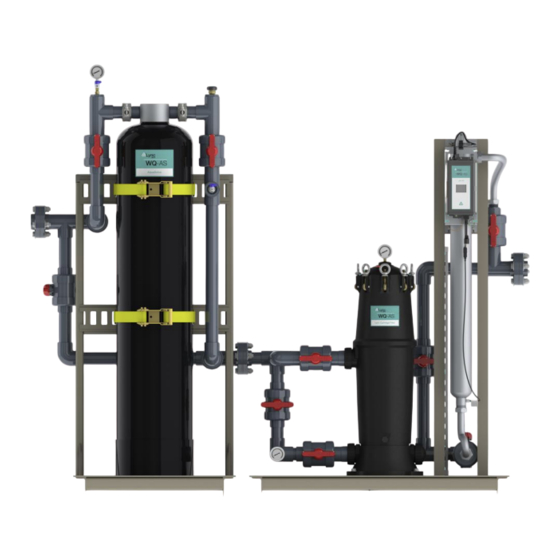
Lync WQ-AS SECTION 2: Lync WQ-AS COMPONENTS 2. Lync WQ-AS Components WQ-AS Skid Components 2.1. WQAS-050-D WQAS-100-D Figure 2-1 General WQ-AS Component Identification Technical Support • (800) 433-5654 • Mon-Fri, 8 am - 5 pm EST L- OMM-007_A • 5/6/2022... -
Page 10: Installation And Operation
Quartz Sleeve O-Ring Installation Location 3.2. Lync WQ-AS is a complete system with factory pre-assembled plumbing and wiring to minimize installation time and labor. Components are fastened onto a steel skid for safe and easy transportation and installation. 1. Confirm that the system being installed matches the flow rate for the application. -
Page 11: Plumbing And Uv Connections
Lync WQ-AS SECTION 3: OPERATION • DO NOT install where system is exposed to harsh chemicals or may be subjected to being struck by moving equipment, carts, mops or any other item that may cause damage. • DO NOT install the system outdoors. Keep system away from moisture, rain, and direct sunlight. -
Page 12: Electrical Connections
Lync WQ-AS SECTION 3: OPERATION 13. Use Teflon tape and install the AquaSolve inlet sample port assembly on the inlet side of the AquaSolve tank (see Figure 3-1). 14. Use Teflon tape and install AquaSolve vacuum relief valve on the outlet side of the AquaSolve tank (see Figure 3-1). -
Page 13: Startup
Lync WQ-AS SECTION 3: OPERATION Startup 3.5. Once the plumbing and electrical connection procedures are completed, the AquaSolve tank(s) needs to be filled with water. Follow the steps below to fill up the tanks: • Verify that the UV unit(s) is unplugged •... -
Page 14: Lync Uv Controller
Lync WQ-AS SECTION 3: OPERATION WARNING! Do not attempt to remove the cartridge filter lid without relieving pressure. To open lid, close shutoff valves before and after filter, press pressure relief button to relieve pressure. Once pressure has been relieved, remove eyebolts and lid. To start up filter, replace lid, tighten eyebolts, and open shutoff valves slowly to check for leaks. -
Page 15: Overview Of Screens
Lync WQ-AS SECTION 3: OPERATION 3.6.2. Overview of Screens Startup Screen When the system is first powered up, this screen will appear. Lamp Warm Up Screen Once Startup Screen system checks are complete, the lamp warm up screen will appear, and automatically complete the lamp warm up sequence. -
Page 16: Normal Operation
Lync WQ-AS SECTION 3: OPERATION 4- Set Up Screen Upon touching , the screen allows the user to select a language as well as the bypassing and silencing of alarms. Touching the house icon from any of these sub-screens will return the user to the Home Screen. - Page 17 Lync WQ-AS SECTION 3: OPERATION Upon touching the QR code, the full QR code is displayed. The Home Screen is the normal operating screen for the system. In this graphic the lamp is operating at full power. If an alarm or warning condition occurs, the system will notify the user from this screen.
-
Page 18: Set Up Screen
Lync WQ-AS SECTION 3: OPERATION The user will be notified if a lamp failure occurs. Upon a lamp failure condition, the alarm relay will energize to close the outlet solenoid valve (optional) on the system and an audible alarm will sound. -
Page 19: Bypassing Alarms - Audible Alarms
Lync WQ-AS SECTION 3: OPERATION The alarm relay output is bypassed. The alarm output relay is not bypassed. 3.6.7. Bypassing Alarms – Audible Alarms Touching the speaker icon will bring up a confirmation screen. Touch Yes to mute the audible alarm for 24 hours and return to the Set Up Screen. -
Page 20: Modbus Communication
Lync WQ-AS SECTION 3: OPERATION The Lamp and Sleeve Replacement Screen can be accessed by touching the information icon at the bottom of the Home Screen. This will provide the system model number along with the model number and QR codes for replacement lamps and quartz sleeves. -
Page 21: Input Registers
Lync WQ-AS SECTION 3: OPERATION 3.7.3. Input Registers The MODBUS input registers of the Lync UV Controller are used to query information about the controller and its installed UV lamp. These registers are listed the table below. The input registers are assigned to one of two logical groupings: •... -
Page 22: Lamp Type
Lync WQ-AS SECTION 3: OPERATION 3.7.4. Lamp Type Input Register Address: 0x0374 This register identifies the specific model of UV lamp that has been attached to the controller. This value applies to the last lamp for which the lamp tag was successfully read by the system since power was applied. -
Page 23: Lamp Rated Operating Time
Lync WQ-AS SECTION 3: OPERATION 3.7.5. Lamp Rated Operating Time Input Register Address: 0x0375 This register displays the rated operating time of the UV lamp in hours. This value applies to the last lamp for which the lamp tag was successfully read by the system since power was applied. -
Page 24: Controller Operating Time
Lync WQ-AS SECTION 3: OPERATION 3.7.6. Controller Operating Time Input Register Address: 0x0470 : 0x0471 These registers display the cumulative operating time of the controller. The Controller Operating Time is shown in units of 30 minute intervals. Technical Support • (800) 433-5654 • Mon-Fri, 8 am - 5 pm EST L- OMM-007_A •... -
Page 25: Lamp Operating Time
Lync WQ-AS SECTION 3: OPERATION 3.7.7. Lamp Operating Time Input Register Address: 0x0472 : 0x0473 These registers display the cumulative time that the lamp has been operating. The value is specified in units of 15 minute intervals. This value applies to the last lamp for which the lamp tag was successfully read by the system since power was applied. -
Page 26: Lamp Life Remaining
Lync WQ-AS SECTION 3: OPERATION 3.7.8. Lamp Life Remaining Input Register Address: 0x0475 This register displays the number of days of operation that remain for the lamp before it will have been operated for its rated maximum lifetime or longer. -
Page 27: Measured Uv Level, Absolute
Lync WQ-AS SECTION 3: OPERATION 3.7.9. Measured UV Level, Absolute Input Register Address: 0x0476 : 0x0477 These registers display the measured UV intensity level reported by the external UV sensor. The value is reported in units of 0.01W/m2 The value 4294967295 (0xFFFFFFFF) is reserved to indicate that the UV level has overflowed the measurement range of the sensor device. -
Page 28: Controller Status Information Group 0
Lync WQ-AS SECTION 3: OPERATION 3.7.10. Controller Status Information Group 0 Input Register Address: 0x0479 This register displays various runtime operating parameters of the system. Technical Support • (800) 433-5654 • Mon-Fri, 8 am - 5 pm EST L- OMM-007_A •... - Page 29 Lync WQ-AS SECTION 3: OPERATION Technical Support • (800) 433-5654 • Mon-Fri, 8 am - 5 pm EST L- OMM-007_A • 5/6/2022 of 42...
- Page 30 Lync WQ-AS SECTION 3: OPERATION Technical Support • (800) 433-5654 • Mon-Fri, 8 am - 5 pm EST L- OMM-007_A • 5/6/2022 of 42...
-
Page 31: Controller Status Information Group 1
Lync WQ-AS SECTION 3: OPERATION 3.7.11. Controller Status Information Group 1 Input Register Address: 0x047A This register displays various runtime operating parameters of the system. Technical Support • (800) 433-5654 • Mon-Fri, 8 am - 5 pm EST L- OMM-007_A •... - Page 32 Lync WQ-AS SECTION 3: OPERATION Technical Support • (800) 433-5654 • Mon-Fri, 8 am - 5 pm EST L- OMM-007_A • 5/6/2022 of 42...
-
Page 33: Troubleshooting
Lync WQ-AS SECTION 3: OPERATION 4. TROUBLESHOOTING Problem Possible Cause Corrective Action Replace lamp Clean or replace quartz sleeve Low or no UV transmittance into the Replace prefilter water Confirm the pretreatment is adequate Bacteria in outlet water Confirm the feed water meets the feed... -
Page 34: Replacement Part List
Lync WQ-AS SECTION 4: REPLACEMENT PART LIST 5. REPLACEMENT PART LIST WQ-AS Skid Parts 5.1. Figure 5-1 WQ-AS Skid Parts Item Description Part # Lync Filter Cartridge (LCB-150-P5) 68100632 Lync Filter Housing (LCH-150) 68110217 Lync UV 50 GPM (LD050AGAA) 68110226 1.5”... -
Page 35: Lync Aquasolve Parts
Lync WQ-AS SECTION 4: REPLACEMENT PART LIST Lync AquaSolve Parts 5.2. Figure 5-2 AquaSolve Cross Section Item Description Part # Stainless Steel Tank Head 68106656 Upper Basket Assembly 68101233 1.5” Riser 68103367 Bottom Distributor Assembly 68101235 14” X 65” AquaSolve Tank Body... -
Page 36: Lync Cartridge Filter Parts
Lync WQ-AS SECTION 4: REPLACEMENT PART LIST Lync Cartridge Filter Parts 5.3. Figure 5-3 Lync Cartridge Filter Parts Item Description Part # Pressure relief assembly includes cap, spring and stem 68100621 Lid with brass reinforced gauge port 68100616 O-ring for lid closure, EPDM 68100619 Adapter 2"... -
Page 37: Lync Uv Parts
Lync WQ-AS SECTION 4: REPLACEMENT PART LIST Lync UV Parts 5.4. Use only Lync supplied UV lamps and quartz sleeves. Failure to do so may result in system failure and will void all warranty. Figure 5-4 Lync UV Parts Item... -
Page 38: Maintenance
Lync WQ-AS SECTION 5: MAINTENANCE 6. Maintenance Maintenance Practice Frequency Check for system leaks Every month Check the differential pressure* for cartridge replacement Every two weeks UV lamp replacement Every year Quartz sleeve replacement Every three years AquaSolve media replacement... - Page 39 Lync WQ-AS SECTION 5: MAINTENANCE 7. Get a 6 foot length of 3/4” sch. 40 PCV and a length of 1” polyvinyl hose. The length of hose depends on the distance to the nearest floor drain. (Both of these can be acquired at Home Depot or Lowes.)
- Page 40 Lync WQ-AS SECTION 5: MAINTENANCE 19. Put the tank in service. Alternative Method for Replacing Media Follow steps 1 – 6 then: 20. Remove center distributor tube and lower basket and siphon all water from tank 21. Lay tank down on its side and tip upside down while using hose to flush media out 22.
- Page 41 Lync WQ-AS SECTION 5: MAINTENANCE immediately. DO NOT energize a system with damp or wet electrical components. 1. Disconnect the power supply from the wall outlet. 2. Turn off the inlet valve and outlet isolation valves. 3. Disconnect the lamp lead wire from the glow cap electrical port. (A).
- Page 42 Lync WQ-AS SECTION 5: MAINTENANCE If hot water is used during disinfection procedure, please use UV Sensor Port Plug # T7402210 and Flow Sensor Port Plug # T7401003. DO NOT unplug the system. 1. Shut off the inlet and outlet isolation valves on the cartridge filter line.
Need help?
Do you have a question about the Lync WQ-AS and is the answer not in the manual?
Questions and answers