
Related Manuals for Victron energy Phoenix Smart IP43 12/30


Summary of Contents for Victron energy Phoenix Smart IP43 12/30
- Page 1 ENGLISH Phoenix Smart IP43 Charger 12/30, 12/50, 24/16, 24/25 | (1+1) & (3) Output | 120-240V Rev. 01 06/2022...
-
Page 2: Table Of Contents
Phoenix Smart IP43 Charger Table of Contents 1. Safety instructions ........................1 2. Quick start guide ........................2 3. Features ..........................4 4. Operation ..........................6 4.1. Charge algorithm ......................6 4.2. Temperature compensation ....................8 4.3. VE.Smart Networking ....................... 9 4.3.1. -
Page 3: Safety Instructions
Phoenix Smart IP43 Charger 1. Safety instructions WARNING: CAREFULLY READ AND FOLLOW ALL SAFETY INSTRUCTIONS • Carefully read the manual before the charger is installed and operated; retain the manual in a safe place for future reference. • The charger must not be installed or operated by any of the following persons, unless they are under strict instruction and supervision: a. -
Page 4: Quick Start Guide
Phoenix Smart IP43 Charger 2. Quick start guide Mount the charger vertically (with terminals facing down) on a non-flammable substrate; secure using the 4 mounting holes on the base. Ensure there is at least 10cm of clearance below and above the charger for airflow/cooling. Connect DC cabling between the charger's BATTERY terminals and the battery or DC system distribution bus;... - Page 5 Phoenix Smart IP43 Charger Configure the charge settings as required for the battery type and capacity. a. Using the mode button: a. Briefly press the MODE button to cycle through the available options and select the most appropriate charge preset; the LED beside the currently selected charge mode will be illuminated.
-
Page 6: Features
Phoenix Smart IP43 Charger 3. Features a. Bluetooth setup and monitoring (Using VictronConnect) Equipped with integrated Bluetooth; enabling quick and simple setup, advanced configuration, comprehensive monitoring and firmware updates via the VictronConnect app and a Bluetooth enabled device (such as a mobile phone or tablet). b. - Page 7 Phoenix Smart IP43 Charger n. Configurable output current A configurable setting that limits the maximum charge current to a reduced level; beneficial when charging lower capacity batteries with a high current charger. o. Recovery function The Phoenix Smart IP43 Charger range will attempt to recharge a severely discharged battery (even down to 0V) with low current and then resume normal charging once the battery voltage has risen sufficiently - many other chargers will not recognise a battery in this state.
-
Page 8: Operation
Phoenix Smart IP43 Charger 4. Operation 4.1. Charge algorithm The Victron Phoenix Smart IP43 Charger range are intelligent multi-stage battery chargers, specifically engineered to optimise each recharge cycle and charge maintenance over extended periods. The multi-stage charge algorithm includes the individual charge stages described below: Bulk The battery is charged at maximum charge current until the voltage increases to the configured absorption voltage. - Page 9 Phoenix Smart IP43 Charger The indicator LEDs display the active charge state; refer to the image below: Page 7 Operation...
-
Page 10: Temperature Compensation
Phoenix Smart IP43 Charger 4.2. Temperature compensation The Victron Phoenix Smart IP43 Charger range will automatically compensate the configured charge voltage based on ambient temperature (except for Li-ion mode or if manually disabled). The optimal charge voltage of a lead acid battery varies inversely with battery temperature; automatic temperature-based charge voltage compensation avoids the need for special charge voltage settings in hot or cold environments. -
Page 11: Ve.smart Networking
Phoenix Smart IP43 Charger 4.3. VE.Smart Networking VE.Smart Networking enables Bluetooth connectivity and communication between multiple Victron products. This powerful feature enables chargers to receive accurate battery voltage (Volt-sense), charge current (Current-sense) and battery temperature (Temp-sense) data from a compatible battery monitor (such as a BMV, SmartShunt, Smart Battery Sense or VE.Bus Smart Dongle) and/or multiple chargers to operate in unison with synchronised charging to further enhance the charge cycle. - Page 12 Phoenix Smart IP43 Charger Synchronised charging can be setup with different model chargers, providing they are VE.Smart Networking compatible (this includes VE.Smart Networking compatible Blue Smart chargers, Phoenix Smart chargers and MPPT solar chargers). Charging from MPPT solar chargers is not prioritised over mains supply chargers, so in some installations (dependent on cable resistance and other factors) and charging conditions it is possible for solar power to be underutilised.
-
Page 13: Multiple Battery Outputs
Phoenix Smart IP43 Charger 4.4. Multiple battery outputs The 1+1 and 3 output version chargers both have an integrated FET battery isolator and therefore feature seperate isolated outputs. With 1+1 output models, the main output can supply the full rated current and the starter/auxiliary output is limited to a maximum of 4A;... -
Page 14: Commencing A New Charge Cycle
Phoenix Smart IP43 Charger 4.5. Commencing a new charge cycle A new charge cycle will commence when: 1. Bulk stage is complete and the current output increases to the maximum charge current for four seconds (due to a simultaneously connected load) 2. -
Page 15: Estimating Charge Time
Phoenix Smart IP43 Charger 4.6. Estimating charge time A lead acid battery is at approximately 80% state of charge (SOC) when the bulk charge stage is completed. The bulk stage duration T can be calculated as T = Ah / I, where I is the charge current (excluding any loads) and Ah is bulk bulk the depleted battery capacity below 80% SOC. -
Page 16: Installation
Phoenix Smart IP43 Charger 5. Installation 5.1. Mounting The Phoenix Smart IP43 Charger range is designed to be wall mounted using the flanges which protrude from either side of the heatsink. Before mounting, the following aspects should be considered to identify/provide a suitable and safe location: a. -
Page 17: Wiring
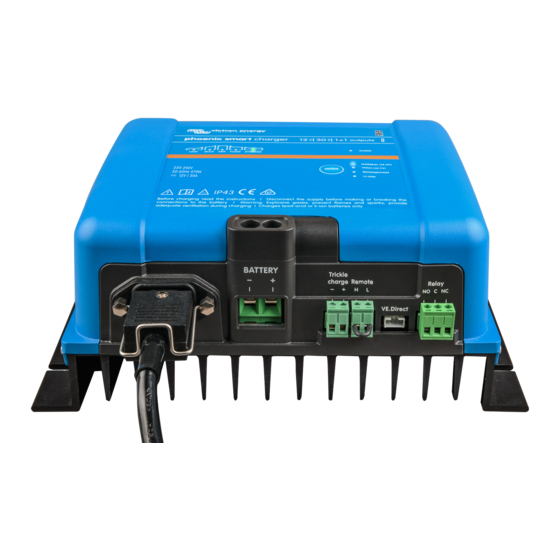
Phoenix Smart IP43 Charger 5.2. Wiring Connect DC cabling between the charger's BATTERY terminals and the battery/batteries or DC system distribution bus; all LEDs will illuminate briefly when DC power is connected. a. Ensure that the DC system is fully shut down (all DC loads and charge sources off/isolated) prior to disconnection of any existing battery/DC system distribution bus cabling and connection of the charger to the battery terminals/DC system distribution bus. -
Page 18: Remote On/Off
Phoenix Smart IP43 Charger 5.2.2. Remote on/off The Phoenix Smart IP43 Charger is equipped with remote on/off terminals, these terminals enable charging to be turned on or off remotely dependent on their state. There are 3 options to turn the Phoenix Smart IP43 Charger on using the remote terminal(s): 1. -
Page 19: Schematics
Phoenix Smart IP43 Charger 5.2.4. Schematics 1+1 output models Refer to the wiring schematic below for the 1+1 output models: Description AC input power supply (typically mains power grid or generator) AC input power supply cord/plug (purchased separately) Phoenix Smart IP43 Charger Main / house battery Auxiliary / starter battery Page 17... - Page 20 Phoenix Smart IP43 Charger 3 output models Refer to the wiring schematic below for the 3 output models: Description AC input power supply (typically mains power grid or generator) AC input power supply cord/plug (purchased separately) Phoenix Smart IP43 Charger DC negative busbar Batteries (1, 2 or 3 batteries can be connected) Page 18...
- Page 21 Phoenix Smart IP43 Charger VE.Smart Networking - Smart Battery Sense Refer to the wiring schematic below for VE.Smart Networking with a Smart Battery Sense: Description Smart Battery Sense Page 19 Installation...
- Page 22 Phoenix Smart IP43 Charger VE.Smart Networking - SmartShunt Refer to the wiring schematic below for VE.Smart Networking with a SmartShunt or BMV: Description SmartShunt Temperature sensor (with integrated voltage sense) Page 20 Installation...
-
Page 23: Setup
Phoenix Smart IP43 Charger 6. Setup 6.1. Charge modes There are 3 integrated charge modes (Normal, High and Li-Ion), as well as an optional Recondition stage that can be included (except for Li-ion mode). The integrated charge modes combined with adaptive charge logic are well suited for most common battery types; such as flooded lead-acid, AGM, Gel and LiFePO4. -
Page 24: Using The Mode Button
Phoenix Smart IP43 Charger 6.2. Using the MODE button Selection of an integrated charge mode and other general settings can be made using the physical MODE button on the charger. To select an integrated charge mode using the MODE button: 1. -
Page 25: Using Victronconnect
Phoenix Smart IP43 Charger 6.3. Using VictronConnect Selection of an integrated charge mode and other general settings can also be made with a Bluetooth enabled device (such as a mobile phone or tablet), using the VictronConnect app. For further details about the VictonConnect app refer to the online user manual: https://www.victronenergy.com/live/ victronconnect:start To select an integrated charge mode using VictronConnect:... - Page 26 Phoenix Smart IP43 Charger e. During initial connection a ‘Bluetooth pairing request’ prompt will appear requesting the Bluetooth PIN code; enter the default PIN code 000000. Access the 'Settings' menu by selecting the ‘Setting’ icon (gear) in the top right corner. g.
- Page 27 Phoenix Smart IP43 Charger Review the available options and select the most appropriate charge preset, then press 'OK'. If required, set a lower maximum charge current: Access the 'Maximum charge current' menu by selecting the ‘Maximum charge current' menu option. ii.
-
Page 28: Bluetooth
Phoenix Smart IP43 Charger 6.4. Bluetooth 6.4.1. Changing the PIN code To prevent an unauthorised Bluetooth connection, it is highly recommended to change the default PIN code. To change the Bluetooth PIN code: a. Complete initial Bluetooth pairing and connection using the default PIN code (000000) b. - Page 29 Phoenix Smart IP43 Charger e. Enter the current and new PIN code (twice), then select OK; avoid using an obvious PIN code that is easy for someone else to guess, such as 111111 or 123456. Page 27 Setup...
-
Page 30: Resetting The Pin Code
Phoenix Smart IP43 Charger 6.4.2. Resetting the PIN code If the PIN code is forgotten or lost, it can be easily reset to the default 000000 using the VictronConnect app. Using VictronConnect To reset the Bluetooth PIN code: 1. Locate the blue smart charger in the LOCAL page and select the ‘device options’ icon (three vertical dots) on the right side of the description. -
Page 31: Disabling Bluetooth
Phoenix Smart IP43 Charger 6.4.3. Disabling Bluetooth It is possible to totally disable Bluetooth communication if desired. Typically, there is no need to disable Bluetooth since unauthorised access is protected with a PIN code, but certain situations may warrant it for an even higher level of security. To disable Bluetooth: a. - Page 32 Phoenix Smart IP43 Charger e. Tick the checkbox and then select ‘OK' as confirmation. Bluetooth will now be disabled, but can be re-enabled again. Page 30 Setup...
-
Page 33: Re-Enabling Bluetooth
Phoenix Smart IP43 Charger 6.4.4. Re-enabling Bluetooth It is possible to re-enable Bluetooth using the MODE button. To re-enable Bluetooth: a. Depress and hold the MODE button (on the Phoenix Smart IP43 Charger) for 10 seconds. b. After 10 seconds have elapsed all charge mode LEDs will blink twice to indicate that Bluetooth has been re-enabled, and all Bluetooth settings reset. -
Page 34: Ve.smart Networking
Phoenix Smart IP43 Charger 6.5. VE.Smart Networking VE.Smart Networking enables Bluetooth connectivity and communication between multiple Victron products to further enhance the charge cycle. Refer to the 'Operation - VE.Smart Networking' section for more information. After VE.Smart networking compatible hardware is installed, VE.Smart networking needs to be setup/enabled. 6.5.1. - Page 35 Phoenix Smart IP43 Charger 6. Enter a name to identify the VE.Smart network and select 'OK' to the prompts. 7. Once setup, details of the data being transmitted to the VE.Smart network are shown on the VE.Smart networking page. 8. Exit the device by selecting the back 'arrow' icon and 'close' icon (cross) in the top left corner. 9.
- Page 36 Phoenix Smart IP43 Charger 10. If prompted, complete initial Bluetooth pairing and connection; the default PIN code is 000000. 11. Access the ‘settings’ menu by selecting the 'settings' icon (gear) in the top right corner. 12. Open the 'VE.Smart networking' page by selecting 'VE.Smart networking'. 13.
- Page 37 Phoenix Smart IP43 Charger 14. Locate and select the VE.Smart network previously setup (or the network you want to join if there are multiple), then select 'OK' to the prompts. Page 35 Setup...
- Page 38 Phoenix Smart IP43 Charger 15. The VE.Smart network is now configured, details of the data being received from the VE.Smart network are shown on the VE.Smart network page. Once successfully configured: a. The VE.Smart network symbol will appear in the top right corner of the STATUS screen (both the battery monitor and the charger).
-
Page 39: Synchronised Charging
Phoenix Smart IP43 Charger 1. Only one battery monitor (BMV, SmartShunt, Smart Battery Sense or VE.Bus Smart Dongle) can be included in a VE.Smart network. 2. All battery monitor connections (voltage sensing cables, temperature sensor and current shunt) and chargers in a common VE. Smart network must be connected to the same battery / battery bank. 3. - Page 40 Phoenix Smart IP43 Charger 5. Select 'CREATE NETWORK' (or 'JOIN NETWORK' if the VE.Smart network has already been created). 6. Enter a name to identify the VE.Smart network and select 'OK' to the prompts. 7. Once setup, details of the data being transmitted to the VE.Smart network are shown on the VE.Smart networking page. 8.
- Page 41 Phoenix Smart IP43 Charger 9. Locate and select another VE.Smart Networking compatible charger from the device list on the LOCAL page. 10. If prompted, complete initial Bluetooth pairing and connection; the default PIN code is 000000. 11. Access the settings menu by selecting the 'settings' icon (gear) in the top right corner. 12.
- Page 42 Phoenix Smart IP43 Charger 14. Locate and select the VE.Smart network previously setup (or the network you want to join if there are multiple), then select 'OK' to the prompts. Page 40 Setup...
- Page 43 Phoenix Smart IP43 Charger 15. The VE.Smart network is now configured, details of the syncronised chargers in the VE.Smart network are shown on the VE.Smart network page. Once successfully configured: a. The VE.Smart network symbol will appear in the top right corner of the STATUS screen (of each charger in the network). b.
- Page 44 Phoenix Smart IP43 Charger 1. Only one battery monitor (BMV, SmartShunt, Smart Battery Sense or VE.Bus Smart Dongle) can be included in a VE.Smart network. 2. All battery monitor connections (voltage sensing cables, temperature sensor and current shunt) and chargers in a common VE. Smart network must be connected to the same battery / battery bank. 3.
-
Page 45: System Reset
Phoenix Smart IP43 Charger 6.6. System reset It is possible to perform a full system reset to restore all charger/battery related settings to their default value; using the VictronConnect app. Note that this does not reset any Bluetooth related settings, such as the PIN code or pairing information. To perform a system reset: a. -
Page 46: Monitoring
Phoenix Smart IP43 Charger 7. Monitoring 7.1. LED indications 7.1.1. Operation states The Phoenix Smart IP43 Charger has multiple LEDs that can be referenced to determine the current charge state and other operational information. Refer to the LED indications in the table below: Charge state BULK FLOAT... -
Page 47: Victronconnect
Phoenix Smart IP43 Charger 7.2. VictronConnect The charger operation and recharge statistics can be closely monitored live or post charging with a Bluetooth enabled device (such as a mobile phone or tablet) using the VictronConnect app. There are 3 different overview screens available (STATUS, GRAPH and HISTORY), each displaying different monitoring or historical data;... -
Page 48: Graph Screen
Phoenix Smart IP43 Charger 7.2.2. Graph screen The GRAPH screen provides an easy to understand graphical representation of each charge stage with respect to battery voltage and charge current. The active charge stage is also highlighted and stated below, along with a brief explanation. Page 46 Monitoring... -
Page 49: History Screen
Phoenix Smart IP43 Charger 7.2.3. History screen The HISTORY screen is a very powerful reference as it contains historical usage data over the charger’s lifetime and detailed statistics for the last 40 charge cycles (even if the charge cycle is only partially completed). By selecting the full screen view the data is displayed in landscape view with significantly more days visible at the same time. - Page 50 Phoenix Smart IP43 Charger a. Charge cycle statistics Cycle overview Expandable bar chart showing the time spent in each charge stage and the charge capacity provided (in Ah) during each charge stage ii. Status Confirms if the charge cycle was successfully completed or if it was ended early/interrupted for some reason, including the reason/cause iii.
-
Page 51: Advanced Configuration
Phoenix Smart IP43 Charger 8. Advanced Configuration In specific use cases where the integrated charge modes are not suitable/ideal for the battery type being charged or the battery manufacturer recommends specific charge parameters and fine tuning is desired, advanced configuration is possible with a Bluetooth enabled device (such as a mobile phone or tablet) using the VictronConnect app. - Page 52 Phoenix Smart IP43 Charger In order to edit/configure 'advanced settings': a. Select the 'Battery preset' dropdown arrow to expand the menu, then select ‘User defined'. b. ‘User defined' configuration will now be enabled. The settings in the 'advanced menu' (with 'expert mode' disabled) include: a.
- Page 53 Phoenix Smart IP43 Charger d. Voltage compensation Temperature Compensation The temperature compensation setting enables the charge voltage temperature compensation coefficient to be configured, or temperature compensation to be totally disabled (such as for Li-ion batteries). The temperature compensation coefficient is specified in mV/°C and applies to the entire battery/battery bank (not per battery cell). e.
-
Page 54: Expert Mode Settings
Phoenix Smart IP43 Charger 8.2. Expert mode settings Expert mode expands the advanced settings menu even further to include more specialised configuration settings. Page 52 Advanced Configuration... - Page 55 Phoenix Smart IP43 Charger To access the 'expert mode' menu: a. Open the 'advanced setting' menu and enable 'user defined' configuration - see the 'Advanced configuration - Advanced settings' section for instructions. b. Enable the ‘Expert mode’ switch, then select 'OK'. c.
- Page 56 Phoenix Smart IP43 Charger c. Absorption Adaptive duration The adaptive duration setting allows selection between adaptive absorption time (calculated based on the bulk time / level of discharge) or a fixed absorption time. ii. Maximum absorption time / Absorption time The maximum absorption time / absorption time setting enables the maximum adaptive absorption time or the fixed absorption time to be configured (depending if adaptive or fixed absorption time is selected).
-
Page 57: Power Supply Function
Phoenix Smart IP43 Charger 8.3. Power supply function The Victron Phoenix Smart IP43 Charger range are also suitable for use as a DC power supply, to power equipment without a battery connected (or while also connected to a battery). While it’s still possible to use the charger as a power supply without changing any settings, a dedicated ‘Power supply’ mode exists for this purpose/usage. -
Page 58: Technical Specifications
Phoenix Smart IP43 Charger 9. Technical specifications 12/30 12/50 24/16 24/25 Specification (1+1) & (3) (1+1) & (3) (1+1) & (3) (1+1) & (3) Input voltage - AC supply 85 - 265VAC (full power from 100VAC, startup from 90VAC) Input frequency - AC supply 45 - 65Hz Input voltage - DC supply 290 - 375 VDC... -
Page 59: Warranty
Victron Energy to make such repairs. Victron Energy is not liable for any consequential damages arising from the use of this product. The maximum liability of Victron Energy under this limited warranty shall not exceed the actual purchase price of the product. Page 57...
Need help?
Do you have a question about the Phoenix Smart IP43 12/30 and is the answer not in the manual?
Questions and answers