
Related Manuals for Keysight Technologies U1273A


Summary of Contents for Keysight Technologies U1273A
- Page 1 All manuals and user guides at all-guides.com Keysight U1273A/ U1273AX Handheld Digital Multimeter Quick Start Guide...
- Page 2 Do not proceed beyond a WARNING notice until the indicated conditions are fully understood and met. For further safety information details, refer to the Keysight U1273A/U1273AX Handheld Digital Multimeter User’s Guide. Keysight U1273A/U1273AX Quick Start Guide...
-
Page 3: Table Of Contents
Current measurements ..... .21 Check the Fuse ......22 Keysight U1273A/U1273AX Quick Start Guide... - Page 4 All manuals and user guides at all-guides.com THIS PAGE HAS BEEN INTENTIONALLY LEFT BLANK. Keysight U1273A/U1273AX Quick Start Guide...
- Page 5 ✔ One pair of red and black test leads ✔ One pair of 4 mm test probes ✔ One K-type thermocouple lead kit ✔ Four 1.5 V AAA alkaline batteries (for U1273A) or lithium batteries (for U1273AX) ✔ Printed copies of the Certificate of Calibration...
-
Page 6: Install The Batteries
OFF position to any other position. Your multimeter is capable of remote data logging. NOTE To use this feature, you will need an IR-USB cable (U1173A, purchased separately) and the Keysight GUI Data Logger Software (downloadable from www.keysight.com/find/hhTechLib). Keysight U1273A/U1273AX Quick Start Guide... - Page 7 90 seconds of inactivity. Press any button to cancel this effect and reset the Auto Dim timer. You may change how the multimeter’s backlight behavior through the Setup menu. Refer to the User’s Guide for further instructions. Keysight U1273A/U1273AX Quick Start Guide...
-
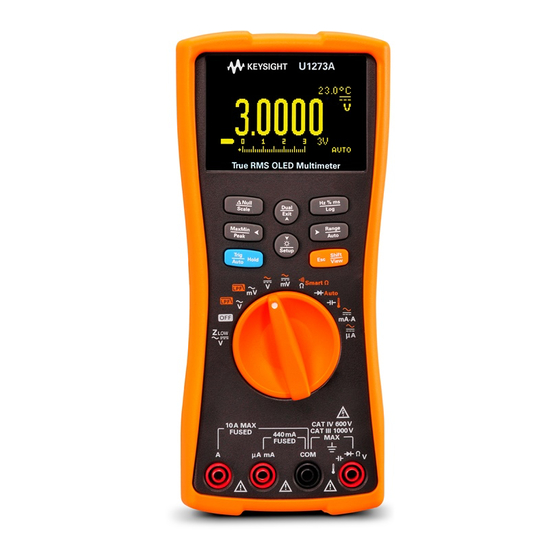
Page 8: The Multimeter At A Glance
All manuals and user guides at all-guides.com The Multimeter at a Glance Display screen Keypad Rotary switch Input terminals Test lead/probe holders IR communication port Battery cover (Lift tilt stand for access) Tilt stand Keysight U1273A/U1273AX Quick Start Guide... -
Page 9: Understanding The Rotary Switch
AC mV AC+DC mV Resistance Smart Continuity Smart Ω (offset compensation) Diode A uto Auto-diode Capacitance Temperature DC mA (or A) AC mA (or A) AC+DC mA (or A) DC μA AC μA AC+DC μA Keysight U1273A/U1273AX Quick Start Guide... -
Page 10: Understanding The Keypad
Switches between frequency, Starts and stops the Data pulse width, and duty cycle Logging. measurements. Sets a manual range and Enables auto-ranging. disables autoranging. Switches between the primary Enters and exits the Log shifted functions. Review menu. Keysight U1273A/U1273AX Quick Start Guide... -
Page 11: Understanding The Input Terminals
To avoid damage to the device, do not exceed the input limit. Rotary position Input terminals Overload protection 1000 Vrms 1000 Vrms for short circuit <0.3 A Smart Auto 11 A/1000 V fast-acting fuse 440 mA/1000 V fast-acting fuse Keysight U1273A/U1273AX Quick Start Guide... -
Page 12: Performing Measurements And Tests
Set up your multimeter as shown in the figure below to perform voltage measurements. When measuring DC voltage from a mixed signal in DC measurement mode, ensure that the Filter ( ) is enabled. Keysight U1273A/U1273AX Quick Start Guide... - Page 13 4 Press to save your changes. 5 Press and hold until the multimeter Setup restarts and returns to normal operation. Turn the multimeter to DC Voltage mode to verify that the LPF symbol is turned on. Keysight U1273A/U1273AX Quick Start Guide...
- Page 14 – Z can remove ghost voltages from your measurements by dissipating the coupling voltage. Use Z to reduce the possibility of false readings in areas where the presence of ghost voltages are suspected. Keysight U1273A/U1273AX Quick Start Guide...
-
Page 15: Resistance Measurements
DC offset or leakage current. – Smart Ω removes unexpected DC voltages within the instrument, at the input, or at the circuit being measured, which will add error to Keysight U1273A/U1273AX Quick Start Guide... -
Page 16: Continuity Tests
( ) contacts. – Normal open: Circuit is normally open, the beeper will sound when a short is detected. – Normal close: Circuit is normally closed, the beeper will sound when an open is detected. Keysight U1273A/U1273AX Quick Start Guide... - Page 17 All manuals and user guides at all-guides.com The continuity function detects intermittent shorts NOTE and opens lasting as short as 1 ms. A brief short or open causes the multimeter to emit a short beep. Keysight U1273A/U1273AX Quick Start Guide...
-
Page 18: Diode Tests
– The Auto-diode function tests both the forward bias and reverse bias directions of your diode simultaneously. The forward bias voltage is shown on the primary display and the reverse bias voltage is shown on the secondary display. Keysight U1273A/U1273AX Quick Start Guide... -
Page 19: Capacitance Measurements
Set up your multimeter as shown in the figure below to perform capacitance measurements. is shown on the bottom left of the display when NOTE the capacitor is charging, and is shown when the capacitor is discharging. Keysight U1273A/U1273AX Quick Start Guide... -
Page 20: Temperature Measurements
Do not connect the thermocouple to electrically live WARNING circuits. Doing so will potentially cause fire or electric shock. Heat source K-type thermocouple The multimeter uses a type-K (default setting) NOTE temperature probe for measuring temperature. Keysight U1273A/U1273AX Quick Start Guide... -
Page 21: Current Measurements
Set the positive input terminal to terminal for currents below 440 mA, and terminal for currents above 440 mA. For better accuracy when measuring low currents NOTE (up to μA), turn the rotary switch to the position. Keysight U1273A/U1273AX Quick Start Guide... -
Page 22: Check The Fuse
(Fuse 1 and Fuse 2) of your multimeter. Displayed read ings Part Fuse Fuse rating number Fuse heal thy Replace fuse 2110-1400 440 mA/1000 V ≈102 Ω 2110-1402 11 A/1000 V ≈0.05 Ω To check Fuse 1 To check Fuse 2 Keysight U1273A/U1273AX Quick Start Guide... - Page 23 The multimeter will sound an input warning alert if the probe tip is in contact with any other sides of the µA mA or A terminal other than the sides specified in the instructions above. Keysight U1273A/U1273AX Quick Start Guide...
- Page 24 All manuals and user guides at all-guides.com THIS PAGE HAS BEEN INTENTIONALLY LEFT BLANK. Keysight U1273A/U1273AX Quick Start Guide...
- Page 25 All manuals and user guides at all-guides.com This information is subject to change without notice. Always refer to the Keysight website for the latest revision. © Keysight Technologies 2012-2017 Edition 4, June 1, 2017 Printed in Malaysia *U1273-90004* U1273-90004 www.keysight.com...
Need help?
Do you have a question about the U1273A and is the answer not in the manual?
Questions and answers