Table of Contents
Advertisement
Quick Links
Item #317297137
Model #LDS-BF3001
USE AND CARE GUIDE
LED VENTILATION FAN
Questions, problems, missing parts? Before returning to the store,
call Hampton Bay Customer Service
8 a.m. - 7 p.m., EST, Monday-Friday, 9 a.m. - 6 p.m., EST, Saturday
1-800-841-1350
HAMPTONBAY.COM
THANK YOU
We appreciate the trust and confidence you have placed in Hampton Bay through the purchase of this ventilating bath fan. We strive to
continually create quality products designed to enhance your home. Visit us online to see our full line of products available for your home improvement needs.
Thank you for choosing Hampton Bay!
1
Advertisement
Table of Contents

Related Manuals for HAMPTON BAY LDS-BF3001


Summary of Contents for HAMPTON BAY LDS-BF3001
- Page 1 THANK YOU We appreciate the trust and confidence you have placed in Hampton Bay through the purchase of this ventilating bath fan. We strive to continually create quality products designed to enhance your home. Visit us online to see our full line of products available for your home improvement needs.
-
Page 2: Table Of Contents
Table of Contents Tools Required................ 5 Table of Contents ............2 Package Contents..............6 Safety Information ............2 Installation - New Construction with Flex Bracket ..7 ........... 4 Installation - New Construction without Flex Bracket 9 Typical Installation............4 Installation - Existing Construction...... - Page 3 Safety Information FCC Part 15Supplier's Declaration of Conformity Product Description : Bathroom Exhaust Fan with LED Light Model Number :LDS-BF3001 Trade Name:HAMPTON BAY Responsible Party :300 Technology Court SE Suite 100, Smyrna, GA 30082 Tel.: (678) 293-8382 Testing Laboratory : Intertek Testing Services Shanghai Building No.86, 1198 Qinzhou Road (North), Caohejing Development Zone, Shanghai 200233, China...
-
Page 4: Typical Installation
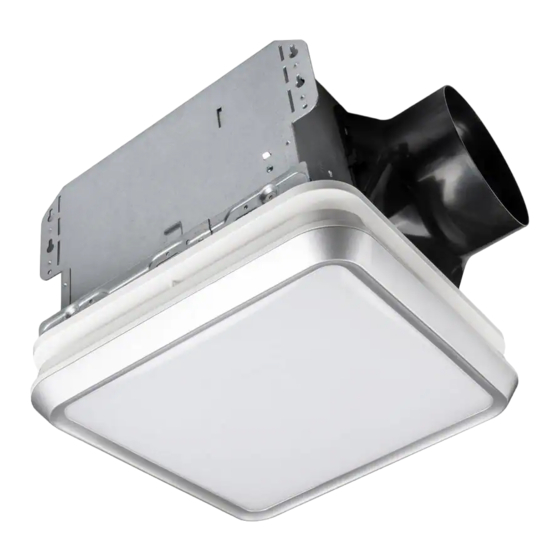
SPECIFICATIONS SPECIFICATIONS Airflow: 160 CFM Main light: 1500lm Night light: 2200K Power consumption: Fan 38W, Light 20W Voltage: 120 V, 60 Hz Weight: 13.45 lbs. Duct diameter: 6 in. Ceiling Opening Dimension Requirements: 12.17 in. (L) x 11 in. (W). Sound output: 1.1 Sones Typical Installation The ducting from this fan to the outside of the... -
Page 5: Warranty
Warranty LIMITED LIFETIME WARRANTY WHAT IS COVERED of charge, postage-paid at their option. This warranty does not cover products that have been abused, altered, damaged, misused, cut or worn. This warranty does not cover use in commercial applications. Use only manufacturer-supplied genuine warranty repair replacement parts to repair this fan. Use of non-genuine repair parts will void your warranty. -
Page 6: Package Contents
Pre-installation (continued) PACKAGE CONTENTS Fan Housing Covering Template Drywall Cutout Template Gabarit de recouvrement Easy installation du boîtier du ventilateur Gabarit de découpe pour Caution/Attention: cloison sèche Installation facile Grille enclosed – Do not throw away Installation instructions are included within the grille’s packaging ①... -
Page 7: Installation - New Construction With Flex Bracket
Installation - New Construction with Flex Bracket CAUTION: Make sure power is switched off at service panel before starting installation. Wear gloves during installing to help protect your hands from injury. NOTE: Ceiling mount only. IMPORTANT: Please remove the tape, which protects the damper during shipping and installation, from the duct adaptor as shown below. - Page 8 Installation - New Construction (continued) Ground- Green or copper wire Neutral-White to White wire Connect the wire Line-Black to Black wire White Green to Green Loosen the short screw (E) and remove the wire cover (F). Pull the house wires through the knockout of wire cover (F). Using the quick connectors to connect 120 V AC house wiring from the wall switch to the fan as shown in the wiring diagram on page 3.
-
Page 9: Installation - New Construction Without Flex Bracket
Installation - New Construction without Flex Bracket CAUTION: Make sure power is switched off at service panel before starting installation. Wear gloves during installing to help protect your hands from injury. NOTE: Ceiling mount only. IMPORTANT: Please remove the tape, which protects the damper during shipping and installation, from the duct adaptor as shown below. - Page 10 Installation - New Construction(continued) Connect the duct Connect a 6 in. circular duct (not supplied) and vent to the duct connector. Secure it with duct tape (not supplied) or a clamp (not supplied) to make the connection secure and air tight. Insert the duct connector back to the fan housing (A) follow the ...
-
Page 11: Installation - Existing Construction
Installation - Existing Construction Remove the existing fan CAUTION: Make sure power is switched off at service panel before starting installation. Wear gloves during installing to help protect your hands from injury. Remove the old fan from the ceiling. IMPORTANT: Please remove the tape, which protects the damper during shipping and... - Page 12 Installation - Existing Construction(continued) Connect the duct Connect a 6 in. circular duct (not supplied) and vent to the duct connector. Secure it with duct tape (not supplied) or a clamp (not supplied) to make the connection secure and air tight. ...
-
Page 13: Light Mode Operation
Installation - Existing Construction(continued) Install the grille with light Attach the grille by squeezing one spring together and inserting the springs into the spring guides in the fan housing (A) firstly. Connect LED wire to the plug in the fan housing. ... -
Page 14: Care And Maintenance
Care and Maintenance WARNING: Disconnect power supply before servicing. See SAFETY INFORMATION before proceeding. Routine maintenance should be done at least once a year. Never use solvents, thinner or harsh chemicals for cleaning the fan. Do not allow water to enter the motor. ... - Page 15 Questions, problems, missing parts? Before returning to the store, call Hampton Bay Customer Service 8 a.m. - 7 p.m., EST, Monday-Friday, 9 a.m. - 6 p.m., EST, Saturday 1-800-841-1350 HAMPTONBAY.COM Retain this manual for future use. FCC compliance information is listed as below: Responsible party: Leedarson America, Inc.
Need help?
Do you have a question about the LDS-BF3001 and is the answer not in the manual?
Questions and answers