Table of Contents
Advertisement
Quick Links
Advertisement
Table of Contents

Subscribe to Our Youtube Channel
Related Manuals for Beurer medical GL48


Summary of Contents for Beurer medical GL48
- Page 1 GL48/GL49 Instructions for use Codefree Blood glucose monitor Step by step...
-
Page 2: Table Of Contents
....................38 12.2 Warnings and safety notes ........................ 38 12.3 Device description ..........................38 12.4 Initial use ..........................39 12.5 Usage ....................40 12.6 Post-processing and disposal ....................41 12.7 Cleaning and maintenance ..........................41 12.8 Disposal 13. Warranty/service ........................41 Beurer GL48/GL49... -
Page 3: Getting To Know Your Device
Your Beurer team. Getting to know your device The GL48/GL49 blood glucose measuring system is intended for fast and simple blood glucose measurement of fresh capillary blood samples, either for self-testing or in a clinical environment by trained personnel. It enables you to measure your blood glucose quickly and easily, store the measured values and dis-play the average of all measured values, thereby providing optimum assistance for monitoring your diabetes. -
Page 4: Scope Of Delivery And Accessories
• The blood glucose monitor, test strips and additionally available control solutions have been specially designed to complement each other. For this reason, use only test strips and control solutions that have been approved for this monitor. Note • Use original manufacturer accessories only. Beurer GL48/GL49... -
Page 5: Replacements
• Battery replacement display for low batteries • Warning that test strip is insufficiently filled Warning • Do not use the device to diagnose diabetes; it is intended for regular monitoring only. • Consult your GP with regard to insulin doses. Beurer GL48/GL49... -
Page 6: Signs And Symbols
Medical device and precautions CE labelling This product satisfies the re- Dispose of packaging in an en- quirements of the applicable Eu- vironmentally friendly manner ropean and national directives. Beurer GL48/GL49... -
Page 7: Warnings And Safety Notes
Consult your GP regularly regarding your measured values. Never independently alter the procedures prescribed by your GP. • Despite the simple usage of the Beurer GL48/GL49 system for self-monitoring of blood glucose levels, you may possibly need to obtain instructions for using the system from your healthcare profes- sional (for example, your GP, chemist or diabetes consultant). - Page 8 • Very high levels of humidity may influence the test results. Relative humidity of more than 90% may lead to inaccurate results. Note • The Beurer GL48/GL49 measuring system is intended for measuring capillary and venous whole blood. Storage and maintenance Warning •...
- Page 9 Dispose of all blood samples and materials with which you or your patients come into contact correctly in order to prevent injury and infection of other persons. • After use, dispose of test strips and lancets in a puncture-proof container. Beurer GL48/GL49...
-
Page 10: Description Of Device And Accessories
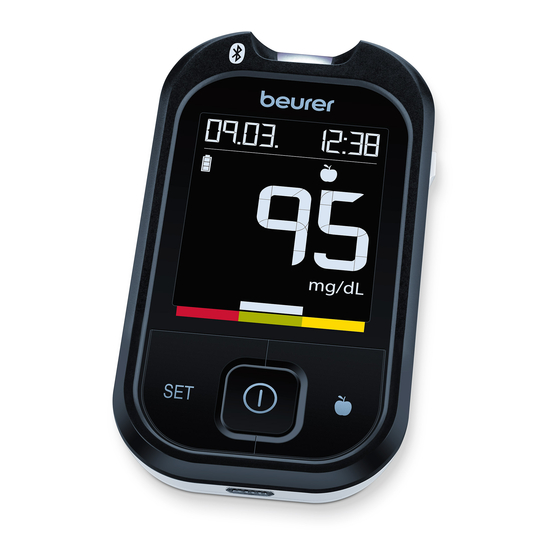
Front 1 Receptacle for test strips, illuminated 2 Test strip ejection slider 3 Display 4 Target scale 5 Highlighting button 6 On/Off button 7 PC connection 8 SET button 9 +/- button Rear 1 Battery compartment (bottom side) Beurer GL48/GL49... -
Page 11: Display Symbols
The monitor is supplied with the following basic settings: • Acoustic signal off • Backlighting off Warning Ensure that you are using the device with the correct blood glucose unit (either mg/dL or mmol/L) setting for you. If in doubt, consult your GP. Beurer GL48/GL49... -
Page 12: Test Strips
• You can touch any part of the test strip with clean, dry hands. • Do not bend, cut or otherwise modify the test strips. • Do not use test strips that have come into contact with fluids. Beurer GL48/GL49... -
Page 13: Initial Use And Basic Settings
• If “ ” appears on the display, the battery power level is so low that no more measurements are possible. 4.2 Making and changing basic settings Remove the batteries and reinsert them. Alternatively, press the SET but- ton [8]. The year display flashes. Beurer GL48/GL49... - Page 14 To switch the acoustic signal on/off, press the “+” or “–” button. “ ”, “ ” and the speaker symbol are displayed for switched on, and “ ” and “ ” are displayed for switched off. Confirm using the SET button [8]. The monitor is now ready for use. Beurer GL48/GL49...
-
Page 15: Taking The Blood Glucose Measurement
• Do not squeeze your finger to obtain a larger drop of blood. If squeezed, the blood is diluted with tis- sue fluid and this may lead to an incorrect measurement. • Please note that insufficient blood circulation at the puncture area, e.g. caused by cold temperatures or illness, may lead to incorrect results. Beurer GL48/GL49... - Page 16 The blood is sucked into the gap. Note Error message “002” appears on the display if the gap was not correctly and sufficiently filled with blood. Repeat the measurement using a new test strip and a greater penetration depth. Beurer GL48/GL49...
-
Page 17: Reading The Result And Labelling Measurements
After meals. General labelling (e.g. after exercising). Labelling measured values enables you, your GP or diabetes consultant to better monitor your blood glucose values. For example, you can display the average values of all measurements taken before meals. Beurer GL48/GL49... -
Page 18: Transfer Of Measurement Values With Bluetooth
Seek medical advice if dubious results persist. • Immediately seek medical attention if your symptoms are not in line with your measured blood glu- cose values and you have observed all instructions for the Beurer GL48/GL49 blood glucose measuring system. - Page 19 2 hours after a meal plicable. mmol/L over 140 mg/dL (7.8 mmol/L) High blood glucose level, Perform a ketone test. For this pur- possibly ketones pose, seek medical attention. 16 7 over 240 mg/dL mg/dL (13.3 mmol/L) mmol/L Beurer GL48/GL49...
-
Page 20: Functional Check Using Control Solution
Hold the monitor so that the display is facing you. Insert a test strip into the slot on the monitor with the contacts first. Ensure the front of the test strip is facing you (see “Test strip”, page 13). Beurer GL48/GL49... - Page 21 95% of all tests. Warning The specified value range (see test strip box) only applies for the control solution. This is not a rec- ommended value for your blood glucose level. Beurer GL48/GL49...
-
Page 22: Measurement Memory
The memory can store a maximum of 900 measured values. If the memory is full, the oldest value is replaced by the most recent value. You can call up every individual measured blood glucose value. You can also calculate and display the average blood glucose value for the last 7, 14, 30 and 90 days. Beurer GL48/GL49... -
Page 23: Displaying Individual Values
(image 2). 1 B 1 B 1 B 0026 12:38 0026 12:38 186 10 3 mg/dL mmol/L mg/dL mmol/L Image 1 09.03. 12:38 09.03. 12:38 10 3 mg/dL mmol/L Image 2 Beurer GL48/GL49... -
Page 24: Displaying Average Blood Glucose Values
Switch the monitor on using the On/Off button [4]. The initial display is shown briefly. Press the “+” rocker switch [6] twice. The measurement unit of the blood glucose value, “ ” and the average of all measured values are displayed. Beurer GL48/GL49... - Page 25 • the unit of measurement for blood glucose values and • “ ” are shown on the display. mg/dL mmol/L Press “+” [6] repeatedly to display the average blood glucose value from the last 14, 30 and 90 days for values labelled as “general” Beurer GL48/GL49...
-
Page 26: Transferring Measurement Values To The "Beurer Healthmanager App
8. Transferring of the measurement values begins as soon as you switch the device off, it has switched off automatically, the measured value memory is called up or you have pulled out the test strip. The Bluetooth symbol flashes during transfer. ® Beurer GL48/GL49... -
Page 27: Transferring Measurements To A Pc
6.5 Transferring measurements to a PC The GL48/GL49 measurement system includes a PC interface [5] that enables you to transfer measure-ment values saved on the device to a PC. (for the position of the connection port, see page 11). Beurer blood glucose diary software is available to download for free at www.beurer.com. -
Page 28: Storing, Maintaining And Disinfecting The Device
Storing Keep the Beurer GL48/GL49 measuring system in the case supplied after each measurement and do not expose it to direct sunlight. Note • Do not store the device, test strips and control solution in your vehicle, in the bathroom or in a cool- ing appliance! •... -
Page 29: What If There Are Problems
Customer Services. Problem: device does not switch on Cause Solution Batteries empty. Replace batteries. Incorrectly inserted or missing batteries. Check whether the batteries have been inserted correctly (see “Inserting and replacing the batter- ies” on page 14). Beurer GL48/GL49... -
Page 30: Technical Specifications
900 measured values with date/time Data retained when batteries are changed Average values for 7, 14, 30, 90 days Automatic switch-off 2 minutes after last actuation Storage/ Temperature: +2 °C – +30 °C transport temperature Relative humidity: < 90 % Beurer GL48/GL49... - Page 31 (0.6 microlitres) and the duration of measurement is approx. five seconds. The test strips detect blood glucose values from 20 to 630 mg/dL (1.1 to 35.0 mmol/L). Chemical components of the test strip sensor • FAD glucose dehydrogenase • Electron shuttle • Enzyme protector • Non-reactive components Beurer GL48/GL49...
-
Page 32: Comparison Of Measured Values With Laboratory Values
Precision Three lots of the GL48/GL49 blood glucose test strips have been tested to assess the precision of the GL48/GL49 blood glucose measuring system. This includes a repeat assessment using venous blood and a laboratory precision assessment using the control material. The blood glucose content of the ve-nous blood samples ranges from 45.0 to 365.0 mg/dL (2.5 to 20.3 mmol/... - Page 33 The GL48/GL49 blood glucose monitor compared to the Cobas hexokinase method. Three lots of GL48/GL49 blood glucose test strips have been tested to assess the system accuracy of the GL48/ GL49 blood glucose measuring system and to compare it with the reference method in which capillary whole blood concentrations of 36.3 mg/dL (2.0 mmol/L) to 597.0 mg/dL (33.1 mmol/L) have been used.
-
Page 34: Usage Limits For Specialist Personnel From The Healthcare Sector
2. Lipaemic samples: Cholesterol levels up to 500 mg/dL (13 mmol/L) and triglycerid levels up to 1,000 mg/dL (11.4 mmol/L) do not influence the results. Severely lipaemic blood samples were not tested with the Beurer GL48/GL49 blood glucose measuring system; therefore, using the device with these samples is not recommended. - Page 35 (0.28 mmol/L) 5.8 mg/dL 6.4% (0.32 mmol/L) Sodium salicylate 160 mg/dL (8.88 mmol/L) -6.2 mg/dL -5.0% (-0.34 mmol/L) Salicylic acid 60 mg/dL (3.33 mmol/L) 2.4 mg/dL 2.5% (0.13 mmol/L) Tolbutamide 64 mg/dL (3.55 mmol/L) -1.0 mg/dL -2.6% (-0.05 mmol/L) Beurer GL48/GL49...
-
Page 36: Proper Use
Change the puncture area each time you take a measurement, e.g. use a different finger or the other hand. Repeatedly using the same area may cause inflammation, numbness or scarring. Make sure the puncture area is hygienically clean. Beurer GL48/GL49... -
Page 37: Warnings And Safety Notes
When testing that the device functions correctly, make sure that there is NOT a lancet inserted in the lancing device. If you have any doubts about whether the lancing device is working correctly, please contact our Customer Service team specified in these instructions for use. Beurer GL48/GL49... -
Page 38: Usage
Turn the moving upper part of the cap until the desired penetration depth is displayed. Pull the tensioning device back until it audibly engages. Release the tensioning device. This automatically snaps back into the default po- sition. The lancing device is now ready for use. Beurer GL48/GL49... -
Page 39: Post-Processing And Disposal
Carefully dispose of all blood samples and materials with which you or your patient have come into contact. Dispose of the lancet in a punc- ture-proof container. This prevents injuries and the infection of others. Place the cap back onto the lancing device. Beurer GL48/GL49... -
Page 40: Cleaning And Maintenance
A warranty claim shall only be considered if the buyer can provide Beurer, or an authorised Beurer part- ner, with – a copy of the invoice/purchase receipt, and – the original product. Beurer GL48/GL49... - Page 41 Google Play and the Google Play logo are trademarks of Google LLC. Android is a trademark of Google LLC. Current status of service addresses Aktueller Stand der Serviceadressen Adresses du service actuelles Stato attuale degli indirizzi di servizio Estado actual de las direcciones de servicio www.beurer.com/service Beurer GL48/GL49...
- Page 42 Beurer GmbH Söflinger Straße 218 89077 Ulm, Germany • • www.beurer.com www.beurer-healthguide.com • Lancet needles / Lanzetten / lancettes / lancetas / lancette: Beurer GmbH • Söflinger Straße 218 • 89077 Ulm, Germany www.beurer.com • www.beurer- healthguide.com...
Need help?
Do you have a question about the GL48 and is the answer not in the manual?
Questions and answers