Bestway 58498 Owner's Manual
Sand filter
Hide thumbs
Also See for 58498:
- Owner's manual (56 pages) ,
- Owner's manual (41 pages) ,
- Owner's manual (29 pages)
Table of Contents
Advertisement
Available languages
Available languages
Quick Links
Advertisement
Table of Contents

Related Manuals for Bestway 58498


Summary of Contents for Bestway 58498
- Page 1 WE SUGGEST NOT TO RETURN THE PRODUCT TO THE STORE QUESTIONS? PROBLEMS? MISSING PARTS? For FAQ, Manuals, Videos Or Spare Parts, Please Visit bestwaycorp.com/support 58498 Hmax 1.5 m OWNER’S MANUAL bestwaycorp.com/support Visit Bestway YouTube channel...
-
Page 2: Important Safety Instructions
SAND FILTER OWNER’S MANUAL Visit Bestway YouTube WE SUGGEST NOT TO RETURN channel THE PRODUCT TO THE STORE QUESTIONS? PROBLEMS? MISSING PARTS? For FAQ, Manuals, Videos Or Spare Parts, Please Visit bestwaycorp.com/support SAFETY INSTRUCTIONS WARNING IMPORTANT SAFETY INSTRUCTIONS When installing and using this electrical equipment,... - Page 3 30 mA. Please examine and verify all sand filter components are present before use. Notify Bestway at the customer service address listed on this manual for any damaged or missing parts at the time of purchase.
-
Page 4: Specifications
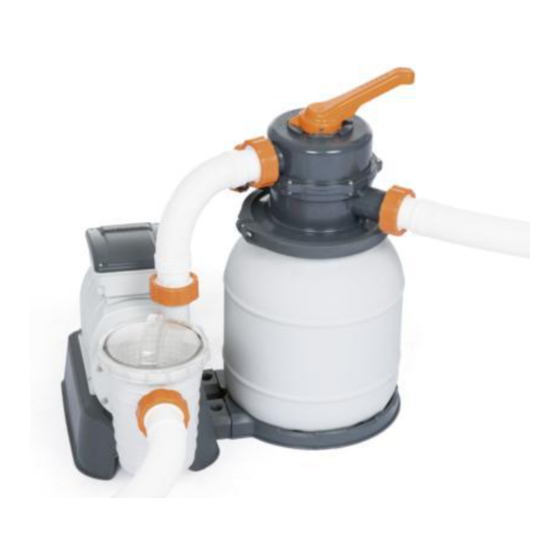
AGAINST SHOCK HAZARD, USE ONLY IDENTICAL REPLACEMENT PARTS WHEN SERVICING. • WARNING: RISK OF ELECTRIC SHOCK. CONNECT ONLY TO A GROUNDING TYPE RECEPTACLE PROTECTED BY A GROUND-FAULT CIRCUIT INTERRUPTER (GFCI). • CAUTION: THIS PUMP IS FOR USE WITH STORABLE POOLS ONLY - DO NOT USE WITH PERMANENTLY-INSTALLED POOLS. - Page 5 REF.NO SPARE PART NO. P03831 P61138ASS16 P03832 P61209ASS16 P03837 P03838 P61211ASS16 P6581ASS16 P6580ASS16 P03839 P6614ASS16 P6029ASS16 P03830 P61214ASS16 P03841 P03829 P6916ASS16 P6124ASS16 P6561ASS16 P6562ASS16 P6563ASS16 P04319 P03836 P6517ASS16 P6680ASS16 P61322ASS16 P61318ASS16 (P6680ASS16) (P61322ASS16) (P61318ASS16) P6019ASS16 P61408ASS16 P6005ASS16 ASSEMBLY (You will need a screwdriver.) 86 mm 1.
- Page 6 3. The sand filter must be vertically fixed on ground or a certain pedestal made of wood or concrete before use to prevent the sand filter from accidentally falling. Fully assembled sand filter will exceed 18 kg. The mounting holes should be 8 mm in diameter and spaced 86 mm apart.
- Page 7 MAX. MIN . CONNECT TO THE POOL FOR POOL WITH 2 VALVES...
- Page 8 Garden hose (not included) For Drain, Backwash, Rinse function FOR POOL WITH 3 VALVES Garden hose (not included) For Drain, Backwash, Rinse function P6680ASS16...
-
Page 9: Operation
FOR POOL WITH 32 MM (1.25 IN.) VALVE P61318ASS16 P61322ASS16/P6680ASS16 P6916ASS16 STOP Before switching on, please read the manual carefully. OPERATION CONTROL VALVE OVERVIEW WARNING: To prevent equipment damage and possible injury, always switch off sand filter before changing the Control Valve function. Changing valve positions while the pump is running can damage the Control Valve, which may cause personal injury or property damage. - Page 10 Filter: Closed: This function is used to filter pool This function stops water flowing water and should be positioned here 99% of between the sand filter and the pool. the time. Water is pumped through the sand filter, where it is cleaned and returned to the pool.
- Page 11 NOTE: • Be sure all provisions for wastewater disposal meet applicable local, state or national codes. Do not discharge water where it will cause flooding or damage. • When the Control Valve is set to the Backwash, Rinse, or Drain position, water will discharge from Port D on the Control Valve.
- Page 12 1. Now the sand filter is ready for use. Set the Control Valve to the Filter function. NOTE: To prevent the risk of electrical shock dry any excess water from yourself and the sand filter. 2. Switch on the sand filter to run it. NOTE: The sand filter has now started its filtering cycle.
- Page 13 5. Put the Strainer back into position. Ensure the hole in the strainer is aligned. 6. Ensure the Seal Ring is in place. Secure the Strainer Cover back. 7. Open the connection valves. NOTE: The Strainer must be emptied and cleaned periodically.
-
Page 14: Troubleshooting
TROUBLESHOOTING Problems Probable Causes Solutions - Recommend 0.45 mm to 0.85 mm #20 silica - Sand is too small sand - Move the control valve from the - Stop the sand filter every time set the Sand is flowing to backwash to the filter function control valve the pool... -
Page 15: Importantes Consignes De Sécurité
Visitez la chaîne YouTube NOUS SUGGÉRONS DE NE PAS RAMENER LE PRODUIT AU MAGASIN DES QUESTIONS ? DES PROBLÈMES ? de Bestway DES PIÈCES MANQUANTES ? Pour les FAQ, les notices, les vidéos ou les pièces détachées, veuillez visiter bestwaycorp.com/support CONSIGNES DE SÉCURITÉ... - Page 16 30 mA. Contrôlez et vérifiez SVP que tous les composants du filtre à sable sont présents avant l’utilisation. Informez Bestway à l’adresse du service clientèle répertoriée dans ce manuel en cas de dommage ou de pièces manquantes au moment de l'achat.
-
Page 17: Spécifications
BRANCHEZ QUE SUR UNE PRISE DE TERRE PROTÉGÉE PAR UN DISJONCTEUR DE FUITE DE TERRE (GFCI). • MISE EN GARDE : CETTE POMPE NE DOIT ÊTRE UTILISÉE QU’AVEC LES PISCINES DÉMONTABLES – NE L’UTILISEZ PAS AVEC DES PISCINES INSTALLÉES DE MANIÈRE PERMANENTE. -
Page 18: Montage
RÈF.N° PIÈCE DE RECHANGE N° P03831 P61138ASS16 P03832 P61209ASS16 P03837 P03838 P61211ASS16 P6581ASS16 P6580ASS16 P03839 P6614ASS16 P6029ASS16 P03830 P61214ASS16 P03841 P03829 P6916ASS16 P6124ASS16 P6561ASS16 P6562ASS16 P6563ASS16 P04319 P03836 P6517ASS16 P6680ASS16 P61322ASS16 P61318ASS16 (P6680ASS16) (P61322ASS16) (P61318ASS16) P6019ASS16 P61408ASS16 P6005ASS16 MONTAGE (Vous aurez besoin d’un tournevis.) 86 mm 1. - Page 19 3. Le standard TEST demande que le filtre à sable soit fixé en position verticale sur le sol ou sur un support en bois ou en béton avant de l’utiliser, afin d’éviter qu’il ne tombe accidentellement. Le filtre à sable complètement monté dépasse les 18 kg.
- Page 20 MAX. MIN . RACCORDEZ À LA PISCINE POUR LA PISCINE AVEC 2 VANNES...
- Page 21 Tuyau d’arrosage (il n’est pas fourni avec) Pour la fonction de vidange, lavage à contre-courant et rinçage POUR LA PISCINE AVEC 3 VANNES Tuyau d’arrosage (il n’est pas fourni avec) Pour la fonction de vidange, lavage à contre-courant et rinçage P6680ASS16...
- Page 22 POUR PISCINE AVEC VANNE DE 32 MM (1,25 PO) P61318ASS16 P61322ASS16/P6680ASS16 P6916ASS16 STOP Avant d’allumer, veuillez lire attentivement la notice. FONCTIONNEMENT VUE D’ENSEMBLE DE LA SOUPAPE DE RÉGLAGE AVERTISSEMENT: Pour éviter des dommages à l’appareil et de possibles blessures, débranchez chaque fois la pompe du filtre à...
- Page 23 Filtration : Fermeture : Cette fonction est utilisée pour Cette fonction arrête le filtrer l’eau et de la piscine et la soupape est passage de l’eau entre le filtre à sable et la sur ce réglage 99% des fois. L’eau est piscine.
- Page 24 REMARQUE : • Contrôlez que toutes les dispositions d’évacuation des eaux usées suivent les réglementations locales ou nationales. N’éliminez pas l’eau là où elle pourrait provoquer une inondation ou des dégâts. • Quand la soupape de réglage est réglée sur la position Lavage à contre-courant, Rinçage ou Drainage, l’eau est évacuée par l’orifice D de la soupape de réglage.
- Page 25 1. Le filtre à sable est prêt pour l’utilisation. Réglez la soupape de réglage sur la fonction Filtration. REMARQUE : Pour éviter les risques d’électrocution, séchez l’eau sur vous-même et sur le filtre à sable. 2. Allumez le filtre à sable pour le faire fonctionner.
- Page 26 5. Remettez le tamis en place. Assurez-vous que le tamis soit aligné. 6. Assurez-vous que la bague d’étanchéité soit en place. Vissez le couvercle du tamis. 7. Ouvrez les soupapes de connexion. REMARQUE : Le tamis doit être vidé et nettoyé...
-
Page 27: Dépannage
DÉPANNAGE Problèmes Éventuelles causes Solutions - Sable de silice n° 20 de 0,45 à 0,85 mm - Le sable est trop petit recommandé - Déplacez la vanne de commande - Arrêtez le filtre à sable chaque fois que vous Le sable s’écoule de la fonction contre-courant à... - Page 28 Distributed in Australia & New Zealand by Bestway Australia Pty Ltd, Unit 2/98-104 Carnarvon St Silverwater, NSW 2128, Australia Tel: Australia: (+61) 29 0371 388; New Zealand: 0800 142 101 Distributed in United Kingdom by Bestway Corp UK Ltd. 8 Wentworth Road, Heathfield Industrial Estate, Newton Abbot, Devon, TQ12 6TL Exported by/Exporté par Bestway (Hong Kong) International Ltd./Bestway Enterprise Company Limited...
Need help?
Do you have a question about the 58498 and is the answer not in the manual?
Questions and answers