Table of Contents
Advertisement
Quick Links
Advertisement
Table of Contents

Related Manuals for Bartscher 1500/17


Summary of Contents for Bartscher 1500/17
- Page 1 1500/17 - 3000/25 110431 - 110432...
- Page 2 Bartscher GmbH Phone: +49 5258 971-0 Franz-Kleine-Str. 28 Fax: +49 5258 971-120 Technical Support Hotline: +49 5258 971-197 D-33154 Salzkotten Germany www.bartscher.com Version: 2.0 Date of preparation: 2022-04-19...
-
Page 3: Table Of Contents
Original instruction manual Safety ......................2 Explanation of Signal Words ..............2 Safety instructions..................3 Intended Use ................... 5 Unintended Use ..................5 General information ..................6 Liability and Warranty ................6 Copyright Protection ................6 Declaration of Conformity ................ 6 Transport, Packaging and Storage .............. -
Page 4: Safety
Safety Diese Bedi enungsanlei tung besc hrei bt di e Installation, Bedi enung und Wartung des Geräts und gilt als wic htige Infor mationsquelle und N achschl agewer k. Di e Kenntnis aller enthaltenen Sic herheits hinweis e und H andlungs anweisungen schafft die Vorauss etz ung für das sichere und s ac hger echte Ar beiten mit dem Gerät. D arüber hi naus müs sen die für den Ei ns atz ber eic h des Geräts geltenden ör tl ichen Unfall verhütungs vorsc hriften und allgemeinen Sicherheits besti mmungen eing ehalten wer den. Dies e Bedi enungs anleitung is t Bes tan dteil des Produkts und muss i n unmi ttelbarer N ähe des Ger äts für das In¬s tall ations-, Bedi enungs-, Wartungs- und R einigungspers onal jederzeit z ugänglich auf¬bewahrt werden. Wenn das Ger ät an eine dritte Pers on weiterg egeben wird, muss die Bedi enungsanlei tung mit ausgehändigt wer den. -
Page 5: Safety Instructions
Safety CAUTION! The signal word CAUTION warns against hazards that may lead to light or moderate injuries if the hazards are not avoided. , di e IMPORTANT! The signal word IMPORTANT indicates possible property damages, which may occur if safety instructions are not observed. NOTE! The symbol NOTE indicates subsequent information and guidelines for the user on usage of the appliance. - Page 6 Safety • Check the power cord regularly for damage. Do not use the appliance if the power cord is damaged. If this cable is damaged, it must be replaced by customer service or a qualified electrician in order to avoid dangers. Supervised Usage only •...
-
Page 7: Intended Use
Safety Intended Use As described below, every use of the appliance for a purpose differing and/or diverging from its intended standard use, is prohibited and considered to be an unintended use. The following is an intended use: – Drying and polishing of washed stainless steel and silver cutlery. Unintended Use An unintended use may lead to personal injuries or property damages caused by hazardous voltage, fire or high temperature. -
Page 8: General Information
General information General information Liability and Warranty All information and instructions in this instruction manual account for legal regulations in force, current level of technical engineering knowledge as well as our expertise and experience, developed over the years. If special models or additional options are ordered, or state-of-the-art technical solutions were implemented, the actual scope of delivery of the appliance may, in some circumstances, differ from descriptions and numerous drawings in this instruction manual. -
Page 9: Transport, Packaging And Storage
Transport, Packaging and Storage Transport, Packaging and Storage Delivery Check Immediately upon reception, check the delivery for completeness and possible shipping damage. In the case of visible transport damage refuse to accept the appliance or accept it conditionally. Mark and note the scope of damage in shipping documents/consignment list of the shipping company and lodge a complaint. -
Page 10: Technical Data
Technical Data Technical Data Technical Specifications Cutlery polishing machine Name: 1500/17 110431 Art. No.: Material: stainless steel Quantity of maize granulate, in kg: Cutlery input opening width, in mm: Cutlery output opening width, in mm: Maximum output, number of cutlery pieces /... -
Page 11: Functions Of The Appliance
Technical Data Version / Characteristics 110431-110432 • Polishing/drying method: heated maize granulate • Fan for granulate removal • UV lamp for cutlery disinfection • ON/OFF switch • Indicator lights: – temperature – heating-up – ready for operation – warning • Features: –... -
Page 12: List Of Components Of The Appliance
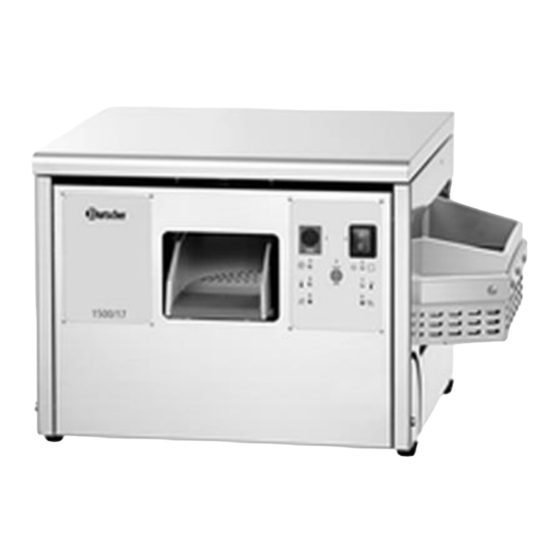
Technical Data List of Components of the Appliance Cutlery polishing machine 110431 Fig. 1 1. Housing 2. Cutlery input opening 3. Feet (4 pcs) 4. Control panel 5. Cutlery output opening 6. Cutlery collection basket 7. Maize granulate 10 / 26 110431... - Page 13 Technical Data Cutlery polishing machine 110432 Fig. 2 1. Housing 2. Cutlery input opening 3. Feet (4 pcs) 4. Control panel 5. Cutlery output opening 6. Cutlery collection sieve 7. Cutlery collection basket 8. Maize granulate 110431 11 / 26...
-
Page 14: Installation And Operation
Installation and operation Installation and operation Installation Unpacking / Positioning • Unpack the appliance, remove all external and internal packaging elements and shipment safeguards. CAUTION! Choking hazard! Prevent children from accessing package materials, for instance: plastic bags and EPS. • If the appliance is covered with a protective film, remove it. - Page 15 Installation and operation Transport Protection Removal CAUTION! If the transport protection is not removed or if it is not fully removed, this may lead to the appliance being damaged. Before starting the appliance, remove entire transport protection. Keep all elements for re-use if the appliance is to be transported again or moved to another location.
-
Page 16: Operation
Installation and operation Operation Appliance Preparation 1. Before use, clean the appliance and accessories thoroughly, following indications in section 6 'Cleaning and Maintenance'. 2. To end with, dry the appliance and accessories thoroughly. Operating Elements / LED Indicator Lights Fig. 4 Symbol Description Fuse... - Page 17 Installation and operation Symbol Description START / END key The appliance is switched on by pressing this key. By pressing this key during the operation, the appliance is being switched off; the maize granulate is dried for approx. 10 minutes before the appliance is switched off. UV lamp LED indicator light When the appliance is switched on, it indicates that the UV lamp is working.
- Page 18 Installation and operation Operation Description Switch-On Phase 1. Plug the appliance into a suitable single socket. 2. Press the ON/OFF switch (2) to switch the appliance on. The cutlery polishing machine is ready for operation. 3. Press the 'START' key (3) to start the appliance. Drying Cycle 1.
- Page 19 Installation and operation CAUTION! Never leave the cutlery polishing machine on if the drier's drum has not been filled with the maize granulate to avoid overheating and damaging the housing of the drier's drum. Loading the Cutlery Polishing Machine 1. Switch the appliance on by pressing the ON/OFF switch (2). 2.
- Page 20 Installation and operation Cutlery Drying / Cutlery Output Cutlery goes into the drier’s drum with the maize granulate and is dried there (Fig. 10). Fig. 7 Fig. 8 After the drying phase, cutlery leaves the cutlery polishing machine through the cutlery output opening and go to the cutlery collection basket (Fig.
- Page 21 Installation and operation 1. If a cutlery piece is stuck in the appliance and it blocks the transport channel, open the appliance cover. As soon as the cover is opened, a micro- switch in the cover disconnects the motor and heating element. 2.
- Page 22 Installation and operation The method of replacing the maize granulate: 1. Remove the plug from the socket. Fig. 11 Fig. 12 2. Open the cover of the appliance (Fig. 11). 3. Undo the fastening knob (A) of the drier's drum cover. 4.
-
Page 23: Cleaning
Cleaning Cleaning Safety Instructions for Cleaning • Before cleaning, disconnect the appliance from the power supply. • Leave the appliance to cool down completely. • Make sure water does not enter the appliance. Do not immerse the appliance in water or other liquids during cleaning. Do not clean the appliance with a pressurized water jet. - Page 24 Cleaning 4. Loosen the bottom side bolts (Fig. 13). 5. Use a soft cloth and carefully wipe dust off of the fluorescent tube that might have accumulated, for example, during operation. NOTE! If possibly, try not to touch the fluorescent tube with your hands. Fig.
-
Page 25: Possible Malfunctions
Possible Malfunctions Possible Malfunctions Mögliche The table below contains descriptions of possible causes and solutions to malfunctions or errors during operation of the appliance. When malfunction cannot be removed, contact the technical service. In such a case, provide article number, model name and serial number. These data may be found in the rating plate. - Page 26 Possible Malfunctions Symbol Problem Possible Cause Solution Flashing indicates Disconnect the that the motor is appliance from mains blocked power supply and make sure there are no cutlery pieces in the LED 9 drier's drum that would indicator light hinder motor rotations is flashing Otherwise, contact the service company in...
- Page 27 Possible Malfunctions Symbol Problem Possible Cause Solution If all the indicated Replace the maize LED indicator lights granulate and reset the are flashing (4, 5, 6, hour counter (following LED 4, 5, 6, 7, 8, 9), you need to indications in sections 4+5+ 7, 8, 9 replace the maize...
-
Page 28: Disposal
Disposal Disposal Electrical Appliance Electric appliances are marked with this symbol. Electrical appliances must be disposed of and recycled in a correct and environmentally friendly manner. You must not dispose of electric appliances with household waste. Disconnect the appliance from the power supply and remove power cord from the appliance.
Need help?
Do you have a question about the 1500/17 and is the answer not in the manual?
Questions and answers