Redline Tuning QuickLIFT Installation Manual
Hide thumbs
Also See for QuickLIFT:
- Installation manual ,
- Installation manual (2 pages) ,
- Installation manual (4 pages)
Advertisement
Table of Contents
- 1 Step 1 - Unpack Quicklift System and Verify Contents
- 2 Step 2 - Gather the Required Tools
- 3 Step 3 - Mount Hood Brackets
- 4 Step 4 - Install LH (Driver’s Side) Lower Bracket
- 5 Step 5 - Install RH (Passenger Side) Lower Bracket
- 6 Step 5 - Continued...
- 7 Step 6 - Install Gas Springs
- Download this manual
Rev. 1.0 5/2022
21-11041
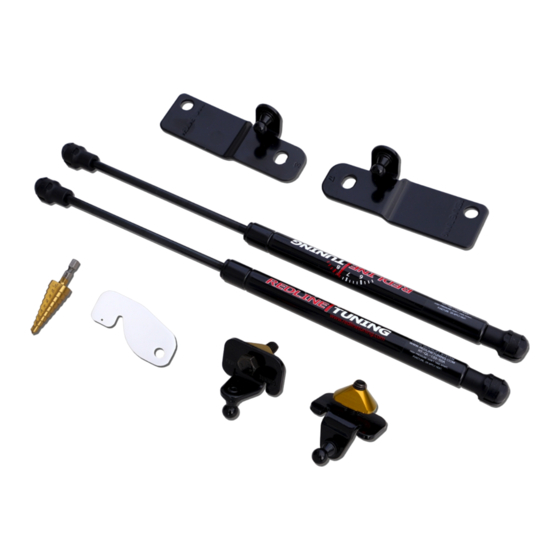
Step 1 - Unpack QuickLIFT System and verify contents.
Remove all items from the packing tube. You should have the
following before beginning:
* (2) Gas-springs
* (1) Hood RH Bracket
* (1) Hood LH Bracket
* (1) Bolt/washer/nut pair
* (1) Fender LH Bracket
* (1) Fender RH Bracket
* Printed Instructions
Step 2 - Gather the required tools.
* 10mm, 13mm sockets and 13mm open wrench
Step 3 - Mount hood brackets
A. Remove the upper hood hinge nut using a 13mm socket wrench.
B. Place LH hood bracket over the upper bolt such that the ball-stud is
aiming inward as shown. Tighten down with same 13mm socket
keeping bracket parallel to hinge. All brackets are labeled in Step 1.
C. Repeat for the passenger side of vehicle (RH hood bracket).
This manual is property of Redline Tuning LLC. Any unauthorized duplication or use
without written permission from Redline Tuning LLC, violates Copyright laws.
Copyright © 2022 Redline Tuning LLC. All Rights Reserved.
QL-133-33A
32-00012
32-00013
55-00042
55-00042
32-00046
(LH/RH Fender)
32-00047
72-00002
2022+ Ford Maverick
QuickLIFT Installation Guide
(1) 32-00012
(RH Hood)
(1) 32-00047
(RH Fender)
QL-133-33A
(1) 32-00013
(LH Hood)
(1) 32-00046
(LH Fender)
72-00002
Advertisement
Table of Contents

Related Manuals for Redline Tuning QuickLIFT


Summary of Contents for Redline Tuning QuickLIFT
- Page 1 This manual is property of Redline Tuning LLC. Any unauthorized duplication or use Rev. 1.0 5/2022 without written permission from Redline Tuning LLC, violates Copyright laws. 21-11041 Copyright © 2022 Redline Tuning LLC. All Rights Reserved. 2022+ Ford Maverick QuickLIFT Installation Guide Step 1 - Unpack QuickLIFT System and verify contents.
- Page 2 Step 4 - Install LH (driver’s side) lower bracket A. Locate tab under fender lip shown in Figure 1. B. Place LH fender bracket on top of fender tab shown. Attach bracket using bolt/washer/nut as shown. 13mm socket wrenches on upper lower needed to tighten assembly.
- Page 3 Step 5 - Continued... E. Bracket shown in the installed position. Washer bottle is now retained as it was before with mounting bracket on top. Step 6 - Install Gas Springs A. The gas springs install with the large housing attached to the TOP or hinge ball-stud. The strut extension attaches to the fender ball-stud.
Need help?
Do you have a question about the QuickLIFT and is the answer not in the manual?
Questions and answers