Table of Contents
Advertisement
Available languages
Available languages
Quick Links
Advertisement
Table of Contents

Subscribe to Our Youtube Channel
Related Manuals for Moretti ARDEA MOBILITY 210


Summary of Contents for Moretti ARDEA MOBILITY 210
- Page 1 SCOOTER ELETTRICO MOBILITY 210 MANUALE DI ISTRUZIONI...
-
Page 2: Table Of Contents
INDICE 1. CODICE ..............................PAG.3 2. INTRODUZIONE............................. PAG.3 3. DESTINAZIONE D'USO ......................... PAG.3 4. DICHIARAZIONE DI CONFORMITÀ UE ....................PAG.3 4.1 Norme e direttive di riferimento ....................pag. 4 5. AVVERTENZE GENERALI ........................PAG.4 6. SIMBOLOGIA UTILIZZATA ........................PAG.4 7. DESCRIZIONE GENERALE ........................PAG.5 8. -
Page 3: Codice
4. DICHIARAZIONE DI CONFORMITÀ UE La MORETTI SpA dichiara sotto la sua esclusiva responsabilità che i prodotti fabbricati ed immessi in commercio dalla stessa MORETTI SpA. e facenti parte della famiglia SCOOTER ELETTRICI – ARDEA MOBILITY sono conformi alle disposizioni applicabili del regolamento 2017 /745 sui DISPOSITIVI MEDICI del 5 aprile 2017. -
Page 4: Norme E Direttive Di Riferimento
4.1 Norme e direttive di riferimento Per garantire gli standard di sicurezza per gli utilizzatori, Moretti S.p.A. rispetta le norme: - EN 12184:2014; - EN 60601-1:2007; - EN 60601-1-2:2006. 5. AVVERTENZE GENERALI ATTENZIONE! Prestare sempre molta attenzione alla presenza di parti in movimento che potrebbero causare intrappolamenti agli arti e lesioni personali. -
Page 5: Descrizione Generale
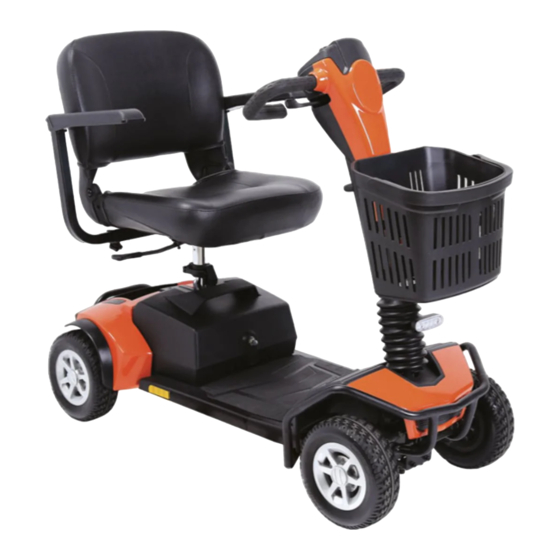
Smaltimento prodotto secondo la direttiva CE/19/2012 Parte applicata di tipo B 0197 Classe di protezione IPX4 Peso max supportato 7. DESCRIZIONE GENERALE Immagine a scopo illustrativo... -
Page 6: Dichiarazione Di Compatibilità Elettromagnetica
8. DICHIARAZIONE DI COMPATIBILITÀ ELETTROMAGNETICA Lo Scooter CN210X è progettato per essere utilizzato nell’ambiente elettromagnetico specificato nelle tabelle che seguono. L’utilizzatore delIo Scooter CN210X deve assicurarsi che venga effettivamente utilizzato nelle condizioni specificate. Tabella 1 GUIDA E DICHIARAZIONE DEL COSTRUTTORE-EMISSIONI ELETTROMAGNETICHE Lo Scooter CN210X è... - Page 7 Tabella 2 GUIDA E DICHIARAZIONE DEL COSTRUTTORE-EMISSIONI ELETTROMAGNETICHE Lo Scooter CN210X è previsto per funzionare nell'ambiente elettromagnetico sotto specificato. Il cliente o l'utilizzatore del dispositivo deve garantire che esso venga usato in tale ambiente. AMBIENTE LIVELLO DI PROVA LIVELLO DI PROVE DI IMMUNITÀ...
- Page 8 Tabella 3 GUIDA E DICHIARAZIONE DEL COSTRUTTORE-IMMUNITÀ ELETTROMAGNETICA Lo Scooter CN210X è previsto per funzionare nell'ambiente elettromagnetico sotto specificato. Il cliente o l'utilizzatore del dispositivo dovrebbe assicurarsi che esso venga utilizzato in tale ambiente. LIVELLO DI PROVA LIVELLO DI AMBIENTE PROVE DI IMMUNITÀ...
- Page 9 Tabella 4 DISTANZE DI SEPARAZIONE RACCOMANDATE TRA APPARECCHI DI RADIOCOMUNICAZIONE PORTATILI E MOBILI E LO SCOOTER CN210X LO SCOOTER CN210X È PREVISTO PER FUNZIONARE IN UN AMBIENTE ELETTROMAGNETICO IN CUI SONO SOTTO CONTROLLO I DISTURBI IRRADIATI RF. IL CLIENTE O L’UTILIZZATORE DELLO SCOOTER CN210X PUÒ...
-
Page 10: Sicurezza
9. SICUREZZA Usare sempre la cintura Non utilizzare lo scoo- di sicurezza, e tenere ter sotto l'influenza di sempre i piedi appog- alcool giati sullo scooter Assicurarsi che non ci Non utilizzare trasmetti- siano ostacoli nelle pros- tori radio elettronici simità... -
Page 11: Avvertenze Per L'utilizzo
10. AVVERTENZE PER L'UTILIZZO 10.1 Avvertenze generali 1. Non utilizzare lo scooter su strade di pubblico transito. Siate consapevoli che può essere difficile per il traffico vedervi quando siete seduti sullo scooter. Usare sempre percorsi pedonali. Attenersi a tutte le regole del traffico pedonale. Attendere fino a quando il vostro percorso è... -
Page 12: Prima Di Ogni Uso
10.3 Prima di ogni uso 1. Verificare il corretto gonfiaggio dei pneumatici, se presenti. 2. Controllare tutti i collegamenti elettrici e assicurarsi che siano tutti ben collegati e non corrosi. 3. Controllare tutti i collegamenti del cablaggio e assicurarsi che siano fissati correttamente. 4. - Page 13 A) Regolazione della velocità • La manopola di regolazione della velocità consente di preselezionare la velocità dello scooter. • Ruotare la manopola in senso orario per aumentare la velocità. • Ruotare la manopola in senso anti-orario per diminuire la velocità. •...
-
Page 14: Regolazione Dello Sterzo
11.2 Regolazione dello sterzo Grazie alla manopola di regolazione, il manubrio può essere inclinato in varie angolazioni. Per la regolazione seguire le seguenti istruzioni: 1. Usare una mano per afferrare il manubrio; 2. Usare l'altra mano per spingere e mantenere verso il basso la manopola di regolazione; 3. -
Page 15: Regolazione Del Sedile
11.4 Regolazione del sedile LEVA DI ROTAZIONE DEL SEDILE Il sedile può essere ruotato di 360 ° e bloccato ogni 45 °: 1. Premere verso il basso la leva, e ruotare il sedile fino alla posizione desiderata (Fig.3). 2. Rilasciare la leva per bloccare il sedile in posizione ogni 45°. -
Page 16: Funzione Blocco/Sblocco Ruote
11.5 Funzione blocco/sblocco ruote Lo scooter è dotato di una leva di sblocco ruote che può impostare lo scooter in modalità blocco/ sblocco ruote. (Fig.7) (immagini a scopo illustrativo) • Per disinnestare il freno di stazionamento e mettere lo scooter in modalità di sblocco ruote spingere in basso la leva verso la lettera N (Fig.7). - Page 17 Lo scooter CN210X ha una struttura che può essere facilmente smontata e trasportata. Il prodotto risulta composto come in Fig.8: Trasmissione Sedile Pacco batteria Struttura Cestino (Fig.8) (immagine a scopo illustrativo) REINSTALLARE LA TRASMISSIONE • Allineare telaio e trasmissione (Fig.9). •...
- Page 18 INSTALLARE IL GRUPPO BATTERIE • Abbassare delicatamente il gruppo batterie sullo scooter (Fig.11). (Fig.11) (immagine a scopo illustrativo) INCLINARE IL MANUBRIO • Allentare la manopola di regolazione del manubrio e sollevare il manubrio (Fig.12). • Raggiunta la posizione desiderata, stringere la manopola di regolazione del manubrio. Cestino Manopola di regolazione...
- Page 19 POSIZIONARE IL SEDILE • Tenere il sedile inclinato in modo da vedere la sede del perno girevole al di sotto. • Posizionare la sede del perno girevole nella base del sedile (Fig.13). Perno Sede perno (Fig.13) (immagine a scopo illustrativo) ATTENZIONE! •...
-
Page 20: Smontaggio
12.2 Smontaggio Eseguire il processo di montaggio (paragrafo 12.1) in ordine inverso. 13. GUIDARE 13.1 Salire e scendere NOTA: Per la sua prima sessione di guida, verifichi che lo scooter venga azionato su una superficie piana e che continuerà a guidare su una superficie piana. PRIMA DI SALIRE SULLO SCOOTER •... -
Page 21: Guida Di Base
SCENDERE DALLO SCOOTER • Verificare che l’apparecchio sia spento e la chiave estratta dall’apposito interruttore; • Riportare il manubrio in posizione verticale; • Sollevare o rimuovere i braccioli; • Slacciare la cintura di sicurezza; • Appoggiare cautamente un piede a terra, trasferire il peso sulla gamba e alzarsi lentamente; •... -
Page 22: Controllo Attraverso Le Strettoie
13.4 Controllo attraverso le strettoie Usando lo scooter per aumentare sensibilmente la propria mobilità, ci si imbatterà senza dubbio in alcuni ostacoli che richiederanno una certa pratica per manovrare lo scooter in maniera disinvolta e sicura. Troverà elencati di seguito una serie di ostacoli comuni nei quali potrebbe imbattersi nel corso dell’uso quotidiano del suo scooter. - Page 23 • Mai tagliare trasversalmente una superficie in pendenza in nessuna direzione; • Non tentare di passare su una discesa ricoperta di neve, ghiaccio, erba tagliata di fresco, foglie o altri materiali potenzialmente pericolosi; • Non fare marcia indietro su una discesa; •...
-
Page 24: Impianto Frenante Del Motore
13.6 Impianto frenante del motore Lo scooter è dotato di un sistema che si serve del motore per facilitare la frenatura. L'impianto frenante del motore è progettato per funzionare quando la chiave è sia in "posizione On" che in "posizione Off". Quando la chiave si trova in "posizione On", lo sblocco ruote si trova in posizione di blocco e lo scooter è... -
Page 25: Pulizia
15. PULIZIA 15.1 Pulizia pneumatici Pulire gli pneumatici con comuni detergenti da cucina e un panno umido. Non utilizzare solventi con gli pneumatici. I solventi potrebbero danneggiare o ammorbidire il materiale degli pneumatici. 15.2 Pulizia corpo • Pulire il corpo dello scooter con un panno umido. Non lavare lo scooter usando un tubo di gomma. Asciugare con un panno morbido e pulito;... -
Page 26: Controlli E Promemoria
Spazzola usurata tappo della spazzola Spazzola nuova 16.1 Controlli e promemoria • Assicurarsi di mantenere il controller pulito, proteggendolo da pioggia o acqua. Non esporre mai lo scooter a diretto contatto con l'acqua. • Tenere le ruote pulite da residui, capelli, sabbia e fibre di tappezzeria. •... -
Page 27: Batteria E Ricarica
16.5 Batteria e ricarica La manutenzione delle batterie rappresenta la parte più importante della manutenzione dello scooter. Mantenere le batterie completamente cariche contribuisce a prolungare la durata di vita della batteria. Servirsi delle seguenti indicazioni per contribuire a conservare le batterie in ottime condizioni. -
Page 28: Carica Della Batteria
• Posizionare lo scooter vicino ad una normale presa elettrica a muro. • Rimuovere la chiave per spegnere lo scooter. • Ruotare il coperchio del vano porta del carica batteria. • Inserire il connettore XLR del caricabatterie nella porta del carica batteria. •... - Page 29 INTERRUTTORE AUTOMATICO PRINCIPALE ATTENZIONE! Non tentare riparazioni elettriche fai-da-te. Consultare il rivenditore locale. Se, senza alcuna ragione apparente, lo scooter dovesse smettere di funzionare, potrebbe essere a causa dello scatto dell'interruttore automatico principale. POSSIBILI RAGIONI DELLO SCATTO DELL'INTERRUTTORE AUTOMATICO PRINCIPALE •...
-
Page 30: Analisi Dei Problemi E Soluzioni
17. ANALISI DEI PROBLEMI E SOLUZIONI Lo scooter è dotato di un controller, che controlla continuamente le condizioni di funzionamento del vostro scooter. Se rileva un problema lo indica con la luce lampeggiante del pulsante ON / OFF. È necessario contare il numero di flash, e vedere l'elenco per verificare che tipo di errore è stato rilevato. -
Page 31: Condizioni Di Smaltimento
18. CONDIZIONI DI SMALTIMENTO 18.1 Condizioni di smaltimento generali In caso di smaltimento del dispositivo non usare mai i normali sistemi di conferimento dei rifiuti solidi urbani. Si raccomanda invece di smaltire il dispositivo attraverso le comuni isole ecologiche comunali per le previste operazioni di riciclo dei materiali utilizzati. 18.2 Avvertenze per il corretto smaltimento del prodotto ai sensi della direttiva europea 2012/19/UE: Alla fine della sua vita utile il prodotto non deve essere smaltito insieme ai rifiuti urbani. -
Page 32: Specifiche Tecniche
19. SPECIFICHE TECNICHE CODICE – MODELLO CN210X PORTATA MASSIMA 149 Kg 220x75 mm RUOTE POSTERIORI RUOTE FRONTALI 220x75 mm RUOTE ANTIRIBALTAMENTO incluse VELOCITÀ MASSIMA 6 Km/h SPECIFICHE BATTERIE 12V 22Ah*2 AUTONOMIA* >21 Km TIPO DI CARICABATTERIE 1,8 Amp off-board, 220V 50Hz CONTROLLER PG S-70A TIPO DI MOTORE... -
Page 33: Garanzia
20. GARANZIA Tutti i prodotti Moretti sono garantiti da difetti di materiale o fabbricazione per un periodo di 2 (due) anni dalla data di vendita del prodotto, salvo eventuali esclusioni e limitazioni specificate di seguito. Questa garanzia non è valida in caso di uso improprio, abuso o modifica del prodotto e per la mancata aderenza alle istruzioni per l’uso. -
Page 34: Ricambi
22. RICAMBI Per le parti di ricambio e gli accessori fare riferimento esclusivamente al catalogo generale Moretti. I ricambi originali Moretti sono garantiti per 6 (sei) mesi a decorrere dal giorno in cui si riceve il ricambio. 23. CLAUSOLE ESONERATIVE Salvo quanto specificato espressamente in questa garanzia ed entro i limiti di legge, Moretti non offre nessun’altra dichiarazione, garanzia o condizione, espressa o implicita, comprese... - Page 35 Prodotto ____________________________________________________________________ Acquistato in data ___________________________________________________________ Rivenditore _________________________________________________________________ Via _______________________ Località __________________________________________ Venduto a ___________________________________________________________________ Via ________________________ Località _________________________________________ MORETTI S.P.A. Via Bruxelles, 3 - Meleto 52022 Cavriglia (Arezzo) Tel. +39 055 96 21 11 www.morettispa.com email: info@morettispa.com MADE IN P.R.C.
- Page 36 ORETTI Via Bruxelles, 3 - Meleto Tel. +39 055 96 21 11 www.morettispa.com 52022 Cavriglia (Arezzo) Fax. +39 055 96 21 200 info@morettispa.com...
- Page 37 ELECTRIC SCOOTER MOBILITY 210 INSTRUCTION MANUAL...
- Page 38 INDEX 1. CODE ................................ PAG.3 2. INTRODUCTION ............................. PAG.3 3. INTENDED USE............................PAG.3 4. DECLARATION OF CONFORMITY ....................... PAG.3 4.1 Applicable regulations and directives ..................pag. 4 5. GENERAL WARNINGS .......................... PAG.4 6. SYMBOLS ............................... PAG.4 7. GENERAL DESCRIPTION ........................PAG.5 8.
- Page 39 Mobility Scooter 210 white 2. INTRODUCTION Thank you for choosing an ARDEA MOBILITY scooter by Moretti. Moretti electric scooters have been designed and constructed to satisfy all your needs for practical, correct and safe use. This manual contains useful suggestions for using your scooter properly and safely. Please read this manual in full before you use the scooter.
- Page 40 4.1 Applicable regulations and directives In order to satisfy safety standards for users, Moretti S.p.A. complies with the following standards: - EN 12184:2014; - EN 60601-1:2007; - EN 60601-1-2:2006. 5. GENERAL WARNINGS WARNING! Take extreme care in the presence of moving parts that could trap limbs and cause injury.
- Page 41 Waste Electrical & Electronic Equipment (WEEE) B Type 0197 IPX4 Protection class Max loading weight 7. GENERAL DESCRIPTION (illustrative images)
- Page 42 8. DECLARATION OF ELECTROMAGNETIC COMPATIBILITY The CN210X Scooter is designed for use in the electromagnetic conditions specified in the following tables. The user of the CN210X Scooter must make sure that it is used in the conditions specified. Table 1 MANUFACTURER'S GUIDE AND DECLARATION - ELECTROMAGNETIC EMISSIONS The CN210X Scooter is intended for use in the following electromagnetic conditions.
- Page 43 Table 2 MANUFACTURER'S GUIDE AND DECLARATION - ELECTROMAGNETIC EMISSIONS The CN210X Scooter is intended for use in the following electromagnetic conditions. The client or user must ensure that it is used in these conditions. ELECTROMAGNETIC IMMUNITY TESTS TEST LEVEL IEC 60601 CONFORMITY LEVEL ENVIRONMENT –...
- Page 44 Table 3 MANUFACTURER'S GUIDE AND DECLARATION - ELECTROMAGNETIC IMMUNITY The CN210X Scooter is intended for use in the following electromagnetic conditions. The client or user must ensure that it is used in these conditions. ELECTROMAGNETIC IMMUNITY TESTS TEST LEVEL IEC 60601 CONFORMITY LEVEL ENVIRONMENT –...
- Page 45 Table 4 RECOMMENDED SEPARATION DISTANCES BETWEEN PORTABLE AND MOBILE RADIO COMMUNICATIONS EQUIPMENT AND THE CN210X SCOOTER The CN210X Scooter is intended to operate in an electromagnetic environment in which RF disturbances are under control. The client or user of the CN210X Scooter can contribute to preventing EM interference by ensuring a minimum distance between the mobile and portable RF communications devices (transmitters) and the CN210X Scooter battery charger during charging and the entire CN210X Scooter during its operation as recommended below, in relation to the maximum output power of the radio communication devices.
- Page 46 9. SAFETY Always use the safety Do not use the scooter belt and keep your under the influence of feet resting on the alcohol scooter at all times Make sure there are no Do not use electronic obstacles nearby when radio transmitters such you are driving the walkie-talkies...
- Page 47 10. WARNINGS ON USE 10.1 General precautions 1. Do not use the scooter on public highways. Please be aware that it may be difficult for drivers to see you when you are sitting on the scooter. Always use pedestrian routes. Comply with the rules of pedestrian traffic.
- Page 48 10.3 Before every use 1. Check the tyres are correctly inflated, if present. 2. Check all the electrical connections and make sure they are properly connected and not corroded. 3. Check all the cables and make sure they are connected properly. 4.
- Page 49 A) Speed adjustment • The speed adjustment knob allows you to pre-select the scooter speed. • Turn the knob in a clockwise direction to increase the speed. • Turn the knob in an anti-clockwise direction to reduce the speed. • It is advisable to select a speed at which you feel safe, comfortable and in control of your scooter.
- Page 50 11.2 Steering adjustment The adjustment knob can be used to slope the handlebar at different angles. Follow the instructions for adjustment: 1. Grip the handlebar with one hand; 2. Use your other hand to push and hold down the adjustment knob; 3.
- Page 51 11.4 Seat adjustment SEAT ROTATION LEVER The seat can be rotated through 360 ° and locked at every 45 °: 1. Press the lever down and rotate the seat to the desired position (Fig. 2. Release the lever to lock the seat in position at every 45°.
- Page 52 11.5 Wheel locking/unlocking function The scooter has a lever to lock/unlock the wheels. (Fig. 7) (illustrative images) • To disengage the stop brake and unlock the scooter wheels, push the lever downwards towards the letter N (Fig. • To engage the brake and lock the scooter wheels, push the lever upwards towards the letter (Fig.
- Page 53 The CN210X scooter is easy to disassemble and transport. The product is formed of the components shown in Fig. 8: Transmission Seat Battery pack Structure Basket (Fig. 8) (illustrative image) REINSTALLING THE TRANSMISSION • Align the frame and the transmission (Fig.
- Page 54 INSTALLING THE BATTERY UNIT • Lower the battery unit gently onto the scooter (Fig. 11). (Fig. 11) (illustrative image) SLOPING THE HANDLEBAR • Loosen the handlebar adjustment knob and lift the handlebar (Fig. 12). • When the desired position is obtained, tighten the handlebar adjustment knob. Basket Adjustment knob...
- Page 55 POSITIONING THE SEAT • Incline the seat to see the rotating pin housing underneath it. • Position the rotating pin housing in the base of the seat (Fig. 13). Pin housing (Fig. 13) (illustrative image) WARNING! • Pinching point! Keep your hands and clothes away from the rotating pin housing of the seat and the seat base;...
- Page 56 12.2 Disassembly Carry out the assembly process (previous paragraph 12.1) in reverse order. 13. DRIVING 13.1 Driving up and down NOTE: For your first driving session, check that the scooter is being driven on a flat surface and will continue to be driven on a flat surface. BEFORE YOU GET ON THE SCOOTER •...
- Page 57 13.2 Basic driving • Check that you are seated safely and correctly on the scooter; • Rotate the speed selector completely in an anti-clockwise direction to set the minimum speed; • Insert the key in the ignition; • Turn the key in a clockwise direction to the “On” position; •...
- Page 58 RAMPS When you go up a ramp, onto a pavement or a sloping surface: • Lean forwards on the seat to move your own centre of gravity forwards and guarantee maximum stability and safety. If there is a bump on the ramp, it is necessary to have a good grip on the road surface: •...
- Page 59 WARNING! If the scooter starts moving more quickly than you consider safe on a downward slope, release the accelerator control lever and bring the scooter to a stop. As soon as you feel you have regained control of the scooter, push the accelerator control lever and continue driving down the rest of the slope with care.
- Page 60 When the key is in the “Off” position and the wheel lock is in the unlocked position, the engine braking system will prevent you from pushing the scooter too quickly (such as on a sloping surface) and you will notice this as you push it. The scooter will move freely until you reach a certain speed, then you will feel resistance, as the engine braking system has been activated.
- Page 61 15.3 Cleaning the seat Clean with a delicate soap or detergent and a damp cloth. A detergent for vinyl can also be used. 16. GENERAL MAINTENANCE INSTRUCTIONS The scooter requires periodic maintenance. Incorrect maintenance of the scooter could lead to a higher number of technical problems, make it less flexible and invalidate the terms of the warranty.
- Page 62 Worn brush Brush cap New brush 16.1 Controls and reminders • Keep the controller clean and protect it from water and rain. Never expose the device to direct contact with water. • Keep the wheel clean of residue, hair, sand and carpet fibres. •...
- Page 63 16.5 Battery and charging Battery maintenance is the most important part of scooter maintenance. Keeping the batteries completely charged contributes to prolonging the battery duration. Follow the instructions below to help store the batteries in optimal conditions. WARNING! New batteries must be completely charged before using your scooter for the first time.
- Page 64 BATTERY MAINTENANCE Continuous cycle GEL or AGM and SLA batteries are used for the scooters. • These batteries do not require maintenance; • There is no risk of leakage or spills, so these batteries can be transported safely on aircraft, buses, trains, etc.;...
- Page 65 POSSIBLE REASONS FOR THE AUTOMATIC MAIN SWITCH TRIPPING • Driving on a steep incline; • Overtaking on a pavement; • Depleted batteries; • Exceeding the maximum weight capacity. When you switch on the scooter, the battery voltage decreases and the battery current increases to satisfy the needs of the engine or the other electrical devices on the scooter.
- Page 66 17. PROBLEMS AND SOLUTIONS The scooter has a controller that continually controls the operating conditions of your scooter. If it detects a problem, the ON / OFF button flashes. You must count the number of flashes and consult the list to check which type of error has been detected. Number of Error Notes...
- Page 67 18. CONDITIONS OF DISPOSAL 18.1 General terms of disposal Never dispose of the product as normal domestic waste. Dispose of the product at a sorted waste collection centre for recycling. 18.2 Instructions for correct disposal in accordance with European directive 2012/19/UE: At the end of its working life, the product must not be disposed of together with normal urban waste.
- Page 68 19. TECHNICAL SPECIFICATIONS CODE – MODEL CN210X MAXIMUM CAPACITY 149 Kg REAR WHEELS 220x75 mm FRONT WHEELS 220x75 mm ROLL-OVER PROTECTION included WHEELS MAXIMUM SPEED 6 Km/h BATTERY SPECIFICATIONS 12V 22Ah*2 AUTONOMY* >21 Km BATTERY CHARGER TYPE 1,8 Amp off-board, 220V 50Hz CONTROLLER PG S-70A ENGINE TYPE...
- Page 69 The intended use of the product is given in the user manual. Moretti is not liable for damage, injury or any other consequences resulting from installation or use which are not scrupulously conforming with the instructions given in the installation, assembly and user manual.
- Page 70 6 (six) months from the day of delivery. 23. NON-LIABILITY CLAUSE Unless otherwise expressly specified in this warranty and within the limits of the law, Moretti makes no declaration, guarantee or condition, express or implicit, including any future declaration, guarantee or condition of sale, suitability for a given purpose, non violation and non interference.
- Page 71 Product ______________________________________________________________ Date of purchase______________________________________________________ Reseller _____________________________________________________________ Street_______________________ Town ___________________________________ Sold to _______________________________________________________________ Street_______________________ Town ___________________________________ MORETTI S.P.A. Via Bruxelles, 3 - Meleto 52022 Cavriglia (Arezzo) - ITALY - Tel. +39 055 96 21 11 www.morettispa.com email: info@morettispa.com MADE IN P.R.C.
- Page 72 ORETTI Via Bruxelles, 3 - Meleto Tel. +39 055 96 21 11 www.morettispa.com 52022 Cavriglia (Arezzo) Fax. +39 055 96 21 200 info@morettispa.com...
Need help?
Do you have a question about the ARDEA MOBILITY 210 and is the answer not in the manual?
Questions and answers