Table of Contents
Advertisement
Available languages
Available languages
Quick Links
Advertisement
Table of Contents

Related Manuals for Moretti ARDEA MOBILITY 220


Summary of Contents for Moretti ARDEA MOBILITY 220
- Page 1 SCOOTER ELETTRICO MOBILITY 220 MANUALE DI ISTRUZIONI...
-
Page 2: Table Of Contents
INDICE 1. CODICI ..............................PAG.3 2. INTRODUZIONE............................. PAG.3 3. DESTINAZIONE D'USO ......................... PAG.3 4. DICHIARAZIONE DI CONFORMITÀ UE ....................PAG.3 4.1 Norme e direttive di riferimento ....................pag. 4 5. AVVERTENZE GENERALI ........................PAG.4 6. SIMBOLOGIA UTILIZZATA ........................PAG.4 7. DESCRIZIONE GENERALE ........................PAG.5 8. -
Page 3: Codici
4. DICHIARAZIONE DI CONFORMITÀ UE La MORETTI SpA dichiara sotto la sua esclusiva responsabilità che i prodotti fabbricati ed immessi in commercio dalla stessa MORETTI SpA. e facenti parte della famiglia SCOOTER ELETTRICI – ARDEA MOBILITY sono conformi alle disposizioni applicabili del regolamento 2017 /745 sui DISPOSITIVI MEDICI del 5 aprile 2017. -
Page 4: Norme E Direttive Di Riferimento
4.1 Norme e direttive di riferimento Per garantire gli standard di sicurezza per gli utilizzatori, Moretti S.p.A. rispetta le norme: - EN 12184:2014; - EN 60601-1:2007; - EN 60601-1-2:2006. 5. AVVERTENZE GENERALI ATTENZIONE! Prestare sempre molta attenzione alla presenza di parti in movimento che potrebbero causare intrappolamenti agli arti e lesioni personali. -
Page 5: Descrizione Generale
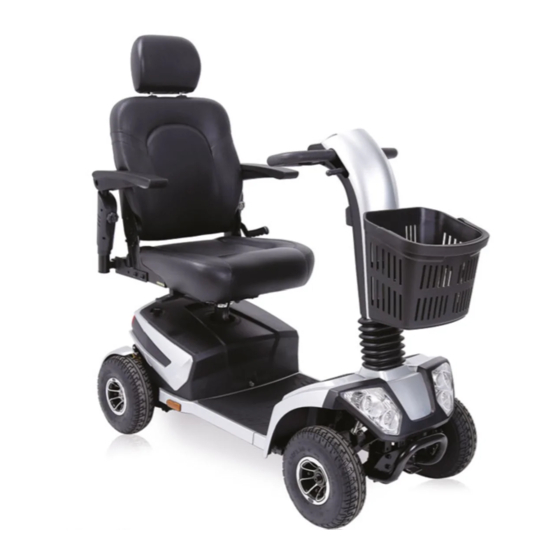
Smaltimento prodotto secondo la direttiva CE/19/2012 0197 Parte applicata di tipo B IPX4 Classe di protezione Peso max supportato 7. DESCRIZIONE GENERALE Immagine a scopo illustrativo... -
Page 6: Dichiarazione Di Compatibilità Elettromagnetica
8. DICHIARAZIONE DI COMPATIBILITÀ ELETTROMAGNETICA Lo Scooter CN220 è progettato per essere utilizzato nell’ambiente elettromagnetico specificato nelle tabelle che seguono. L’utilizzatore dello Scooter CN220 deve assicurarsi che venga effettivamente utilizzato nelle condizioni specificate. Tabella 1 GUIDA E DICHIARAZIONE DEL COSTRUTTORE-EMISSIONI ELETTROMAGNETICHE Lo Scooter CN220 è... - Page 7 Tabella 2 GUIDA E DICHIARAZIONE DEL COSTRUTTORE-EMISSIONI ELETTROMAGNETICHE Lo Scooter è previsto per funzionare nell'ambiente elettromagnetico sotto specificato. Il cliente o l'utilizzatore del dispositivo deve garantire che esso venga usato in tale ambiente. AMBIENTE LIVELLO DI PROVA LIVELLO DI PROVE DI IMMUNITÀ ELETTROMAGNETICO- IEC 60601 CONFORMITÀ...
- Page 8 Tabella 3 GUIDA E DICHIARAZIONE DEL COSTRUTTORE-IMMUNITÀ ELETTROMAGNETICA Lo Scooter è previsto per funzionare nell'ambiente elettromagnetico sotto specificato. Il cliente o l'utilizzatore del dispositivo dovrebbe assicurarsi che esso venga utilizzato in tale ambiente. AMBIENTE LIVELLO DI PROVA PROVE DI IMMUNITÀ LIVELLO DI CONFORMITÀ...
- Page 9 Tabella 4 DISTANZE DI SEPARAZIONE RACCOMANDATE TRA APPARECCHI DI RADIOCOMUNICAZIONE PORTATILI E MOBILI E LO SCOOTER Lo Scooter è previsto per funzionare in un ambiente elettromagnetico in cui sono sotto controllo i disturbi irradiati RF. Il cliente o l’utilizzatore dello Scooter può contribuire a prevenire interferenze elettromagnetiche assicurando una distanza minima fra gli apparecchi di comunicazione mobili e portatili a RF (trasmettitori) ed il carica batterie dello Scooter durante la fase di carica e gli interi dispositivi Scooter durante il loro funzionamento come sotto raccomandato, in relazione alla potenza di uscita massima degli apparecchi di radiocomunicazione.
-
Page 10: Sicurezza
9. SICUREZZA Usare sempre la cintura Non utilizzare lo scoo- di sicurezza, e tenere ter sotto l'influenza di sempre i piedi appog- alcool giati sullo scooter Assicurarsi che non ci si- Non utilizzare trasmetti- ano ostacoli nelle prossi- tori radio elettronici mità... -
Page 11: Avvertenze Per L'utilizzo
10. AVVERTENZE PER L'UTILIZZO 10.1 Avvertenze generali 1. Non utilizzare lo scooter su strade di pubblico transito. Siate consapevoli che può essere difficile per il traffico vedervi quando siete seduti sullo scooter. Usare sempre percorsi pedonali. Attenersi a tutte le regole del traffico pedonale. Attendere fino a quando il vostro percorso è... -
Page 12: Prima Di Ogni Uso
10.3 Prima di ogni uso 1. Verificare il corretto gonfiaggio dei pneumatici, se presenti. 2. Controllare tutti i collegamenti elettrici e assicurarsi che siano tutti ben collegati e non corrosi. 3. Controllare tutti i collegamenti del cablaggio e assicurarsi che siano fissati correttamente. 4. - Page 13 A) Regolatore di velocità • La manopola di regolazione della velocità consente di preselezionare la velocità dello scooter. • Ruotare la manopola in senso orario per aumentare la velocità. • Ruotare la manopola in senso anti-orario per diminuire la velocità. •...
-
Page 14: Regolazione Dello Sterzo
H) Frecce Premere uno dei due pulsanti (destro o sinistro), a seconda della direzione di svolta che si vuole presegnalare, per attivare il lampeggiamento del rispettivo indicatore di direzione. Premere nuovamente per spegnerlo. 11.2 Regolazione dello sterzo La leva di regolazione dello sterzo è situata davanti alla maniglia dello sterzo sul lato destro. 1. -
Page 15: Regolazione Del Sedile
ATTENZIONE! Assicurarsi che le manopole di regolazione siano ben strette al tubo inserito nel bracciolo. Non estrarre eccessivamente il bracciolo. RIBALTARE I BRACCIOLI Sollevare verso l'alto i braccioli per facilitare la salita e/o discesa dallo scooter. INCLINAZIONE DEI BRACCIOLI Per aumentare l’inclinazione dei braccioli, ruotare la manopola di regolazione in senso antiorario. -
Page 16: Funzione Blocco/Sblocco Ruote
1. Ripiegare lo schienale, tirando verso l'alto la leva posta sul lato sinistro della seduta, quindi posizionarsi dietro lo scooter e, dopo aver spinto verso il basso la leva posta inferiormente la seduta (lato destro), con entrambe le mani sollevare il sedile dal piantone del reggi-sella (Fig.5); 2. -
Page 17: Montaggio E Smontaggio
12. MONTAGGIO E SMONTAGGIO ATTENZIONE! • Attenzione ad eventuali punti di pizzicamento quando si aggancia il telaio posteriore a quello anteriore. Durante la fase di assemblaggio, osservare le etichette di avvertenza in corrispondenza dei punti di pizzicamento; • Pericolo di pizzicamento e schiacciamento! Aumento del rischio di pizzicamento o schiacciamento, conseguenza del peso dei componenti (come le batterie), durante la fase di preparazione per il trasporto e gli interventi di manutenzione. -
Page 18: Guida Di Base
(Fig.9) (Fig.10) Immagine a scopo illustrativo Immagine a scopo illustrativo SCENDERE DALLO SCOOTER • Verificare che l’apparecchio sia spento e la chiave estratta dall’apposito interruttore; • Riportare il manubrio in posizione verticale; • Sollevare o rimuovere i braccioli; • Slacciare la cintura di sicurezza; •... -
Page 19: Controllo Attraverso Le Strettoie
1. Arrestare completamente lo scooter; 2. Impostare la velocità al livello minimo; 3. Ruotare il manubrio nella direzione verso la quale si desidera dirigersi. STERZARE IN RETROMARCIA Si raccomanda di fare molta attenzione quando di guida in retromarcia. 1. Usare la mano destra per spingere in avanti la leva di controllo dell'acceleratore o usare la mano sinistra per tirare all’indietro la leva di controllo dell’acceleratore;... -
Page 20: Percorrere Salite E Discese
ERBA E GHIAIA Lo scooter funziona egregiamente su erba e ghiaia, nonché lungo le salite, ma è necessario attenersi ai parametri operativi esposti nel presente manuale, nel capitolo Specifiche tecniche. In caso di dubbi su una situazione, evitarla. • Sentirsi liberi di usare to scooter sui prati o nei parchi; •... -
Page 21: Impianto Frenante Del Motore
Procedura 2: Emergenza (Non in funzione) • Girare l'interruttore di accensione in "posizione Off"; • Scendere dallo scooter; • Impostare la leva di sblocco ruote su "Sbloccata"; • Restando in piedi accanto allo scooter, accompagnarlo a mano lungo la superficie in pendenza; •... -
Page 22: Pulizia
ATTENZIONE! • Se lo scooter e i suoi componenti non venissero riposti correttamente e in modo sicuro, lo scooter e i componenti potrebbero muoversi o essere trasportati dall'aria e provocare lesioni o danni; • Non sedere sullo scooter durante il trasporto. In caso di trasporto, assicurare saldamente lo scooter mediante un sistema di ancoraggio/fissaggio approvato. -
Page 23: Controlli E Promemoria
La mancanza di manutenzione delle spazzole potrebbe invalidare la garanzia del vostro scooter. Per controllare o sostituire le spazzole del motore: • Svitare il tappo della spazzola del motore; • Rimuovere le spazzole; • Controllare l'usura delle spazzole; • Sostituire le spazzole se necessario. Tappo della spazzola Spazzola nuova Spazzola usurata... -
Page 24: Riporre Lo Scooter
16.4 Riporre lo scooter Se si prevede di non utilizzare lo scooter per un lungo periodo di tempo, si consiglia di: • Caricare completamente le batterie prima di riporlo; • Scollegare le batterie dallo scooter; • Conservare lo scooter in un ambiente caldo e asciutto; •... -
Page 25: Carica Della Batteria
• Posizionare lo scooter vicino ad una normale presa elettrica a muro. • Rimuovere la chiave per spegnere lo scooter. • Ruotare il coperchio del vano porta del carica batteria. • Inserire il connettore XLR del caricabatterie nella porta del carica batteria. •... -
Page 26: Analisi Dei Problemi E Soluzioni
INTERRUTTORE AUTOMATICO PRINCIPALE ATTENZIONE! Non tentare riparazioni elettriche fai-da-te. Consultare il rivenditore locale. Se, senza alcuna ragione apparente, lo scooter dovesse smettere di funzionare, potrebbe essere a causa dello scatto dell'interruttore automatico principale. POSSIBILI RAGIONI DELLO SCATTO DELL'INTERRUTTORE AUTOMATICO PRINCIPALE •... -
Page 27: Analisi Dei Problemi E Soluzioni Cn220
17.1 Analisi dei problemi e soluzioni CN220 Numero di flash Errore Note Batteria quasi 1 Flash Batteria quasi scarica. Ricaricarla appena possibile scarica Batteria totalmente scarica. Lasciando lo scooter spento Tensione batteria 2 Flash qualche minuto, la batteria potrebbe ricaricarsi quel tanto troppo bassa sufficiente per garantire ancora qualche minuto di autonomia La batteria è... -
Page 28: Analisi Dei Problemi E Soluzioni Cn220
I seguenti sintomi possono indicare un problema serio al Vostro scooter. Contattare il rivenditore locale se si presenta uno qualsiasi dei seguenti casi: 1. Rumore del motore; 2. Usura dei cavi e dei collegamenti; 3. Connettori incrinati o rotti; 4. Usura irregolare su uno qualsiasi dei pneumatici; 5. -
Page 29: Condizioni Di Smaltimento
I seguenti sintomi possono indicare un problema serio al Vostro scooter. Contattare il rivenditore locale se si presenta uno qualsiasi dei seguenti casi: 1. Rumore del motore; 2. Usura dei cavi e dei collegamenti; 3. Connettori incrinati o rotti; 4. Usura irregolare su uno qualsiasi dei pneumatici; 5. -
Page 30: Specifiche Tecniche
19. SPECIFICHE TECNICHE 19.1 Specifiche tecniche CN220 CODICE – MODELLO CN220 PORTATA MASSIMA 159 Kg RUOTE POSTERIORI 265x85 mm RUOTE FRONTALI 265x85 mm RUOTE ANTIRIBALTAMENTO Incluse VELOCITÀ MASSIMA 10 Km/h SPECIFICHE BATTERIE 12V 50 Ah*2 AUTONOMIA* >34 Km TIPO DI CARICABATTERIE 5 Amp off-board, 220V 50Hz CONTROLLER PG S-90A... -
Page 31: Garanzia
** Il termine pendenza stimata (rated slope) é definito nella norma EN 12184:2014. 20. GARANZIA Tutti i prodotti Moretti sono garantiti da difetti di materiale o fabbricazione per un periodo di 2 (due) anni dalla data di vendita del prodotto, salvo eventuali esclusioni e limitazioni specificate di seguito. -
Page 32: Ricambi
22. RICAMBI Per le parti di ricambio e gli accessori fare riferimento esclusivamente al catalogo generale Moretti. I ricambi originali Moretti sono garantiti per 6 (sei) mesi a decorrere dal giorno in cui si riceve il ricambio. 23. CLAUSOLE ESONERATIVE Salvo quanto specificato espressamente in questa garanzia ed entro i limiti di legge, Moretti non offre nessun’altra dichiarazione, garanzia o condizione, espressa o implicita, comprese eventuali... - Page 33 Prodotto ____________________________________________________________________ Acquistato in data ___________________________________________________________ Rivenditore _________________________________________________________________ Via _______________________ Località __________________________________________ Venduto a ___________________________________________________________________ Via ________________________ Località _________________________________________ MORETTI S.P.A. Via Bruxelles, 3 - Meleto 52022 Cavriglia (Arezzo) Tel. +39 055 96 21 11 www.morettispa.com email: info@morettispa.com MADE IN P.R.C.
- Page 34 NOTE...
- Page 35 NOTE...
- Page 36 ORETTI Via Bruxelles, 3 - Meleto Tel. +39 055 96 21 11 www.morettispa.com 52022 Cavriglia (Arezzo) Fax. +39 055 96 21 200 info@morettispa.com...
- Page 37 ELECTRIC SCOOTER MOBILITY 220 INSTRUCTION MANUAL...
- Page 38 INDEX 1. CODES ..............................PAG.3 2. INTRODUCTION ............................. PAG.3 3. INTENDED USE............................PAG.3 4. DECLARATION OF CONFORMITY ....................... PAG.3 4.1 Applicable regulations and directives ..................pag. 4 5. GENERAL WARNINGS .......................... PAG.4 6. SYMBOLS ............................... PAG.4 7. GENERAL DESCRIPTION ........................PAG.5 8.
- Page 39 Mobility Scooter 220 2. INTRODUCTION Thank you for choosing an ARDEA MOBILITY scooter by Moretti. Moretti electric scooters have been designed and constructed to satisfy all your needs for practical, correct and safe use. This manual contains useful suggestions for using your scooter properly and safely. Please read this manual in full before you use the scooter.
- Page 40 4.1 Applicable regulations and directives In order to satisfy safety standards for users, Moretti S.p.A. complies with the following standards: - EN 12184:2014; - EN 60601-1:2007; - EN 60601-1-2:2006. 5. GENERAL WARNINGS WARNING! Take extreme care in the presence of moving parts that could trap limbs and cause injury.
- Page 41 Waste Electrical & Electronic Equipment (WEEE) 0197 B Type IPX4 Protection class Max loading weight 7. GENERAL DESCRIPTION Illustrative image...
- Page 42 8. DECLARATION OF ELECTROMAGNETIC COMPATIBILITY The CN220 Scooters are designed for use in the electromagnetic conditions specified in the following tables. The user of the CN220 Scooters must make sure that it is used in the conditions specified. Table 1 MANUFACTURER'S GUIDE AND DECLARATION - ELECTROMAGNETIC EMISSIONS The scooters are intended for use in the following electromagnetic conditions.
- Page 43 Table 2 MANUFACTURER'S GUIDE AND DECLARATION - ELECTROMAGNETIC EMISSIONS The scooters are intended for use in the following electromagnetic conditions. The client or user must ensure that it is used in these conditions. ELECTROMAGNETIC IMMUNITY TESTS TEST LEVEL IEC 60601 CONFORMITY LEVEL ENVIRONMENT –...
- Page 44 Table 3 MANUFACTURER'S GUIDE AND DECLARATION - ELECTROMAGNETIC IMMUNITY The scooters are intended for use in the following electromagnetic conditions. The client or user must ensure that it is used in these conditions. ELECTROMAGNETIC IMMUNITY TESTS TEST LEVEL IEC 60601 CONFORMITY LEVEL ENVIRONMENT –...
- Page 45 Table 4 RECOMMENDED SEPARATION DISTANCES BETWEEN PORTABLE AND MOBILE RADIO COMMUNICATIONS EQUIPMENT AND THE SCOOTERS THE SCOOTERS ARE INTENDED TO OPERATE IN AN ELECTROMAGNETIC ENVIRONMENT IN WHICH RF DISTURBANCES ARE UNDER CONTROL. THE CLIENT OR USER OF THE SCOOTERS CAN CONTRIBUTE TO PREVENTING EM INTERFERENCE BY ENSURING A MINIMUM DISTANCE BETWEEN THE MOBILE AND PORTABLE RF COMMUNICATIONS DEVICES (TRANSMITTERS) AND THE SCOOTER BATTERY CHARGER DURING CHARGING AND THE INTERNAL SCOOTER DEVICES DURING THEIR OPERATION AS INDICATED...
- Page 46 9. SAFETY Always use the safety Do not use the scooter belt and keep your under the influence of feet resting on the alcohol scooter at all times Make sure there are no Do not use electronic obstacles nearby when radio transmitters such driving walkie-talkies...
- Page 47 10. WARNINGS ON USE 10.1 General precautions 1. Do not use the scooter on public highways. Please be aware that it may be difficult for drivers to see you when you are sitting on the scooter. Always use pedestrian routes. Comply with the rules of pedestrian traffic.
- Page 48 10.3 Before every use 1. Check the tyres are correctly inflated, if present. 2. Check all the electrical connections and make sure they are properly connected and not corroded. 3. Check all the cables and make sure they are connected properly. 4.
- Page 49 A) Speed regulator • The speed adjustment knob allows you to pre-select the scooter speed. • Turn the knob in a clockwise direction to increase the speed. • Turn the knob in an anti-clockwise direction to reduce the speed. • It is advisable to select a speed at which you feel safe, comfortable and in control of your scooter.
- Page 50 H) Direction indicators Press one of the two buttons (right or left), depending on the turn direction you want to pre- signalise, to activate the flashing of the respective turn signal. Press again to turn it off. 11.2 Steering adjustment The steering adjustment lever is positioned in front of the steering handle on the right side.
- Page 51 WARNING! Ensure that the adjustment knobs are firmly screwed onto the tube inserted in the armrest. Do not extract the armrest too far. TIPPING THE ARMRESTS Raise the armrests to assist getting on and/or off the scooter. SLOPING THE ARMRESTS Turn the adjustment knob in an anti-clockwise direction to increase the slope of the armrests.
- Page 52 The seat can be adjusted using the seat post height adjustment. 1. Fold up the backrest by pulling up the lever on the left-hand side of the seat, then stand behind the scooter and, after pushing down the lever on the underside of the seat (right-hand side), use both hands to lift the seat off the rod (Fig.
- Page 53 12. ASSEMBLY AND DISASSEMBLY WARNING! • Take care over any pinching points when attaching the rear frame to the front frame. During assembly, check the warning labels at the pinching points; • Pinching and crushing risk! There is an increased risk of pinching or crushing, due to the weight of the components (such as the batteries), when preparing the scooter for transport or during maintenance activities.
- Page 54 (Fig. 9) (Fig. 10) Illustrative image Illustrative image GETTING OFF THE SCOOTER • Check that the scooter is switched off and the key has been removed from the ignition; • Return the handlebar to the vertical position; • Lift or remove the armrests; •...
- Page 55 STEERING NEAR A NARROW PASSAGE To steer near a narrow passage, such as when entering or exiting a door or changing direction: 1. Bring the scooter to a complete stop; 2. Set the minimum speed; 3. Turn the handlebar in the direction in which you wish to go. STEERING IN REVERSE Be extremely careful when reversing.
- Page 56 GRASS AND GRAVEL The scooter functions well on grass and gravel, and also on hills, but it is necessary to comply with the operating parameters indicated in this manual, in the technical specifications chapter. If any situation causes doubt, avoid it. •...
- Page 57 Procedure 2: Emergency (not in operation) • Turn the ignition to the “Off” position; • Get off the scooter; • Set the wheel unlocking lever to "Unlocked"; • Remain standing alongside the scooter and accompany it by hand along the entire sloping surface;...
- Page 58 WARNING! • If the scooter and its components are not correctly and safely stored, they could move or be carried by the air and cause injury or damage; • Do not sit on the scooter during transport. When transporting the scooter, ensure it is firmly secured with an approved anchoring/attachment system.
- Page 59 Failure to perform maintenance on the brushes could invalidate the warranty on your scooter. To check and replace the engine brushes: • Unscrew the engine brush cap; • Remove the brushes; • Check wear of the brushes; • Replace the brushes if necessary. Brush cap New brush Worn brush...
- Page 60 16.4 Storing the scooter If you do not intend to use the scooter for a lengthy period of time, it is advisable to: • Completely charge the batteries before you store it; • Disconnect the batteries from the scooter; • Keep the scooter in a warm, dry place; •...
- Page 61 • Position the scooter near a normal electrical socket on the wall. • Remove the key to switch off the scooter. • Rotate the battery charger compartment cover. • Insert the XLR connector of the battery charger in the battery charger port. •...
- Page 62 AUTOMATIC MAIN SWITCH WARNING! Do not attempt to carry out do-it-yourself electrical repairs. Consult your local retailer. If the scooter should stop working, for no apparent reason, it could be that the automatic main switch has tripped. POSSIBLE REASONS FOR THE AUTOMATIC MAIN SWITCH TRIPPING •...
- Page 63 17.1 CN220 problems and solutions Number of Error Notes flashes Battery almost 1 Flash Battery almost discharged. Charge as soon as possible. discharged Battery totally discharged. If the scooter is left switched off Battery voltage too for several minutes, the battery could charge sufficiently to 2 Flashes guarantee several minutes of autonomy The battery is over-charged.
- Page 64 The following symptoms may indicate that your scooter has a serious problem. Contact your local retailer if any one of the following cases occurs: 1. Engine noise; 2. Worn cables and connections; 3. Bent or broken connectors; 4. Uneven wear on any one of the tyres; 5.
- Page 65 The following symptoms may indicate that your scooter has a serious problem. Contact your local retailer if any one of the following cases occurs: 1. Engine noise; 2. Worn cables and connections; 3. Bent or broken connectors; 4. Uneven wear on any one of the tyres; 5.
- Page 66 19. TECHNICAL SPECIFICATIONS 19.1 CN220 technical specifications CODE – MODEL CN220 MAXIMUM CAPACITY 159 Kg REAR WHEELS 265x85 mm FRONT WHEELS 265x85 mm ROLL-OVER PROTECTION Included WHEELS MAXIMUM SPEED 10 Km/h BATTERY SPECIFICATIONS 12V 50 Ah*2 AUTONOMY* >34 Km BATTERY CHARGER TYPE 5 Amp off-board, 220V 50Hz CONTROLLER PG S-90A...
- Page 67 The intended use of the product is given in the user manual. Moretti is not liable for damage, injury or any other consequences resulting from installation or use which are not scrupulously conforming with the instructions given in the installation, assembly and user manual.
- Page 68 6 (six) months from the day of delivery. 23. NON-LIABILITY CLAUSE Unless otherwise expressly specified in this warranty and within the limits of the law, Moretti makes no declaration, guarantee or condition, express or implicit, including any future declaration, guarantee or condition of sale, suitability for a given purpose, non violation and non interference.
- Page 69 Product ______________________________________________________________ Date of purchase______________________________________________________ Reseller _____________________________________________________________ Street_______________________ Town ___________________________________ Sold to _______________________________________________________________ Street_______________________ Town ___________________________________ MORETTI S.P.A. Via Bruxelles, 3 - Meleto 52022 Cavriglia (Arezzo) - ITALY - Tel. +39 055 96 21 11 www.morettispa.com email: info@morettispa.com MADE IN P.R.C.
- Page 70 NOTES...
- Page 71 NOTES...
- Page 72 ORETTI Via Bruxelles, 3 - Meleto Tel. +39 055 96 21 11 www.morettispa.com 52022 Cavriglia (Arezzo) Fax. +39 055 96 21 200 info@morettispa.com...
Need help?
Do you have a question about the ARDEA MOBILITY 220 and is the answer not in the manual?
Questions and answers