Noble House Home Furnishings Rocking Chair Assembly Instructions Manual
Hide thumbs
Also See for Rocking Chair:
- Assembly instructions manual (10 pages) ,
- Assembly instructions (5 pages) ,
- Assembly instructions manual (7 pages)
Advertisement
Quick Links
Assembly Instructions
Caution: You must read this Assembly Instructions before you proceed
Please look in the leg panel for hardware packs.
Rocking Chair
Caution: This Rocking Chair is NOT a TOY.
Keep your child / children at bay in the process of assembly.
For turning the Rocking Chair and to prevent damage to the Rocking Chair,
two persons may be needed to execute this action.
Noble House Home Furnishings LLC
Page 1 of 10
Advertisement

Related Manuals for Noble House Home Furnishings Rocking Chair


Summary of Contents for Noble House Home Furnishings Rocking Chair
- Page 1 Caution: This Rocking Chair is NOT a TOY. Keep your child / children at bay in the process of assembly. For turning the Rocking Chair and to prevent damage to the Rocking Chair, two persons may be needed to execute this action.
-
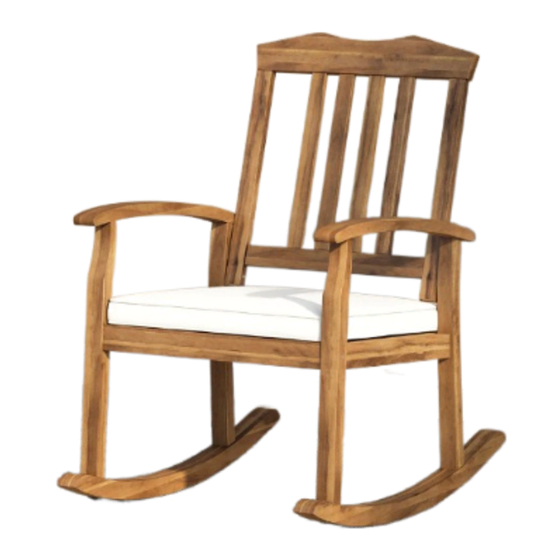
Page 2: Parts List
Parts List Label Picture Description Backrest Panel Seat Panel Left Leg Panel Right Leg Panel Seat Cushion Hardware Label Picture Description Screw ① (M6*80mm) Screw ② (M6*70mm) ③ Allen Wrench Noble House Home Furnishings LLC Page 2 of 10... -
Page 3: Assembly Preparation
Assembly Preparation Before Beginning Assembly: Noble House Home Furnishings LLC Page 3 of 10... -
Page 4: Assembly Steps
This Rocking Chair has multiple parts and may require up to 30 minutes to assemble. To give you an overview of the Rocking chair parts, the above picture is to help you put the various parts into perspective. Please read through the instructions below to familiarise yourself with the parts and steps before assembly. - Page 5 Align the tenon of the Seat Panel (B) into the mortise of the Right Leg Panel (D) as shown above. Then, affix the Seat Panel (B) to Right Leg Panel (D) using Screws ① ③ ) and the Allen Wrench ( DO NOT FULLY TIGHTHEN THE SCREWS. Noble House Home Furnishings LLC Page 5 of 10...
- Page 6 Seat Panel (B) into the Mortise of Left Leg Panel (C) as shown above. ① Then, affix the Seat Panel (B) to the Left Leg Panel (C) using Screws ( ) and the ③ Allen Wrench ( DO NOT FULLY TIGHTHEN THE SCREWS. Noble House Home Furnishings LLC Page 6 of 10...
- Page 7 Attach the Backrest Panel (A) to the Right Leg Panel (D) and Left Leg Panel (C), ② ③ using Screws ( ) and the Allen Wrench ( DO NOT FULLY TIGHTHEN SCREWS. Noble House Home Furnishings LLC Page 7 of 10...
- Page 8 Step 6 Place the Seat Cushion (E) onto the Rocking Chair. Connect the Seat Cushion (E) to the Seat Panel (B) by using Magic Tape as shown above Noble House Home Furnishings LLC Page 8 of 10...
- Page 9 This would help to align all the parts at all the joint areas. Then get out of the Rocking Chair and in a sequential manner, proceed to tighten all Screws. Whenever moving or lifting the Rocking Chair be sure to secure assistance from your adult partner(s).
- Page 10 Noble House Home Furnishings LLC Page 10 of 10...