Table of Contents
Advertisement
Quick Links
OPERATING INSTRUCTIONS AND
SPECIFICATIONS
CompactRIO cRIO-9066 and
cRIO-9067
Embedded Real-Time Controller with Reconfigurable FPGA for
C Series Modules
This document describes how to get started with the National Instruments cRIO-9066 and
cRIO-9067, referred to inclusively as the cRIO-906x. This document contains device
specifications and information about installing hardware, configuring device I/O, powering the
device, and connecting the device to a network.
POWER
POWER
STATUS
STATUS
USER1
USER1
USER FPGA1
USER FPGA1
1
RESET
RESET
V
C
INPUT
INPUT
9-30 V
9-30 V
25 W MAX
25 W MAX
8
7
1
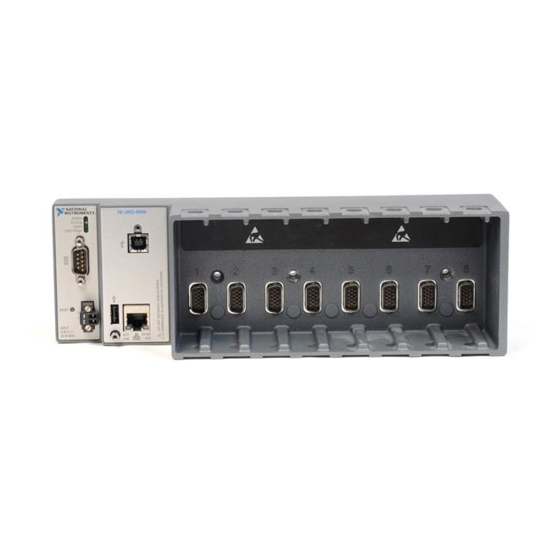
RS-232 Serial Port
2
LEDs
3
USB Device Port
4
RJ-45 Ethernet Port 2 (Not available on the cRIO-9066)
™
Figure 1. CompactRIO cRIO-906x Front Panel
1
ACT/
ACT/
10/100/
10/100/
LINK
LINK
1000
1000
6
2
POWER
POWER
STATUS
STATUS
USER1
USER1
USER FPGA1
USER FPGA1
3
1
RESET
RESET
V
C
5
INPUT
INPUT
9-30 V
9-30 V
25 W MAX
25 W MAX
8
7
5
RJ-45 Ethernet Port 1
6
USB Host Port
7
Power Connector
8
Reset Button
2
ACT/
ACT/
10/100/
10/100/
LINK
LINK
1000
1000
1
ACT/
ACT/
10/100/
10/100/
LINK
LINK
1000
1000
6
2
3
4
5
Advertisement
Table of Contents

Related Manuals for National Instruments CompactRIO cRIO-9066


Summary of Contents for National Instruments CompactRIO cRIO-9066
- Page 1 Embedded Real-Time Controller with Reconfigurable FPGA for C Series Modules This document describes how to get started with the National Instruments cRIO-9066 and cRIO-9067, referred to inclusively as the cRIO-906x. This document contains device specifications and information about installing hardware, configuring device I/O, powering the device, and connecting the device to a network.
-
Page 2: Safety Guidelines For Hazardous Locations
Product misuse can result in a hazard. You can compromise the safety protection built into the product if the product is damaged in any way. If the product is damaged, return it to National Instruments for repair. Safety Guidelines for Hazardous Locations The cRIO-906x is suitable for use in only Class I, Division 2, Groups A, B, C, D, T4 hazardous locations;... -
Page 3: Electromagnetic Compatibility Guidelines
Furthermore, any modifications to the product not expressly approved by National Instruments could void your authority to operate it under your local regulatory rules. -
Page 4: What You Need To Install Compactrio Reconfigurable Embedded Hardware
A number 2 Phillips screwdriver Power supply USB A-to-B cable National Instruments recommends using a locking USB cable, such as Caution part number 157788-01, in order to meet the shock and vibration specifications of this product. Category 5 (CAT-5) or better shielded, twisted-pair Ethernet cable ... -
Page 5: Mounting The Chassis
10-terminal, detachable screw terminal connector, as shown in Figure 3. For information about the minimum cabling clearance for C Series modules Note with other connector types, visit and enter the Info Code ni.com/info rdcrioconn CompactRIO cRIO-9066/cRIO-9067 Operating Instructions | © National Instruments | 5... - Page 6 44.1 mm (1.74 in.) 29.3 mm (1.15 in.) 14.1 mm (0.55 in.) 44.1 mm (1.73 in.) For more information about the dimensions of the system, including detailed Note dimensional drawings, visit ni.com/dimensions 6 | ni.com | CompactRIO cRIO-9066/cRIO-9067 Operating Instructions...
- Page 7 Fasten the chassis to the surface using three M4 or number 8 screws appropriate for the surface, as shown in Figure 6. Screws must be longer than 19 mm (0.75 in.) to pass all the way through the chassis. National Instruments does not provide these screws with the chassis.
- Page 8 Fasten the panel mounting plate to the chassis using a number 2 Phillips screwdriver and three M4 × 23 screws, as shown in Figure 8. National Instruments provides these screws with the panel mounting kit. You must use these screws because they are the correct depth and thread for the panel mounting plate.
-
Page 9: Mounting The Chassis On A Din Rail
Fasten the DIN rail clip to the chassis using a number 2 Phillips screwdriver and two M4 × 25 flathead screws, as shown in Figure 9. National Instruments provides these screws with the DIN rail mounting kit. Tighten the screws to a maximum torque of 1.3 N ·... -
Page 10: Installing C Series I/O Modules In The Chassis
I/O modules. Align the I/O module with an I/O module slot in the chassis, as shown in Figure 12. The module slots are labeled 1 to 8, left to right. 10 | ni.com | CompactRIO cRIO-9066/cRIO-9067 Operating Instructions... -
Page 11: Removing I/O Modules From The Chassis
Tighten the grounding screw to 0.5 N · m (4.4 lb · in.) of torque. Attach the other end of the wire to the grounding electrode system of your facility using a method appropriate for the application. CompactRIO cRIO-9066/cRIO-9067 Operating Instructions | © National Instruments | 11... -
Page 12: Wiring Power To The Chassis
After the initial powerup, you must install software on the chassis and Note configure system settings in Measurement & Automation Explorer (MAX) as described in the Configuring the System in MAX section of this document. 12 | ni.com | CompactRIO cRIO-9066/cRIO-9067 Operating Instructions... -
Page 13: Controller Startup Options
When you reset the cRIO-906x controller either programmatically or by Caution using the Reset button, you also reset the FPGA. All FPGA I/O lines are tri-stated after a reset, and will enter predefined states once loaded. CompactRIO cRIO-9066/cRIO-9067 Operating Instructions | © National Instruments | 13... - Page 14 Use a USB A-to-B cable to connect the USB device port of the cRIO-906x to a USB port on the host computer. The device driver software automatically installs on the host computer. National Instruments recommends using a locking USB cable, such as Caution part number 157788-01, in order to meet the shock and vibration specifications of this product.
-
Page 15: Connecting The System To A Network
Real-Time application. For more information about VISA VIs, refer to the LabVIEW Help. For information about available transceiver modes for serial communication, visit ni.com/info and enter the Info Code serialtransceiver CompactRIO cRIO-9066/cRIO-9067 Operating Instructions | © National Instruments | 15... - Page 16 USB device port during field maintenance instead of interrupting communication on the RJ-45 Ethernet ports. National Instruments recommends using a locking USB cable, such as Caution part number 157788-01, in order to meet the shock and vibration specifications of this product.
-
Page 17: Using The File System
STATUS USER1 USER FPGA1 POWER LED The POWER LED lights up while the cRIO-906x is powered on. This LED indicates that the power supply connected to the chassis is adequate. CompactRIO cRIO-9066/cRIO-9067 Operating Instructions | © National Instruments | 17... -
Page 18: Status Led
Use the LabVIEW FPGA Module and NI-RIO software to define the USER FPGA1 LED to meet the needs of your application. Refer to the LabVIEW Help for information about programming this LED. 18 | ni.com | CompactRIO cRIO-9066/cRIO-9067 Operating Instructions... -
Page 19: Troubleshooting Network Communication
Configure the IP and other network settings in MAX. Press and release the Reset button to reboot the chassis. For further troubleshooting steps, visit and enter the Info Code ni.com/info RIOMAXTroubleshoot CompactRIO cRIO-9066/cRIO-9067 Operating Instructions | © National Instruments | 19... -
Page 20: Where To Go Next
Visit ni.com/compactriodevguide for the NI CompactRIO Developers Guide. CompactRIO Sample Projects These projects include deterministic control, waveform acquisition, and datalogging. You can find CompactRIO sample projects on the Create Project dialog in LabVIEW. 20 | ni.com | CompactRIO cRIO-9066/cRIO-9067 Operating Instructions... -
Page 21: Specifications
Number of 6-input LUTs ........53,200 Number of DSP slices (18 x 25 multipliers) ......... 220 Available block RAM ........4,480 kbits Number of DMA channels ....... 16 Internal Real-Time Clock Accuracy ............5 ppm CompactRIO cRIO-9066/cRIO-9067 Operating Instructions | © National Instruments | 21... -
Page 22: Power Requirements
Torque for screw flanges......0.3 to 0.4 N · m (2.7 to 3.5 lb · in.) Weight ...............1048 g (36.97 oz) for cRIO-9066, 1050 g (37.04 oz) for cRIO-9067 Battery life may drop dramatically in extreme temperatures. 22 | ni.com | CompactRIO cRIO-9066/cRIO-9067 Operating Instructions... -
Page 23: Safety Voltages
• EN 55022 (CISPR 22): Class A emissions • EN 55024 (CISPR 24): Immunity • AS/NZS CISPR 11: Group 1, Class A emissions • AS/NZS CISPR 22: Class A emissions CompactRIO cRIO-9066/cRIO-9067 Operating Instructions | © National Instruments | 23... -
Page 24: Online Product Certification
At the end of the product life cycle, all products must be sent to a EU Customers WEEE recycling center. For more information about WEEE recycling centers, National Instruments WEEE initiatives, and compliance with WEEE Directive 2002/96/EC on Waste and Electronic Equipment, visit ni.com/environment/ weee 24 | ni.com | CompactRIO cRIO-9066/cRIO-9067 Operating Instructions... -
Page 25: Battery Replacement And Disposal
Ingress protection ..........IP 40 Operating humidity (IEC 60068-2-56) ..... 10% RH to 90% RH, noncondensing Storage humidity (IEC 60068-2-56)....5% RH to 95% RH, noncondensing Pollution Degree (IEC 60664)......2 CompactRIO cRIO-9066/cRIO-9067 Operating Instructions | © National Instruments | 25... -
Page 26: Shock And Vibration
NI. National Instruments corporate headquarters is located at 11500 North Mopac Expressway, Austin, Texas, 78759-3504. National Instruments also has offices located around the world. For telephone support in the United States, create your service request at or dial ni.com/support... - Page 27 NI product. Refer to the Export Compliance Information at ni.com/legal/export-compliance for the National Instruments global trade compliance policy and how to obtain relevant HTS codes, ECCNs, and other import/export data. NI MAKES NO EXPRESS OR IMPLIED WARRANTIES AS TO THE ACCURACY OF THE INFORMATION CONTAINED HEREIN AND SHALL NOT BE LIABLE FOR ANY ERRORS.
Need help?
Do you have a question about the CompactRIO cRIO-9066 and is the answer not in the manual?
Questions and answers