Table of Contents

Related Manuals for Vision Engineering SWIFT PRO Series


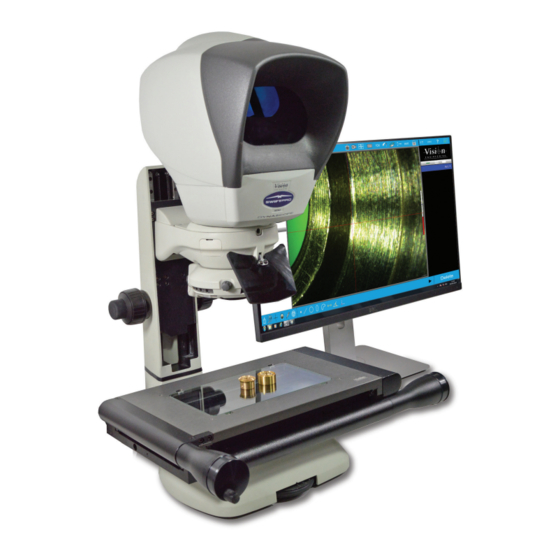
Summary of Contents for Vision Engineering SWIFT PRO Series
- Page 1 Est. 1958 www.visioneng.com User Guide Swift PRO series of optical and video measuring systems Swift PRO Duo Swift PRO Cam Swift PRO Elite FM 557119 Vision Engineering been certified for the quality management system ISO 9001:2015.
- Page 3 Servicing deliver superior ergonomic performance, reducing the exertion of the user to a minimum. Depending Repairs may only be carried out by Vision Engineering- on the duration of uninterrupted work, appropriate trained service personnel. Only original Vision Engineering measures should be taken to sustain optimal operator spare parts may be used.
- Page 4 We have compiled the texts and illustrations as accurately the following conditions: as possible. However, Vision Engineering Ltd. will not be responsible for the accuracy of the information contained ƒ The document may be used for informational purposes...
-
Page 5: Table Of Contents
Contents Page System equipment Stand & objectives Swift PRO Cam Stage Head QC 3000 Controller Assembly Removing the transit protection Attaching the lens mount Objective lens attachment Attaching the LED ringlight Attaching the episcopic illuminator (EPI) Connecting the EPI Stage assembly (150mm x 100mm & 200mm x 100mm) PC system connection QC 3000 connection Stage alignment (video systems only) - Page 6 Technical specifications Measuring Stage Measuring Range Height adjustment Encoder Resolution Video Camera Optics (Swift PRO Duo and Elite) Illumination PSU fuse ratings Dimensions Swift PRO Duo and Elite Swift PRO Cam Service & calibration record Serial numbers Service information Warranty...
-
Page 7: System Equipment
System equipment System equipment Stand & objectives Ò Stand Lens mount Lens options Illuminator options Toolkit Anti-glare shield Z Axis upgrade kit (optional) Swift PRO Cam Stage 150mm x 100mm manual stage 200mm x 100mm manual stage www.visioneng.com/support... -
Page 8: Head
System equipment Head QC 3000 Controller Monitor Keyboard and mouse www.visioneng.com/support... -
Page 9: Assembly
Assembly Assembly Removing the transit protection Ò Remove the two securing screws and then remove the transit plate Keep the transit protection for future transport of your system. It is highly recommended that you refit the transit protection whenever you transport your system. Attaching the lens mount Insert the lens mount up into the focus assembly... -
Page 10: Attaching The Led Ringlight
Assembly Attaching the LED ringlight Locate the LED ringlight into position over the lens mount and tighten the securing screws For connection details, see page 6. Attaching the episcopic illuminator (EPI) Locate the cone over the EPI and secure it with the grub screw Locate the EPI into the focus assembly and secure it... -
Page 11: Stage Assembly (150Mm X 100Mm & 200Mm X 100Mm)
Assembly Stage assembly (150mm x 100mm & 200mm x 100mm) Use the stand’s levelling foot to ensure the base is stable. Place the stage on the stand ensuring the retractable foot (position B4 in diagram below) is fully retracted. Check the stand stage mount feet and the underside of the stage are clean and free... -
Page 12: Pc System Connection
Assembly PC system connection Ringlight illumination Z Axis (if fitted) Y Axis X Axis Mains in Stand USB to controller From camera USB to controller Sub-stage, EPI accessory, head power illumination, and AUX connector All connectors must be engaged fully and secured. WARNING: To comply with safety regulations, easy access to the mains socket must be maintained. -
Page 13: Stage Alignment (Video Systems Only)
Assembly Stage alignment (video systems only) Turn on the system. Switch on the PC and follow on screen instructions for crossing reference marks. Using the Focus control , focus on the three horizontal lines in the centre of the alignment plate attached to the stage. Rotate the stage by hand until the horizontal lines are parallel to the horizontal crosshair on the PC’s screen. -
Page 14: Head Attachment
Assembly Head attachment Lower the head into position on the focus assembly Insert the head connector into the head socket Turn the system on using the mains switch. Use the X and Y stage controls to centre the alignment plate in the viewing screen. -
Page 15: Stage Glass Levelling
Assembly Stage glass levelling Use the X axis and Y axis controls to bring the rear right- hand corner of the stage glass (fixed corner) into view. Use the focus control to bring the glass surface into sharp focus. Use the axis controls to bring the front right-hand corner into view. -
Page 16: Operation & Setup
Operation & setup Operation & setup Main system controls Y axis control X axis control Coarse focus control Fine focus control On/off switch Substage light dimmer Episcopic light dimmer Ringlight dimmer Iris control All desktop control systems configured by Vision Engineering for this product are set with the following password: Vision... -
Page 17: Getting The Most From Your System
ƒ Power supply; 100-120V/ 220-240V, 50/60Hz with product and you purchased your own PC, voltage fluctuations up to 10% of the nominal voltage Vision Engineering recommend the use of a ƒ Transient over voltages typically present on the Mains powered USB hub for the camera signal. -
Page 18: Substage Illumination Led Replacement (All Models)
Operation & setup Substage illumination LED replacement (all models) Disconnect the system’s power supply. Remove the head, stage and illuminators, carefully place the unit on its side and remove the 4 LED cover plate securing screws Remove the LED cover plate Remove the LED securing screws and remove it from the stand... -
Page 19: Retrofitting The Z Axis Module
Operation & setup Retrofitting the Z axis module This procedure should only be carried out by authorised service personnel. Please contact your local Vision Engineering branch for assistance Optional riser block This procedure should only be carried out by authorised service personnel. - Page 20 Technical specifications Technical specifications Measuring Stage Dimensions Precision measuring stage, with factory-set Non-Linear Swift PRO Duo and Elite Error Correction (NLEC) calibration as standard. ƒ A = 680mm max. (X,Y) Stage accuracy: 5+(6.5L/1000)µm ƒ B = 430mm (150mm x 100mm) (Z) Z-axis accuracy 10 µm using controlled conditions 515mm (200mm x 100mm) with 200x magnification*...
- Page 21 Service & calibration record Service & calibration record Serial numbers System serial number Stage serial number Stage serial number PSU serial number PSU serial number Sysytem serial number Service information Date of next Service type Comments Date of service Company Signature service www.visioneng.com/support...
- Page 23 Vision Engineering. Except as stated herein, Vision Engineering makes no other warranties, express or implied by law, whether for resale, fitness for a particular purpose or otherwise. Further, Vision Engineering shall not under any circumstances be liable for...
- Page 24 Email: info@visioneng.com.br Email: infomx@visioneng.com Disclaimer – Vision Engineering Ltd. has a policy of continuous development and reserves the right to change or update, without notice, the design, materials or specification of any products, the information contained within this brochure/datasheet and to discontinue production or distribution of any of the products described.
Need help?
Do you have a question about the SWIFT PRO Series and is the answer not in the manual?
Questions and answers