Savant S2 Quick Start Manual
Hide thumbs
Also See for S2:
- Quick reference manual (2 pages) ,
- Deployment manual (24 pages) ,
- Quick reference manual (2 pages)
Table of Contents
Advertisement
Quick Links
Savant® S2 Host Rack Mountable
Quick Reference Guide
Box Contents
(1)
Savant® S2 Host Rack Mountable - (SHR-S2-xx)
(1)
Install Kit (075-0221-xx)
(1)
Mounting Plate (074-0577-xx)
(1)
5V DC 3A Power Supply
with Quick Change AC Adapters (025-0223-xx)
(2) 6-pin Screw Down Plug-in Connector (028-9352-xx)
(2) 3-pin Screw Down Plug-in Connector (028-9351-xx)
(1)
4 inch Cable Tie (014-0071-xx)
(1)
Product and Regulatory Insert (009-1950-xx)
Specifications
Environmental
Temperature
32° to 104° F (0° to 40° C)
Humidity
10% to 90% Relative Humidity (non-condensing)
Cooling
10 CFM
Maximum BTU
51.5 BTU/hr
Dimensions and Weights
Height
1.40 in
Device
(3.5 cm)
2.75 in
Shipping
(6.98 cm)
Rack Space
1U
Power
Input Power
5V DC 3A
Maximum Power
15 watts
Wireless Standards
SHR-S2-00
Wi-Fi (802.11 a/b/g/n 2.4/5 GHz)
SHR-S2-01
Wi-Fi (802.11 a/b/g 2.4 GHz)
IMPORTANT! 802.11r (fast roaming) is not supported
Security
WPA™, WPA2™, WPA/WPA2™
Regulatory
FCC Part 15
Safety and
Emissions
Contains FCC ID
Z64-WL18SBMOD
Contains IC
451I-WL18SBMOD
RoHS
Compliant
Supported Releases
da Vinci 9.1.3 and higher
SHR-S2-00
Studio 3.0.2 and higher
da Vinci 9.2 and higher
SHR-S2-01
Studio 3.0.2 and higher
SHR-S2-xx Quick Reference Guide | 009-1907-05
Copyright 2021 Savant Systems, Inc | 211201
Width
Depth
Weight
6.00 in
3.20 in
0.5 lb
(15.2 cm)
(8.1 cm)
(0.22 kg)
9.50 in
9.75 in
2.1 lb
(24.1 cm)
(24.7 cm)
(0.95 kg)
CE
C-Tick
UKCA
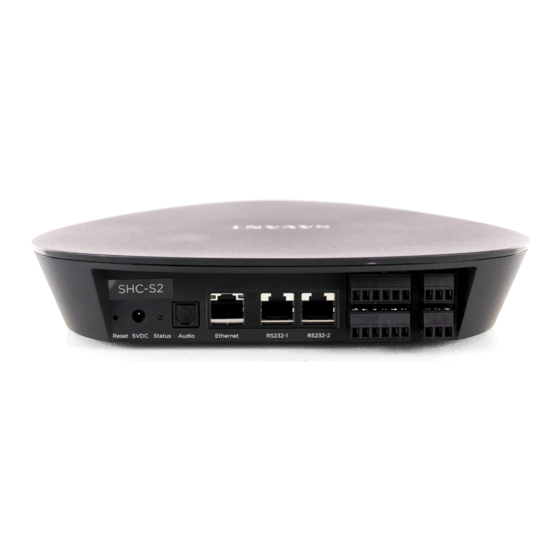
Front Panel
Reset
A
A
Reset Button
B
Status LED
Chassis Installation
The S2 Host can be installed on a solid, flat, level surface such as a
table, cabinet, or shelf. The location should be dry, well ventilated, and
out of direct sunlight.
Rack
The optional RCK-3000-xx provides a ventilated shelf for mounting
S2 Hosts. This rack is compatible with all standard 19-inch National
Electrical Manufacturers Association (NEMA) rack mounts.
Mounting Plate
A mounting plate (074-0577-xx) is supplied with the SHR-S2. This
mounting plate is used to mount the Host to a wall or existing
structure. To mount the Host, follow the instructions below.
1. Position the mounting plate onto the wall where the Host will be
located. Position the bracket so the tabs that hold the Host are
positioned horizontally.
ICES-
2. Mark the two mounting holes on the wall.
003
3. Install wall anchors and screw mounting plate to the wall.
4. Snap the SHR-S2 Host into the bracket so the tabs on the mounting
bracket seat into the slots on the side of the Host.
Host
1
of
2
To clear all Ethernet settings and revert them
back to their factory defaults, press and hold the
reset button for five seconds until the LED blinks
red rapidly; then release.
Off: Disconnected from power supply.
Amber: Host is booting/rebooting and is
disconnected from the network.
Amber Blinking: Host is in provisioning mode
and ready to be added to a network. Host is not
assigned an IP Address.
Green: Connected to the local network and is
assigned an IP Address.
Green Blinking: Host is in AP Mode and will begin
broadcasting it's own network. If Host AP Mode
is configured, it should be noted that the local
network and Host AP Mode network are entirely
separate.
Mounting
Bracket
45 Perseverance Way, Hyannis, MA 02601
Savant.com
Status
B
| 508.683.2500
Advertisement
Table of Contents

Subscribe to Our Youtube Channel
Related Manuals for Savant S2


Summary of Contents for Savant S2
- Page 1 (24.7 cm) (0.95 kg) Chassis Installation Rack Space The S2 Host can be installed on a solid, flat, level surface such as a Power table, cabinet, or shelf. The location should be dry, well ventilated, and Input Power 5V DC 3A out of direct sunlight.
- Page 2 – Refer to the RS-232 Conversion to DB-9 and RS-422/485 Pinout and from serial controllable devices. Reference Guide on the Savant Customer Community for more information on RJ-45 to DB9 adapters offered by Savant. RS-232 Ports 1-2 RS-232 - CTS/RTS handshaking. CTS RTS handshaking availability is based on the component profile.
Need help?
Do you have a question about the S2 and is the answer not in the manual?
Questions and answers