
Subscribe to Our Youtube Channel
Related Manuals for T&D RTR-57U


Summary of Contents for T&D RTR-57U
- Page 1 ������� User's Manual Thank you for purchasing our product. Carefully read this instruction manual before using this unit. © Copyright 2001-2005 T&D Corporation. All rights reserved. 2005. 09 16004455040...
-
Page 2: Notices About This User's Manual
Safety Precautions and Instructions ■ Notices about this User's Manual In order to properly use this product, please carefully read this manual before using. T&D Corporation accepts no responsibility for any ◆ To ensure safety be sure to obey all of the malfunction of and / or trouble with this product or with your computer following warnings. - Page 3 Do not use batteries other than specified. Doing so may bathroom. cause fire or damage. Store RTR-57U main units, batteries and communication Do not use an AC adaptor other than specified. Doing so may cables out of the reach of children. It is dangerous to touch lead to fire or damage.
- Page 4 CAUTIONS Wireless Regulations Radio, EMC and Safety Regulations Do not expose the unit to harmful gases or chemicals. It may cause corrosion and/or other danger to the unit and to people This device complies with part 15 of the Federal Communications handling the unit.
-
Page 5: Table Of Contents
・For Windows Me..................18 ・For Windows 98..................19 Menus at a Glance ................59 Basic Functions If Installation Fails ...................63 Specifications for RTR-57U Data Collector Communicating with the Data Logger ........64 ...........22 Wireless Communication Optional Accessories ................65 ・Register the Data Logger Unit to be used as a Remote Unit ....25 Warranty .................... -
Page 6: About Data Collector Rtr-57U
The RTR-57U has a large enough capacity to collect data from 16 RTR-5 units at Data Collector can then be connected to your computer to enable easy full capacity. If not at full capacity, the RTR-57U can collect and manage data of up downloading and total data management. The RTR-57U Data Collector to 250 data downloading sessions. -
Page 7: Contents Of Package
3 minutes. ● Backlit Display for Viewing in Dark Places The RTR-57U comes equipped with a backlit display for easy viewing even in hard to see places. The light can be switched ON/OFF in the main menu. If set to be ON, it will light up when operation begins and automatically turn off when operation stops for a few seconds, saving battery energy. -
Page 8: Part Names And Functions
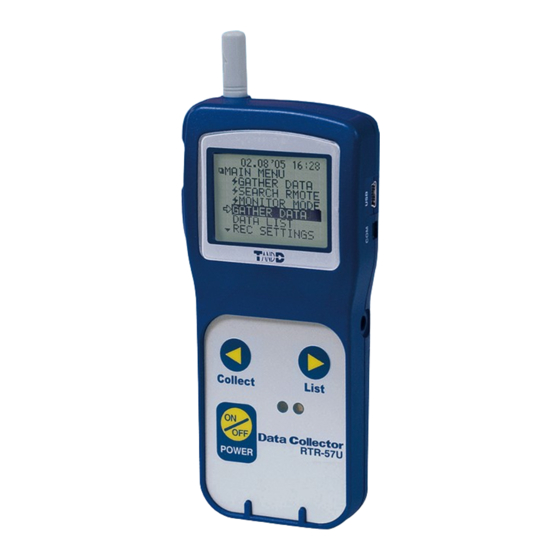
Part Names and Functions ① ⑤ ② ⑥ ③ ① Operation Dial ⑥ Serial Communication cable ② LCD Display connection jack ③ Operation Buttons ⑦ AC adaptor connection jack ④ Optical Communication Port ⑧ Antenna ⑤ USB cable connection jack ⑨... - Page 9 ( ▼ ) to view. emperature, Humidity, Voltage and Pulse Data that has been downloaded to an RTR-57U unit can be displayed in Graph form. See p.39 for details about the display. Event List Display ・After making a setting, adjust the dial to select 【...
-
Page 10: Getting Ready
Note ・If the date and time of the RTR-57U main unit are not accurate, the starting time ・The RTR-57U unit has no battery of a programmed start and the recorded time of downloaded data will be different recharging ability. -
Page 11: Communicating With The Computer
(to computer) with a USB cable and Windows. After installing, your computer will be able to detect and recognize an RTR-57U device that has been connected with a USB cable. -When installing the software [T&D Recorder for Windows US], the USB Device Driver will also be copied to your hard disc. -
Page 12: Installing The Usb Device Driver
Connect the Serial Communication Cable (TR-07C) to a serial able to detect and recognize RTR-57U devices that have been port on your computer. connected with a USB cable. Connect the Serial Cable to the COM port on the RTR-57U. ® ◆ For Windows Turn on your computer and open Windows. ... -
Page 13: For Windows 2000
After installation has been completed, click the [Finish] button. Confirm the Connections (see p.17) Note ・If the Driver is not automatically detected, please search by specifying the place as (CD-ROM [Device Driver ¥RTR-57U]) and install manually from there. ® ◆ For Windows 2000 Turn on your computer and open Windows. ... -
Page 14: For Windows Me
® ® ◆ Confirming the Connection (Windows XP / 2000) ◆ For Windows Turn on your computer and Open the [Control Panel] and double click on [System]; the open Windows. system properties will be displayed. After Windows has been Click the [Hardware] Tab, and click the [Device Manager] button in completely started up, the Device Manager Area. -
Page 15: For Windows 98
® ◆ For Windows Turn on your computer and open Windows. After Windows has been completely started up, connect the supplied USB cable to a USB port on your computer. Insert the attached CD-ROM in the CD-ROM drive. If the Installation Window opens, close it. By connecting a data Collector to the USB cable already connected to your computer, the [Found New... -
Page 16: Communicating With The Data Logger
Communicating with the Data Logger ® There are two ways to communicate between the RTR-57U and the Data ◆ Confirming the Connection (Windows XP / 2000) Logger. Open the [Control Panel] and double click on [System]; the ◆ Wireless Communication system properties will be displayed. - Page 17 ◆ Optical Communication 〔For RTR-51/52/53,RVR-52A and TR-51A/52〕 Place logger face down on RTR-57U...
-
Page 18: Wireless Communication
If you wish for those settings to remain in effect, please make sure to use the [Read Settings] function before making any changes. (See p.29 for details.) Place the unit face down on the RTR-57U. Communication Cable In the Main Menu, click [REC SETTINGS]... - Page 19 [REC Programmed] and press dial to transmit the recording conditions to the Remote Unit. Please make sure that the date and time settings in the 〔Recording Interval〕 RTR-57U are correct before making recording start settings. Choose from 15 intervals : S… 1,2,5,10,15,20,30 seconds For details, see [Setting the Date and Time] from p.10).
-
Page 20: Downloading Recorded Data
◆ About the Default Settings When making recording condition settings via your computer, under [Start At any time, you can return the RTR-57U to its default settings of Wireless Communication] you can select [Forbid] or [Permit] to either forbid or Recording Mode : Endless... - Page 21 When you check the amount of the memory to confirm whether the data you wish to download can be saved in the RTR-57U, and the data cannot be saved, the message [Memor y Full] will be displayed and the downloading will be canceled.
-
Page 22: Non-Wireless Communication
Recording Start settings after having download the recorded data. Optical Communication ・If you make changes to the recording condition via the RTR-57U unit, channel names for RTR-51/52/53,RVR-52A and TR-51A/52 may change. When you do not wish to change the names, make sure to Read Settings before making changes.(See p.34) - Page 23 [REC Programmed] and press dial to transmit the recording conditions to the Remote Unit. Please make sure that the date and time settings in the RTR-57U are correct before making recording start settings. For details, see [Setting the Date and Time] from p10.
-
Page 24: Downloading Recorded Data
◆ Message after Downloading ◆ Downloading Recorded Data Connect the RTR-57U to the Data Logger either by placing it on the Collector ① When the downloading is completed, a ① for optical communication or connect via the optional communication cable. -
Page 25: Graph Display
Graph Display In this display you can view in graph form the downloaded Temperature, Humidity, Soil Moisture, Voltage and Pulse data. A graph is displayed for each channel of data and can be scrolled left and right with the operation dial or by the buttons on the main unit. ①... -
Page 26: Event List Display
(Lo → Hi) or RTR-57U in an event data list. With the operation dial or main unit falling (Hi → Lo), occurs and lasts for more than 1 second. -
Page 27: Checking Upper And Lower Limits
Checking Upper and Lower Limits By setting upper and lower limits you can check data as it is ◆ Viewing the Results of Saved Data downloaded to see if all measurements fall within the limit range and In the Main Menu, open [DATA LIST] and select the data you wish have the results displayed. -
Page 28: Remote Unit Conditions Display
Remote Unit Conditions Display You can check selected Remote Unit info (Recording Conditions, 〔Pulse Recording〕 Current Measurements, and Battery Life, etc.) The total number of pulse readings during the recording interval set when recording settings were made for the Remote Unit will be displayed. In the Main Menu, open [ Gather Data] . -
Page 29: Searching For Remote Units
Remote Units that have been added to the In the Main Menu, open [ SEARCH RMOTE]. same Group name in other RTR-57U Data Collectors. ① Select the search range from ([All Groups] or [Specify Group]) and click to start the search. -
Page 30: Monitoring
Monitoring The RTR-57U can be set to patrol and monitor RTR-51/52/53 or [Specify Group] : All Remote Units in the selected groups will be contacted via wireless RVR-52A groups and display in order the current readings for view. communication, and current measurement readings for those units will be displayed consecutively every 2 seconds. -
Page 31: Viewing / Deleting Saved Data
Viewing / Deleting Saved Data All downloaded data is temporarily saved in the RTR-57U Collector. It ◆ About Monitoring Communication Time is possible to select saved data and view it in graph form or select it Please note that if the monitoring interval is set for less time than for deletion. -
Page 32: Displaying Recorded Data In Graph Or Event List
◆ Displaying Recorded Data in Graph or Event List Deleting Selected Data ◆ In the Main Menu, open [DATA In the Main Menu, open [Data LIST] or press the [List] button on List] or press the [List] button the main unit to view the data list. on the main unit. -
Page 33: Deleting All Data
Radio Wave Monitor This function enables the user to check the condition of radio wave Deleting All Data ◆ transmissions. Depending on the location of the logger, at special frequencies there In the Main Menu, open [Set Functions] and [Clear MEMORY] . may be some instances in which, due to radio wave interference or other causes, communication capability does not meet expected A message asking for permission will... -
Page 34: Other Functions: Operational Settings
Other Functions: Operational Settings Here are explanations of other handy functions that can be found in Checking Memory ◆ the [Operational Settings] window, under the [Main Menu] window. In the Main Menu, open [SET FUNCTIONS] and [Check MEMORY] . Adjusting Contrast ◆... -
Page 35: Menus At A Glance
… Menus at a Glance … MONITOR MODE …View Current Measurements (See p.49) For details about operations please see the relevant pages. 【BACK】 GATHER DATA Start search for All Groups Consecutive display of current contactable remotes measurements of contacted ... - Page 36 REC SETTINGS SET FUNCTIONS 【BACK】 【BACK】 Upper and Lower Call by Group Call by Name Limit Settings Wireless Settings Display (See p.43) (See p.25) By Group*2 【BACK】 Temperature Direct Humidity After setting, click [BACK] to (See p.33) Voltage finish. Pulse Backlight 【BACK】...
-
Page 37: If Installation Fails
If Installation Fails Specifications for RTR-57U Data Collector If, during USB device driver installation, some trouble occurs that results in a Compatible Models RTR-51・RTR-52・RTR-53・RVR-52A・TR-51A・TR-52・ failure to install properly, the following display will appear in the Device TR-71U・TR-72U Manager. Recording Capacity 16 units at full data 16,000 readings ×... -
Page 38: Optional Accessories
USB:One Full Logger's Data ~ 5 sec. 40in[1m] RS-232C:One Full Logger' s Data ~ 25 sec. Cable length: 40in (1m) Data from RTR-51 / 52 / 53 / RVR-52A to RTR-57U via wireless: One Full Data~420sec. Data from TR-7 Series to RTR-57U via cable: One Full Data ~ 50sec. - Page 39 Please stop by and see what we have to offer. http://www.tandd.com/ RTR-57U User's Manual Published by T&D CORPORATION © Copyright 2001-2005 T&D Corporation. All rights reserved. This is printed on 100% recycled paper.
Need help?
Do you have a question about the RTR-57U and is the answer not in the manual?
Questions and answers