Table of Contents
Advertisement
Quick Links
Advertisement
Table of Contents

Related Manuals for Fuel3D SCANIFY F3D2001

Summary of Contents for Fuel3D SCANIFY F3D2001
- Page 1 User Manual SCANIFY F3D2001 Version 1.0 Revision Date: 2015.01.02...
-
Page 2: Table Of Contents
- Registering your device and locating your serial number - Setting up your scanner Taking a scan - Selecting a suitable subject - Utilizing the target holders - Acquiring a scan with Fuel3D Studio Hardware - Connections - Flashes - Cameras - LED Indicators... -
Page 3: Scanify Profile
3D printing and on-screen applications (.STL, .OBJ, .PLY). All versions of Fuel3D Studio are created to be as easy to use as possible, with a simple, intuitive user interface and can be installed on both PC (currently available) and Mac (coming in early 2015). -
Page 4: Set-Up
The Serial Number is required to register your SCANIFY on our website and is necessary when downloading Fuel3D Studio. It is important that you keep your serial number easily accessible as it is a unique identifier for your scanner and may be required if you have a support request. - Page 5 PC. Once plugged into a computer Studio will automatically install the device drivers. Note: Device drivers must be installed before opening Fuel3D Studio, this may take several minutes the first time a new scanner is connected.
-
Page 6: Taking A Scan
Taking a Scan Selecting a suitable subject Some subjects may work better than others and we encourage experimenting with a wide variety of items to get an understanding of what scans best. Below are examples that can help you decide whether a subject is suitable to scan. Subjects that work well: Examples that work well: Masonry... -
Page 7: Utilizing The Target Holders
Subjects that may not work well: Examples that may not work well: Lack of detail – lack of surface or Metallic – shiny or Plastics – these color information reflective objects objects may be Too large – a may result in will reflect the light reflective and lack whole body... - Page 8 When scanning a person’s face it is advised to use the handheld target holder and place it against the chin. WARNING • Epilepsy Caution: The Fuel3D Scanner incorporates flashing lights which may affect individuals who have photosensitive epilepsy or other such conditions. Users must accept full responsibility.
-
Page 9: Acquiring A Scan With Fuel3D Studio
Acquiring a scan with Fuel3D Studio Launching the View Finder You can open the View Finder by selecting the ‘Launch View Finder’ button that is located below your list of projects. ‘Launch View Finder’ button The View Finder will then display a live view from the scanner. - Page 10 Ideal conditions for scanning would be indoors with good lighting. If lighting is too dark you can use the guide lights. These are on by default whilst scanning but can be toggled ‘Off’ or ‘On’ within the View Finder interface. Guide light radio button Ensure there are no lights in the scan capture area.
-
Page 11: Hardware
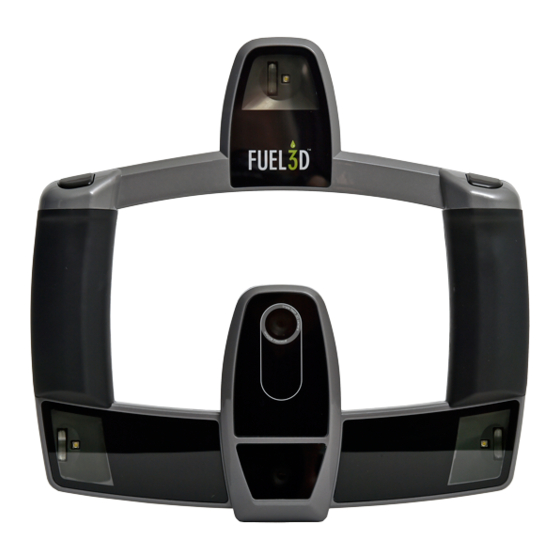
Hardware Connections To function the scanner requires two connectors (included): 2.0 Micro USB to USB data cable 5V Power Adapter Both connections attach at the bottom of the scanner Select the appropriate power adaptor for your region. Plug the power adaptor into a power outlet and the other end into the scanner. -
Page 12: Cameras
Cameras The scanner uses a stereo camera set-up located in the center of the scanner. The central camera is utilized while using the viewfinder. Tip: The Trigger Buttons Ensure that your camera lenses are clean. The SCANIFY has two trigger buttons located on top of the scanner. Used when taking a The SCANIFY should be held with the cameras and flashes facing towards the subject. -
Page 13: Led Indicators
LED indicators The indicator LEDs face towards you while taking a scan. The right LED will illuminate while the scanner is receiving power. The left LED will illuminate when the View Finder is running on the computer. The top and bottom LEDs can be used to help track the target by providing you with feedback of when the scanner is in range. -
Page 14: Caring For Your Scanner
If the left LED indicator flashes slowly while the target is in range and you are unable to take a scan please contact support at: fuel3d.zendesk.com. Caring for your scanner Properly caring for your scanner will ensure that it continues to produce high-quality outputs. -
Page 15: Software
Software Navigating Fuel3D Studio The Fuel3D Studio interface 3D scan viewer List of projects Scan export options List of libraries View menu (note that mesh is currently disabled) 3D scan viewer control options The lower pane contains scans within your... - Page 16 Creating libraries and projects Libraries designate the location on your computer where your Projects will be saved. Remove the selected library Add a new project library Library selection Your scans are saved within projects. You can create an unlimited number of Projects (dependent on your storage space) within the library you have created.
-
Page 17: Acquiring A Scan
Note: Rotating your scan in the 3D view will not alter the orientation after exporting from Studio. The lower pane window The lower pane is where you can browse and select your scans once you have selected a scan in a project. Once selected they will open in the built-in 3D viewer. Rename selected scan Delete selected Move between scans... -
Page 18: Inspecting Your Scan
This is accomplished by pressing either one or both of the trigger buttons or by clicking the ‘Capture’ button in the View Finder. Holding the scanner and using the trigger buttons Once a scan has been taken it will take 30 seconds for the flashes to cool down before you can take another scan. - Page 19 The mono-color view mode may help you identify which areas are bad. This data may be removed using the cropping tool. Spotting movement and lighting interference in your scans Movement within scans can generate bad data. For example, you may see a noisy scan occasionally (surface of scan will appear rough when it should be smooth) this can be attributed to movement either on the part of the operator of the scanner or the subject being scanned.
-
Page 20: Cropping A Scan
Cropping a scan Select the cropping button to open the crop interface Cropping allows you to place points on your scan to select the area you wish to keep. You can place a point by clicking a position on your scan. This creates a node. At least three nodes are required to create an area that can then be accepted as a crop but it is recommended to select more depending on what you are cropping. -
Page 21: Exporting Your Scan
You may also use keyboard controls to control the cropped scan within the 3D viewer. : Zoom-in : Zoom-out : Pan/rotate : Undo crop node placement : Redo crop node placement Note: Don’t worry, your original scan data is saved and a crop can always be undone, even after the software is closed. -
Page 22: Troubleshooting
Very dark objects which the scanner struggles to illuminate. Bright objects which may reflect too much light. If you continue to have problems capturing a scan you can use the ‘Share with Fuel3D’ button to upload your scan to use for evaluation and guidance. - Page 23 You may also use non-permanent texture spray to coat your object with and then complete your scan. This spray will help to cover reflective surfaces which will improve the scan outputs. Note: For a full list of workarounds, instructions and issue troubleshooting please visit our FAQ at: fuel3d.zendesk.com.
- Page 24 © Copyright 2014 Fuel 3D Technologies Limited. All rights reserved. Fuel3D®, SCANIFY® and Pellego® are registered trademarks in the name of Fuel 3D Technologies Limited. All other trademarks are the property of their respective owners. All Fuel 3D Technologies Limited products and services are subject to continuous development. We reserve the right...
Need help?
Do you have a question about the SCANIFY F3D2001 and is the answer not in the manual?
Questions and answers