
Subscribe to Our Youtube Channel
Related Manuals for Buhler SnackFix


Summary of Contents for Buhler SnackFix
- Page 1 Operating Instructions SnackFix Issue-date: 2016-08-V1.0 Translation of original document (German) Read the instructions carefully German version is binding. prior to any installations!
- Page 2 Bühler GmbH Daimlerstrasse 8 74211 Leingarten Germany T +49 7131 907-0 F +49 7131 907-301 info.countlines@buhlergroup.com buhlergroup.com/countlines © Bühler GmbH 2016 SnackFix 2016-08...
- Page 3 The obligations agreed to in the delivery contract, the General Terms and Conditions as well as the delivery conditions of the manufacturer shall apply in addition to the respective legal regulations that are ap- plicable at the time the contract becomes effective. SnackFix 2016-08...
- Page 4 Violations are subject to com- pensation for damages. The manufacturer reserves the right to make additional claims. The manufacturer owns the copyright. SnackFix 2016-08...
-
Page 5: Table Of Contents
2.10 Labeling 32 2.11 Environmental Protection ..........35 Technical Data ................36 General Data ..............36 Connection Values ............38 3.3.1 Electricity ............38 Capacity Values ..............39 Operating Conditions ............39 Noise Emission ..............39 Name Plate ............... 40 SnackFix 2016-08... - Page 6 Adjust the Belt Tension at the TB ...... 64 7.4.6 Adjusting the knife height at the SZ ....65 7.4.7 Adjusting the downholder at the CU ....66 Adjusting the Knife Follow Movement with Eccentric Control ................68 Actions after usage ............69 SnackFix 2016-08...
- Page 7 11.2 Disassembly ..............102 11.3 Disposal 102 11.4 Disassambly Pump ............103 11.5 Disassambly Contimix ............. 103 11.6 Disassambly Side guiding plates ........103 12 Spare Parts ................104 13 Index .......... Fehler! Textmarke nicht definiert. 14 Appendix .................. 105 SnackFix 2016-08...
-
Page 8: Overview
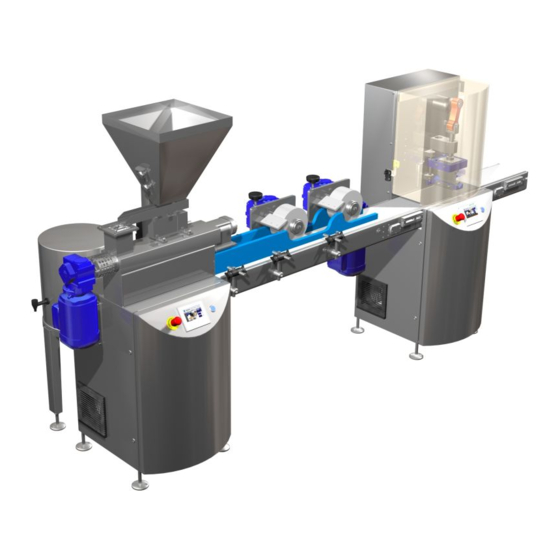
Control cabinet, preparation unit Pump Control cabinet, cutting unit Hopper 40l Vibration feeder Contimix Conveyor belt I TB Equalizing Roller I EGW 180 Equalizing Roller II EGW 180 Conveyor belt I TB Cutting machine SZ 100 M/TB SnackFix 2016-08... -
Page 9: Short Description
1.2 Short description Chapter „Design and Function“ Detailed description on page 41. The line serves for producing confectionery products such as granola bars on a small scale. For this, the ingredients are mixed, formed, cooled and cut. SnackFix 2016-08... -
Page 10: Other Applicable Documents
Overview Other applicable documents 1.3 Other applicable documents In addition to this instruction following documents are applicable: Operating instructions of the control panels “Operator manual” ( Instructions of integrated components Documentation file) SnackFix 2016-08... -
Page 11: Safety
NOTICE This combination of a symbol and signal word indicates a possible hazardous situation which could lead to material or environmental damage if it is not prevented. SnackFix 2016-08... - Page 12 Identifies a condition or an automatic sequence as a result of an action. Identifies enumerations and list entries with a specific sequence. Identifies references to chapters in this manual. [BUTTON] Identifies designations of buttons and other controls. SnackFix 2016-08...
-
Page 13: Intended Use
Do not rebuild, retool or modify the machine or single compo- nents. Any claims for to damages caused by misuse are excluded. The machine is designed for being used in the food industry. Installation site SnackFix 2016-08... -
Page 14: Responsibility Of The Operator
(interface analysis) and, if necessary, check the in- tegration in an emergency stop chain. The operator must have all the safety equipment checked regu- larly for functionality and completeness. SnackFix 2016-08... -
Page 15: Employee Requirements
People whose respon- siveness is affected by e.g., drugs, alcohol or medication are not au- thorized. When choosing the employees, the applicable age and job-specific regulations for the production site must be observed. SnackFix 2016-08... -
Page 16: Unauthorized Individuals
When in doubt, speak to the individual and remove him/her from the hazard and working area. Stop the work on the machine as long as the unauthorized indi- vidual is in the hazard and working area. SnackFix 2016-08... -
Page 17: Training
Put on the personal safety gear required in the various chapters of this manual before beginning work – no exceptions. Follow the directions posted in the working area for personal safety gear. SnackFix 2016-08... - Page 18 Rings, chains and other jewellery may not be worn. PSA_Schuhe Safety shoes Safety shoes serve to protect from heavy falling parts and slipping on slippery floors. PSA_Helm Protective helmet Protective helmet is used to protect against falling and flying parts and materials. PSA_Brille SnackFix 2016-08...
- Page 19 Wear when doing special work PSA_Atem Light breathing protection Breathing protection is used to protect the respiratory organs from health-threatening particles and dust. SnackFix 2016-08...
-
Page 20: Basic Hazards
Danger of injury from falling due to dirt or the product leaking from the machine! Contamination and leaking products create slippery areas. A fall can lead to injuries. Always keep the working area clean. Wear non-slip safety shoes. SnackFix 2016-08... -
Page 21: Hazards From Electric Powers
Any contact with these components can lead to seri- ous injury or death. Before working on the components mentioned, disconnect them completely from the power supply. Allow 10 min to pass in order to be sure that the internal capacitors are completely discharged SnackFix 2016-08... -
Page 22: Hazards From Mechanics
Do not reach into moving conveyor belts. Do not reach into rotating deflection rollers. Do not reach between conveyor belts, frame and other machine parts. Wear personal protective gear within the work area. SnackFix 2016-08... -
Page 23: Hazards From Lacking Hygiene
Observe all legal regulations and hygiene rules for the food in- dustry and health protection. Follow all directions relevant to hygiene in this manual. Make sure that the operating environment complies with the specifications listed for the machine at all times. SnackFix 2016-08... -
Page 24: Hazards From High Temperatures
For any works with operating materials always wear heat- resistant protective clothing and protective gloves. Before starting any works with operating materials, check if the- se are hot. If required, wait until they have cooled down. SnackFix 2016-08... -
Page 25: Hazards From Noise
Before starting work, check to see if all safety equipment is fully functional and correctly installed. Never bypass or disable safety equipment. Make sure that all safety equipment is always accessible. SnackFix 2016-08... -
Page 26: Position Of Safety Installations
Main switch on the control cabinet of the cutting unit Emergency stop button Touch Panel (on/off) Solenoid safety switch for protective hoods and hoppers Furher safety installations are installed at the 15l vessel please see the separate documentation SnackFix 2016-08... -
Page 27: Description Of The Installed Safety Installations
Before restarting, make sure that the cause for the emergency Fig. 4: Emergency stop button stop has been eliminated and that all safety equipment is mount- ed and fully functional. Only release the emergency stop button when no further hazard is present. SnackFix 2016-08... - Page 28 The protective hood of the cutting machine is equipped with solenoid tive hoods safety switch (1). The machine stops as soon as the protective hoods are opened dur- ing operation. Fig. 5: Solenoid safety switch at the hoods SnackFix 2016-08...
-
Page 29: Secure Against Restarting
Before removing the lock and restarting the power supply, make sure that no hazard exists for individuals. Remove key from main switch. Switch on the machine. To do this, turn the main switch to the "I" position. SnackFix 2016-08... - Page 30 Safety Secure against restarting The main switches are located at the control cabinets of the mass preparation unit and the cutting unit. SnackFix 2016-08...
-
Page 31: Stopping In Case Of Emergency
Make sure that all safety devices are mounted and functioning and that no persons are endangered before restarting. Before restarting check the machine and make sure that all safe- ty devices are mounted and functioning. SnackFix 2016-08... -
Page 32: Labeling
Turn off power before connecting or disconnecting equipment. Do not expose to water! The protective covers are labeled with the symbol “cutting damages”. Danger of cutting Never grasp underneath the protective covers during operation. SnackFix 2016-08... - Page 33 Before starting any work, make sure that all surfaces have cooled down to the ambient temperature. Safety First Only trained personell should make any changes. No direct water jet The control cabinets are labeled with this symbol. No direct water jet into the hood! SnackFix 2016-08...
- Page 34 Only when the main switch is in off-position, the frequency converter is without voltage. Wait for discharge time! ATTENTION! Screws and clamps may work loose during transport and mounting. Therefore check all screws and clamps for fastness prior to start-up. Observe instructions! SnackFix 2016-08...
-
Page 35: Environmental Protection
The following substances that are harmful for the environment are used: Lubricants like greases and oils contain poisonous substances. They Lubricants must not get into the environment. Lubricants must be disposed by a waste management company. SnackFix 2016-08... -
Page 36: Technical Data
Serial number preparation unit 63911-01 Serial number Equalizing roller 63911-02 EGW I 180-100 Serial number Equalizing roller 63911-03 EGW II 180-100 Serial number Cutting machine 63911-04 QS 100 M/TB Machine type SnackFix Year of construction 2016 Customer SnackFix 2016-08... - Page 37 800 mm Height approx. 1600 mm Working height approx. 900 mm Working direction from left to right - Nominal width for forming approx. 100 mm Weight preparation unit approx. 400 kg Weight Cutting unit approx. 400 kg SnackFix 2016-08...
-
Page 38: Connection Values
Fuse protection Control voltage V DC Protection class IP 54 Cutting unit Specification Value Unit Voltage 3 x 400 V AC Frequency Connection power 10,5 Current consumption, maximum Fuse protection Control voltage V DC Protection class IP 54 SnackFix 2016-08... -
Page 39: Capacity Values
0.8 – 2,4 Operating speed m/min Power of all drives see 62329-MSR 3.5 Operating Conditions Environment Specification Value Unit 10 − 30 Temperature range °C Relative humidity, maximum 3.6 Noise Emission Specification Value Unit Noise emission < 80 dB(A) SnackFix 2016-08... -
Page 40: Name Plate
Fig. 8: Control cabinet name plate Manufacturer Type Order no. System circuit diagram no. Nominal voltage Frequency Control voltage Power Nominal current Pre-fuse Year of construction SnackFix 2016-08... -
Page 41: Design And Function
Please ask Bepex for separate information The cutting machine cuts the strands crosswise to the belt moving Cutting direction into the required product width. The length of the product can be influenced by the width of the equalizing rollers (between 50- 115mm). SnackFix 2016-08... -
Page 42: Component Description
Pump Please see the separate documentation“Pump” in the documentation file for further information. 4.2.3 Mass preparation unit Fig. 9: Mass preparation unit 40l hopper Control cabinet Vibration feeder Emergency-stop button Contimix 15l Vessel Gear pump Control cabinet SnackFix 2016-08... - Page 43 The vibration feeder conveys the cereals from the hopper to the con- timix. With the control unit on the back side of the machine it is possi- ble to change the flowrate (kg/h). Fig. 10: Equalizing roller Control unit On/off SnackFix 2016-08...
-
Page 44: Equalizing Roller Egw 180
The roller is driven by a gear motor which is operated by a frequency controller. The rotational speed of the equalizing roller can be adjust- ed at the control panel. Scrapers clean the roller from mass particles. SnackFix 2016-08... -
Page 45: Cutting Machine Sz 100 M/Tb
Different parameters such as the belt speed can be adjusted at the control panel which is installed at the machine. The strands that are to be cut are conveyed to the transport belt. The transport belt takes over the strands and conveys them to the cutting SnackFix 2016-08... - Page 46 The ultrasonic knife is especially suitable for cutting products without de- forming them and it prevents the products from sticking to the knife. The type of knife that is not used must be demounted during produc- tion. SnackFix 2016-08...
- Page 47 The transport belt is kept in track on the machine table by belt guide rails. Belt tensioning devices allow for regulating the belt tension. One ( belt edge can be hinged upwards Fig. 14: Belt edge on page 47). SnackFix 2016-08...
-
Page 48: Control Panels
Fig. 16: Control panel Display Emergency stop button Illuminated push button [RESET] for acknowledging errors For detailed information regarding operation, please see the separate operating instructions of the control panel Chapter „Operator manual“ in the documentation file). SnackFix 2016-08... -
Page 49: Operating Elements
Component Description 4.2.7 Operating elements The following components are equipped with main switches: Main switch Mass preparation unit Cutting unit Fig. 17: Main switches Main switch at the Mass preparation unit Main switch at the Cutting unit SnackFix 2016-08... - Page 50 Release the emergency stop button by turning. Press blinking illuminated push button [RESET]. Illuminated push button [RESET] goes out. Switch on again the tempering devices at the main switches lo- cated at the individual devices. SnackFix 2016-08...
-
Page 51: Connections
The connection for power supply is connected via the control cabinets Connection for power supply by customer. 4.4 Workplace The workplace of the operating personnel is located at the operating side of the laboratory equipment at the control panels. SnackFix 2016-08... -
Page 52: Transport, Packaging And Storage
Only use approved hoisting devices and sling gear with sufficient load bearing capacity. Never use partly torn or chafed ropes or straps. Do not guide ropes and straps across sharp edges and corners, do not tie or twist them. SnackFix 2016-08... -
Page 53: Symbols On The Packaging
Fragile Identifies packaging with breakable or fragile contents. Handle the packaging with caution, do not allow it to fall and do not expose to bumping or shaking. Protection against moisture Protect packaging against moisture and keep dry. SnackFix 2016-08... -
Page 54: Transport Inspection
Make sure that the pallet cannot tip over with an unbalanced centre of gravity. Lift the pallet with the transport piece and start the transport. Fig. 19: Transport with the forklift Separate the Masspreparation Unit from the Cutting Unit to lift the Units from the pallet. SnackFix 2016-08... - Page 55 Rig ropes, straps or multi-point suspension gear according to the adjacent drawing. Make sure that the transport pieces are not damaged by the sling gear. If necessary use different sling gear. Start the transport. Fig. 21: Transport with the crane SnackFix 2016-08...
-
Page 56: Packaging
Hazards to the envi- ronment can occur due to improper disposal of packaging material. Dispose of packaging material in an environmentally compatible manner. Observe the local applicable disposal rules. If necessary, hire a specialist company for disposal. SnackFix 2016-08... -
Page 57: Storage
If necessary, refresh or re- place the preservative. Under some circumstances, there might be storage information printed on the packaging which is above and beyond the requirements listed here. Please comply with these accordingly. SnackFix 2016-08... -
Page 58: Installation And First Start-Up
The floor cover must fulfill the following conditions: The surface quality must prevent spilled material from seeping in. The surface must be easy clean. The surface must be suitable for wet cleaning. The surface must be skid proof. SnackFix 2016-08... -
Page 59: Operation
Do not reach into moving conveyor belts. Do not reach into rotating deflection rollers. Do not reach between conveyor belts, frame and other machine parts. Wear personal protective gear within the work area. SnackFix 2016-08... -
Page 60: Switching On And Off
Make sure that all safety devices are mounted and functioning and that no persons are endangered before restarting. Before restarting check the machine and make sure that all safe- ty devices are mounted and functioning. SnackFix 2016-08... -
Page 61: Adjustments And Preparations
Hygienic protective clothes 7.4.1 Set-Up Vessel HM520 Fill the water jacket between the two lines on the level gauge. Set temperature at 85°C. Fig. 22: level gauge Fig. 23: temperature For information, please see the separate operating instructions Bonamat. SnackFix 2016-08... -
Page 62: Adusting The Vibration Unit
Lifting and lowering devices for adjusting the working positions are located on the equalizing rollers EGW. Adjusting the working position Turn the hand crank and adjust the required height. Use the thickness gauge (accessories). Fig. 4: Lifting and lowering device on the EGW SnackFix 2016-08... -
Page 63: Adjusting The Scrapers At The Egw
Loosen the screws (1). Adjust the distance between scraper (2) and roller (3). With Teflon-coated equalizing rollers, never adjust the scraper too closely to the roller because this damages the surface. Tighten the screws (1). Fig. 24: Scraper SnackFix 2016-08... -
Page 64: Adjust The Belt Tension At The Tb
Turn the adusting screws (1) and monitor if the belt is moving in the correct direction. Turn the tensioning screws (2) to tension the belt. Be sure that both sides are parallel. Fig.: Belt adjusting and belt tensioning SnackFix 2016-08... -
Page 65: Adjusting The Knife Height At The Sz
This should be to be still pulled out with slight resistance. Firmly tighten the clamp screw (1) at the knurled nut (2). Firmly tighten the hexagon screw (3). Close protective cover. SnackFix 2016-08... -
Page 66: Adjusting The Downholder At The Cu
Lift up protective cover. Loosen cylinder head screws (1). Adjust the downholder angle (3) to a height of approx. 3 mm (0.12 ") over the slab. Make sure that the downholder’s horizontal position is equal over the complete working width. SnackFix 2016-08... - Page 67 Operation The scrapers (2) must uniformly push at both sides of the knife. Tighten the cylinder head screw (1). Close protective cover. SnackFix 2016-08...
-
Page 68: Adjusting The Knife Follow Movement With Eccentric Control
Switch the machine off and secure against restarting. Demount encasement at the drive side. Loosen screw (S) and pull out bolt (B). Plug bolts (B) into suitable position as shown in the chart above. Tighten screws (S). Mount encasement. Fig. 27: Plug-in position bolts SnackFix 2016-08... -
Page 69: Actions After Usage
7.6 Actions after usage Trained employee Personnel: Clean the machine Switch the machine off and secure against restarting. Clean the machine after every use For longer shutdowns make sure that the machine including all components is mounted. SnackFix 2016-08... -
Page 70: Maintenance
Any contact with these components can lead to seri- ous injury or death. Before working on the components mentioned, disconnect them completely from the power supply. Allow 10 min to pass in order to be sure that the internal capacitors are completely discharged SnackFix 2016-08... - Page 71 Do not open covers or housing during operation. Observe the after-run time: Before opening the covers or hous- ing, make sure that no components are still moving. Wear close-fitting protective clothing in the hazard zone with low tear strength. SnackFix 2016-08...
- Page 72 With unauthorised restarting of the power supply during installation, there is a danger of serious injury or death for the individuals in the hazard zone. Switch off all electrical power supplies and secure against re- starting before beginning any work. Allg_5_Wart SnackFix 2016-08...
- Page 73 Remove any leak, used or waste grease from all lubrication points that are manually supplied with grease and dispose of ac- cording the valid local regulations. Collect oils that have been changed in suitable containers and dispose of according the valid local regulations. SnackFix 2016-08...
-
Page 74: Maintenance Plan
Have the control panel checked for damages by an elec- trician Every 6 weeks Check drives: Technical employee Visual control of oil level, temperature, wear, noise Monthly Safety valves: Technical employee Perform a visual check for damages and leaks. Check existing seals. SnackFix 2016-08... - Page 75 Check belt tension and belt run and adjust if re- quired. Check belt rollers and clean them if required. Check belt surface for immoderate wear. Exchange belt if worn out. For further information regarding maintenance, see separate operating instructions in the documentation file. SnackFix 2016-08...
-
Page 76: Clean The Machine
Always wear heat-resistant protective clothing/gear and protec- tive gloves when working near hot surfaces. Before starting any work, make sure that all surfaces have cooled down to the ambient temperature. SnackFix 2016-08... - Page 77 Foam the parts with foam disinfectant (concentration 2 – 3%). Foam disinfection Leave the disinfectant on for approx. 15 minutes. Flush the cleaned parts with tap water (40 – 50°C / 104 – 122°F). Flushing Thoroughly dry all components with a soft cloth. SnackFix 2016-08...
- Page 78 Always weause hoses while running the pump. Close outlet of the conimix and flush with hot water. Let the machine run at higest speed for approx. 10 min. Drain and refill again. If necessary open Contimix: SnackFix 2016-08...
- Page 79 Maintenance Maintenance Plan min. 15mm Fig. 28: Cutting unit Front plate Contimix Screws When mounting the screws, be sure that the screws have space to each other. SnackFix 2016-08...
- Page 80 Remove and demount downholder. Clean knife, downholder angles and scrapers. When processing very sticky products it may be required that knife, angles and scrapers are cleaned every hour. Slightly oil the knife. Mount downholder. Close protective cover. SnackFix 2016-08...
- Page 81 Release belt (6). Conveyor belt Remove scraper and clean it. Clean surface and bottom side of the belt (3). Clean belt drive roll (4), belt tensioning roll (6). After wiping, install all demounted and cleaned parts. Tension the belt. SnackFix 2016-08...
- Page 82 It is possible to remove the short transfer belt without any tools. Plug off the motor and lift the belt sligthtly up and pull: NOTICE Belts must be tensioned parallel. If not – belt is moving to one direction and will be damaged! SnackFix 2016-08...
- Page 83 Switch the machine off and secure against restarting. Demount the scraper and clean it. Demount equalizing roller and side plates. Clean the equalizing roller and the side plates. Mount equalizing roller and side plates. Mount the scraper. Fig. 30: EGW 180 Drive shaft EGW SnackFix 2016-08...
- Page 84 Have lubricants disposed of by a waste management company. If substances that a re harmful for the environment accidentally get into the environment, immediately take appropriate measures. In case of doubt, inform the responsible local authori- ty and ask them what measures to take. SnackFix 2016-08...
-
Page 85: Lubricate The Machine
For the lubrication list and lubrication point overview, please see following pages: „Selection For the selection of lubricants, please see Lubricants“ on page 90. See separate operating instructions of the external suppliers ( documentation file) for description of lubrication. SnackFix 2016-08... - Page 86 Klüber PARALIQ GA carriage Fehler! QS 120 M/TB: Food-approved part- 200 ml Fill up, if required Verweis- container of part- ing liquid: (0.05 gal) quelle ing liquid e.g. alcohol, sugar SnackFix 2016-08...
- Page 87 Lubricate the machine Maintenance Plan Designation, ma- Activity, lubrication, Fig. Qty. Lubricant Amount *) nufacturer, type change interval konnte solving oil nicht ge- funden werden. SnackFix 2016-08...
- Page 88 Lubricate the machine Maintenance Plan Fig. 31: EGW 180-100 – gear motor Fig. 32: TB– gear motors SnackFix 2016-08...
- Page 89 Lubricate the machine Maintenance Plan Fig. 33: SZ 100 M/TB – guiding of plunger / of knife carriage Fig. 34: SZ 100 M/TB – guiding of follow carriage SnackFix 2016-08...
- Page 90 Getriebefett/ synth PA Fett Gear grease UH1 14- NLGI 2 NSF-H1 (lebensmittel- geeignet/ food grade- certified) Klüber- Fragol H1- FLG GT-2 Wälzlagerfett/ synth PA Fett Bearing grease UH1 64-62 NLGI 2 NSF-H1 (lebensmittel- geeignet/ food grade- certified) SnackFix 2016-08...
-
Page 91: Changing The Knife At The Qs
Always wear protective gloves when working at sharp edges. Pull out knife (3) downwards. Insert new knife and push it up to the stop of the knife bar. Fig. 35: Knife Firmly tighten screws (1). Close protective cover. SnackFix 2016-08... -
Page 92: Change Scrapers At The Downholder Of The Sz
Danger of injury from sharp edges at the knife and the scrapers! Sharp edges can cause severe cuts. Always wear protective gloves when working at sharp edges. Insert new scrapers and firmly tighten screws (2). Close protective cover. Fig. 36: Downholder SnackFix 2016-08... -
Page 93: Measures After Carried Out Maintenance
Ensure that all utilized tools, materials and other equipment have been removed from the working area. Clean the working area and dispose of any eventually leaked substances as e.g. liquids, supplies or similar. Ensure that all safety devices at the machine work properly. SnackFix 2016-08... -
Page 94: Malfunctions
Any contact with these components can lead to seri- ous injury or death. Before working on the components mentioned, disconnect them completely from the power supply. Allow 10 min to pass in order to be sure that the internal capacitors are completely discharged Elekt_5_Sichern_1 SnackFix 2016-08... - Page 95 Before starting any work for malfunction removal of movable parts switch the machine off and secure against restarting. Wait until all components have stopped moving. Wear tight protective clothing with low tensile strength when working in the hazard area. . Mech_2_Band SnackFix 2016-08...
- Page 96 Make sure that all work for error elimination is carried out and completed according to the information and directions in this manual. – Make sure that no individuals are in the hazard zone. – Make sure that all covers and safety equipment are installed and functioning properly. SnackFix 2016-08...
-
Page 97: Behavior In Case Of Malfunction
Errors which can be acknowledged after error elimination are displayed by a blinking reset-illuminated pushbutton. If error continues to occur, contact a technical employee/technician or an electrician. Fig. 37: Illuminated pushbutton [RESET] Eliminate error. Press blinking illuminated pushbutton [RESET]. Illuminated pushbutton [RESET] goes out. SnackFix 2016-08... -
Page 98: Malfunction Chart
Downholder is not cor- Adjust downholder. Technical employee rectly adjusted. Counter cutting rail is Clean the counter cut- Trained employee not clean. ting rail. Conveyor belt is not Clean the conveyor belt. Trained employee clean. SnackFix 2016-08... -
Page 99: Equalizing Roller Egw 180-100
Adjust the scraper. Technical employee equalizing roll is too big. Measures after Malfunction Removal Perform the following steps after having removed the malfunction: Reset the emergency stop devices. Acknowledge malfunction. Ensure that there is nobody within the hazard zone. SnackFix 2016-08... -
Page 100: Dissassembly And Disposal
Always wear heat-resistant protective clothing/gear and protec- tive gloves when working near hot surfaces. Before starting any work, make sure that all surfaces have cooled down to the ambient temperature. SnackFix 2016-08... - Page 101 Disassemble components properly. Observe the, in part, high dead weight of the components. If necessary, use lifting equip- ment. Secure components so that they do not fall off or turn over. Consult the manufacturer if there are any queries. SnackFix 2016-08...
-
Page 102: Disassembly
Hazards to the environment can occur due to improper disposal. Only allow authorised specialty companies dispose of e-waste, electronic components, lubricants and other auxiliary materials. When in doubt, request information on environmentally compati- ble disposal from the local authorities or specialised disposal companies. SnackFix 2016-08... -
Page 103: Disassambly Pump
For enough space it is necessary to remove the first plastic roller only by open the front screw and pull from the shaft. 11.6 Disassambly Side guiding plates Open the star knobs and lift the whole guiding. SnackFix 2016-08... -
Page 104: Spare Parts
For a quick and error free processing of your order, we need the fol- lowing information: Machine no. Position no. Designation Quantity Article no. Specification for spare parts and drawings see chapter „Spare Parts“ in the documentation file. SnackFix 2016-08... -
Page 105: Appendix
P&ID Wiring diagram Wiring diagram no. 62329-90 Spare parts lists / Spare parts drawings Supplier documentation – Specifications Bonamat (Vessel 15l) Maprotec Pump SEW Geardrive Siemens Panel Parts see in the file MSR SnackFix 2016-08...
Need help?
Do you have a question about the SnackFix and is the answer not in the manual?
Questions and answers