
Subscribe to Our Youtube Channel
Related Manuals for Teradek Bolt 4K LT


Summary of Contents for Teradek Bolt 4K LT
- Page 1 Bolt 4K LT 750/1500/MAX Zero Delay Wireless Transmitter and Receiver Quick Start Guide...
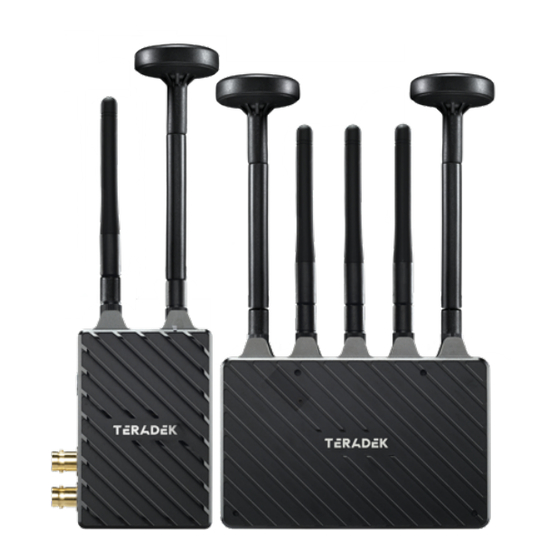
- Page 2 PHYSICAL PROPERTIES Bolt 4K LT (TX) A: RP-SMA connectors Bolt 4K LT (RX) B: 6-28V DC power input C: HDMI input D: 3G-SDI output E: 3G-SDI input F: OLED display G: Menu joystick H: Power switch I: USB port (not shown)
-
Page 3: Table Of Contents
TABLE OF CONTENTS 4K Zero-Delay Wireless System ....2 Power and Connect ......... 3 Power Connector/Pin-Out ....... 5 Custom 3rd Party Cables ......5 Mounting ..........6 Mounting Array Antenna ......7 Array Antenna Receive Pattern ....8 Receiver Menu ........9 Transmitter Menu ........11 Bolt Manager ........12 Bolt App ..........13... -
Page 4: 4K Zero-Delay Wireless System
4K ZERO-DELAY WIRELESS SYSTEM Bolt 4K LT is the newest entry-level wireless video system to be introduced to the Bolt 4K family. Bolt 4K LT devices are fully compatible with all other Bolt 4K devices, are capable of transmitting 10-bit, 4:2:2 HDR video at a range of up to 750 feet, 1500 feet, or 5000 feet line-of-sight over the unlicensed 5GHz band, and can multicast to 6 receivers simultaneously. -
Page 5: Power And Connect
POWER AND CONNECT Connect the output from your video source to either the SDI or HDMI input (C or E) on the Bolt transmitter. Connect either the SDI or HDMI output (D or L) from the Bolt receiver to the video input on your monitor. - Page 6 If using an Array Antenna: Connect the receiver’s three center connectors to the Array Antenna connections labeled “V,” then connect the left and right connectors to the “H” connections using the RP-SMA connectors (see image below). H-V configuration Move the power switches on both the transmitter and receiver (H) to the ON position. Video appears within a few seconds.
-
Page 7: Power Connector/Pin-Out
POWER CONNECTOR/PIN-OUT Bolt uses a 2−pin power connector Description * Pin 1 is closest to the red dot on the connector CUSTOM/THIRD PARTY CABLES • Test the power cable polarity with ONLY the power cable connected to Bolt. Do not connect video cables. •... -
Page 8: Mounting
MOUNTING Bolt 4K LT devices have a 1/4”-20 threaded hole (additional 3/8”-16 threaded hole on the receiver) on the bottom for mounting the included light stand adapter or any other mounting accessory. • Mount the Bolt transmitter vertically, keeping the Bolt 4K LT receivers antennas clear of any obstructions. -
Page 9: Mounting Array Antenna
• Mount the Array Antenna vertically, keeping it clear of any obstructions. • Orient the transmitter and receiver so they are parallel to each other. • For best results, orient the Array Antenna so the front (with the Teradek logo) has a clear line−of−sight to the transmitter. DO NOT OVERTIGHTEN CAUTION: SCREWS INSERTED INTO THE RECEIVER’S 3/8”... -
Page 10: Array Antenna Receive Pattern
ARRAY ANTENNA RECEIVE PATTERN The Array Antenna has a built-in directional antenna with a receive pattern that varies based on its distance from the transmitter. The horizontal receive angle measures 55° at 5,000 ft (1.5 km), 104° at 4,000 ft (1.25 km), and is effectively omni directional at up to 500 ft (150 m). The vertical receive angle measures 20°... -
Page 11: Receiver Menu
• Switch TX - Select a different transmitter (paired transmitters only). • Wireless Settings - Configure the transmitter’s wireless settings. Enable Fixed Frequency - Fixed Frequency Mode allows your Bolt 4K LT to designate a specific � non-DFS channel within the selected wireless region for use, providing a stronger connection in difficult environments. - Page 12 • Test Pattern - Select a video format to output a test pattern. Remove the test pattern by pressing left on the Menu joystick. • Audio Settings - Configure Bolt’s Audio settings. If Beep on REC is activated, you will hear a short tone whenever the camera begins or stops recording.
-
Page 13: Transmitter Menu
Bolt App (pg. 10). • Wireless Settings - Configure the transmitter’s wireless settings. Enable Broadcast Mode (MAX only) - Broadcast Mode enables Bolt 4K LT to extend its range when � used with the Array Antenna, and to transmit to an unlimited number of receivers (non-DFS channels only). -
Page 14: Bolt Manager
Bolt Manager allows you to configure, pair, and upgrade your Bolt device. Bolt Manager is available as software for Mac and Windows at www.teradek.com/pages/downloads, or for purchase as a standalone device. NOTE: Available configuration settings will differ between Bolt models. -
Page 15: Bolt App
BOLT APP Use the Bolt App to remotely manage and monitor every parameter of the Bolt 4K including pairing, channel selection, and 3D LUTs. CONNECT VIA BLUETOOTH Download the Bolt App from the App Store. Navigate to the Bluetooth menu on both the transmitter and receiver, then select Enable (see pages 6-8). - Page 16 RECEIVER STATUS DISPLAY • Settings (Shortcut to menu items listed on pg. 8) - Tap the button at the top of the display to customize the receiver’s various settings such as the output format, audio, display and OSD. • SNR (Signal to Noise Ratio) - Compare the signal power level to the noise power level from the attached antennas.
- Page 20 Teradek regularly releases new firmware versions to improve performance, add features, or fix vulnerabilities. teradek.com/pages/downloads contains all the latest firmware and software updates. Visit teradek.com/contact for tips, information, and to submit help requests to Teradek’s support team.
- Page 21 © 2021 Teradek, LLC. All rights reserved.
Need help?
Do you have a question about the Bolt 4K LT and is the answer not in the manual?
Questions and answers